
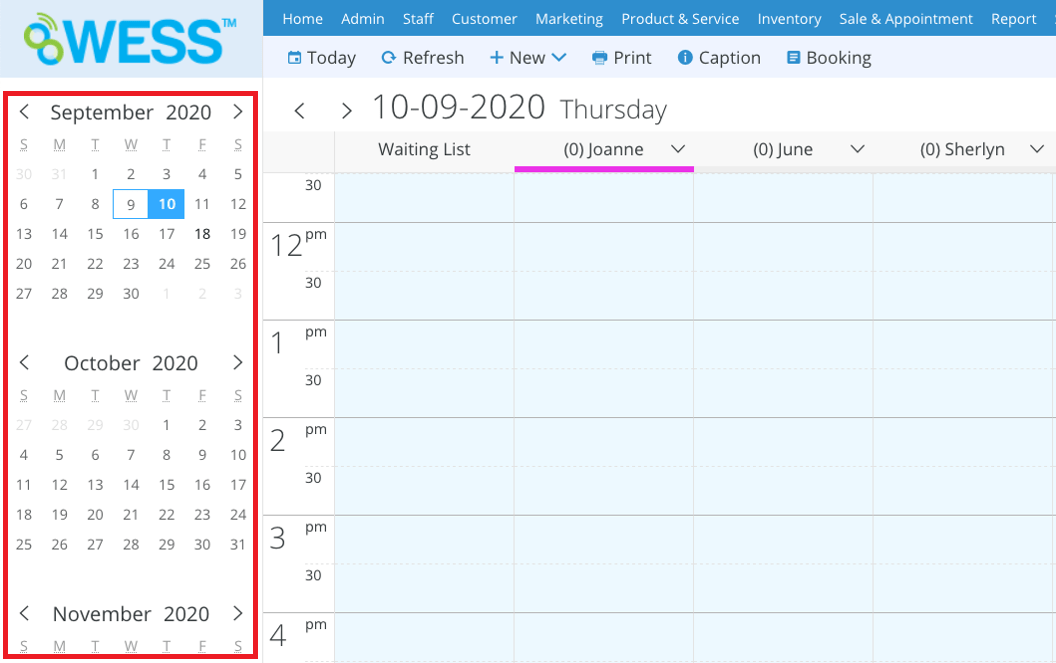
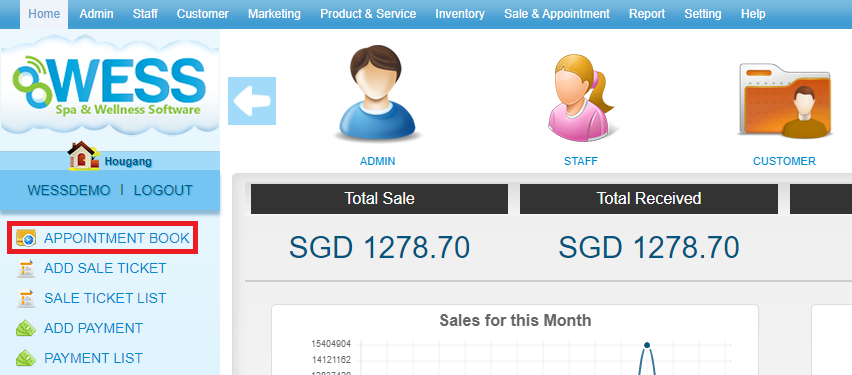
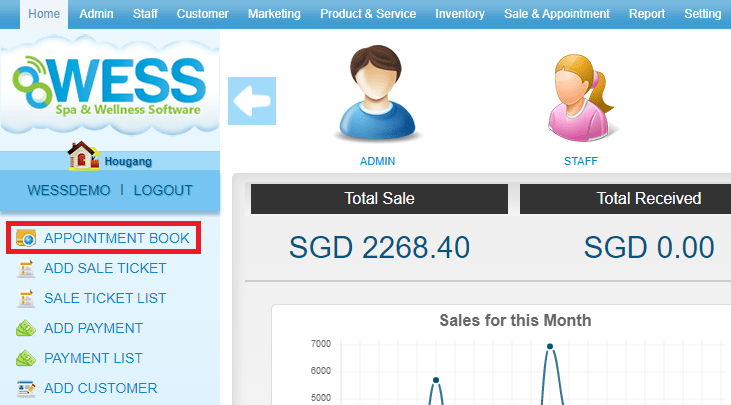
Step 1: Click “APPOINTMENT BOOK”
 Step 2: Select the date
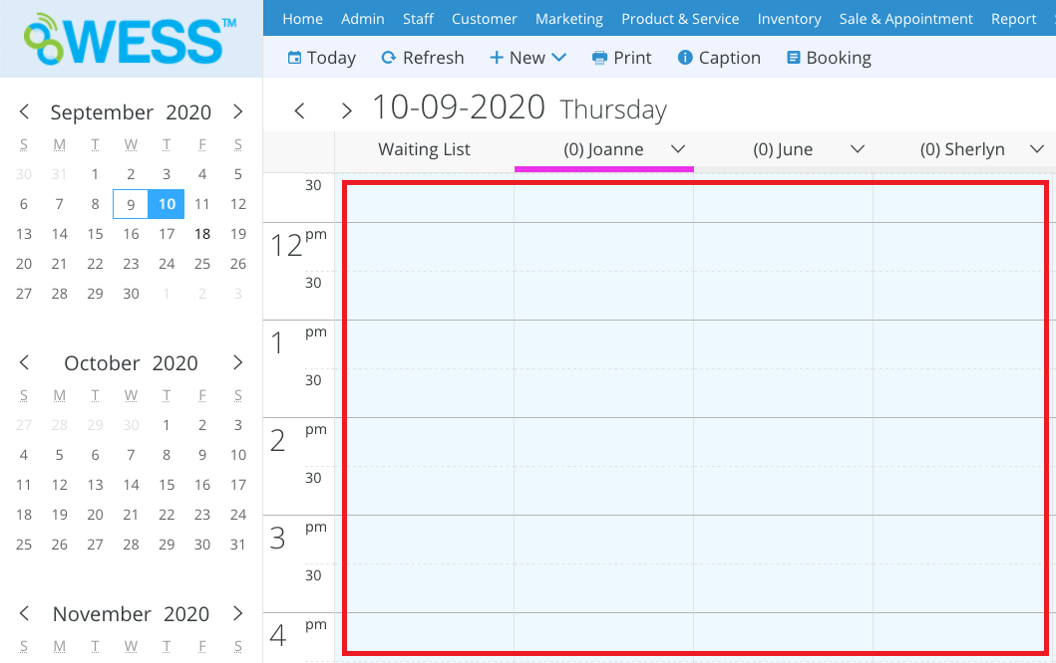
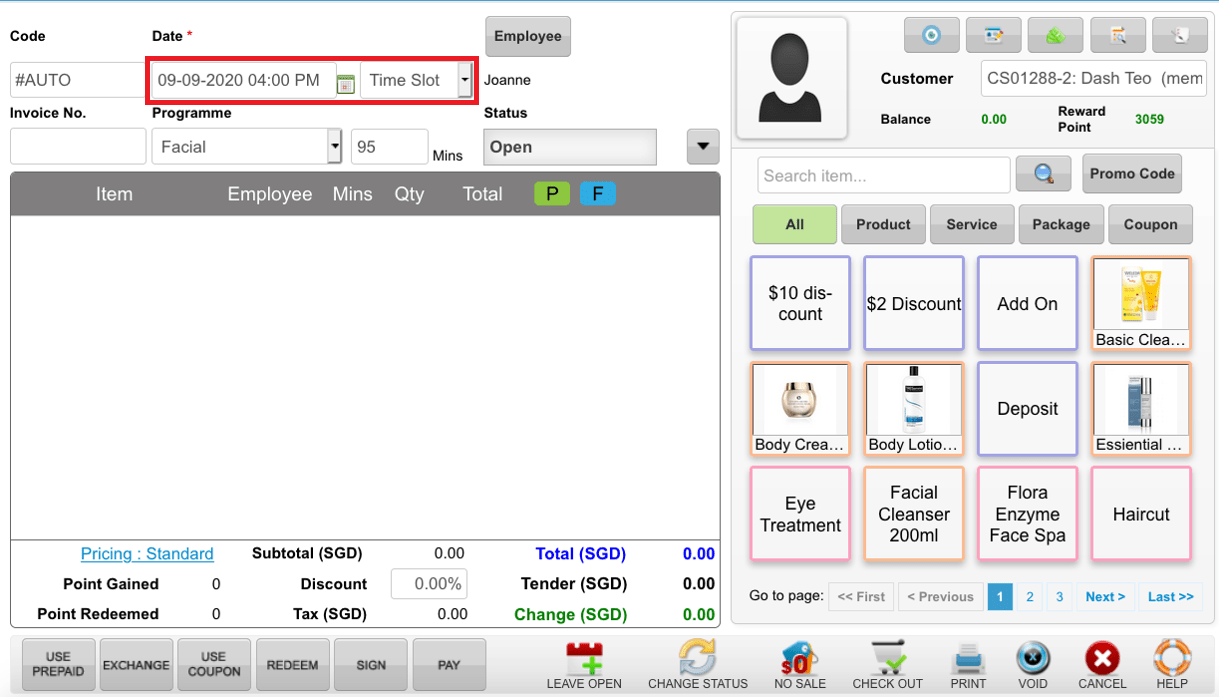
 Step 3: Select the time that customer want to booking
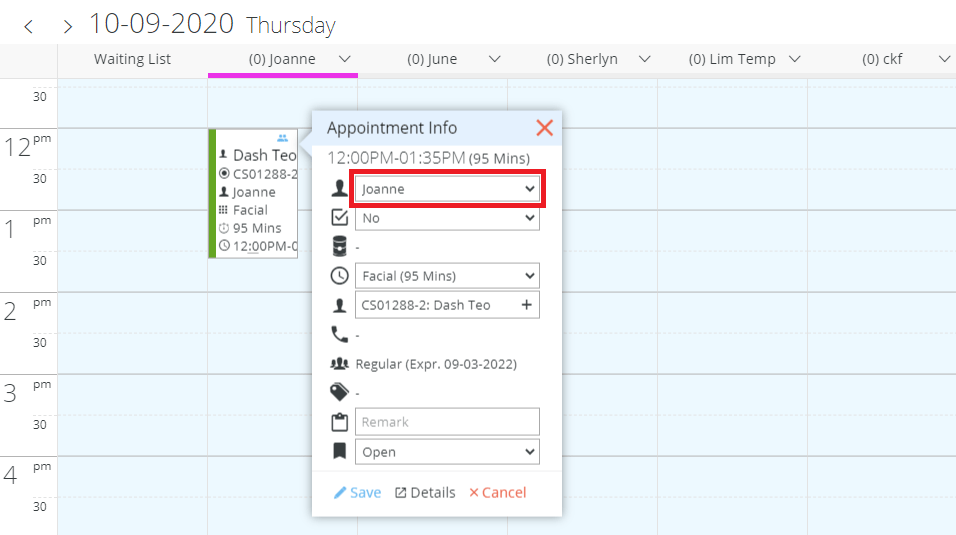
 Step 4: Click “EMPLOYEE OPTION”
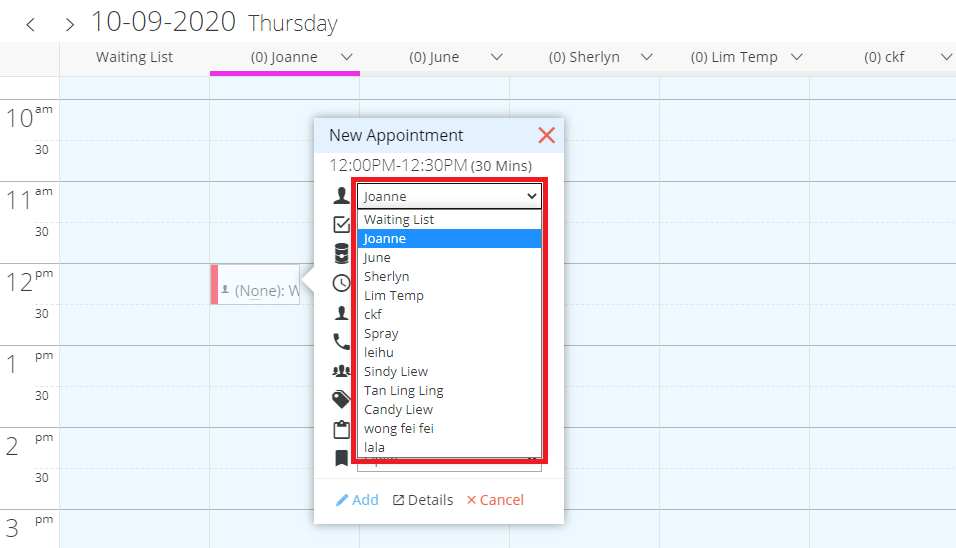
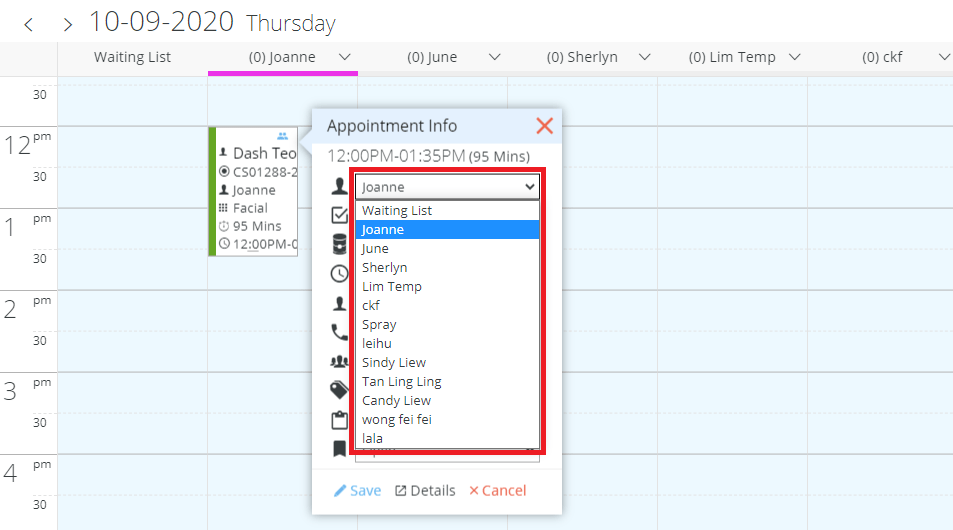
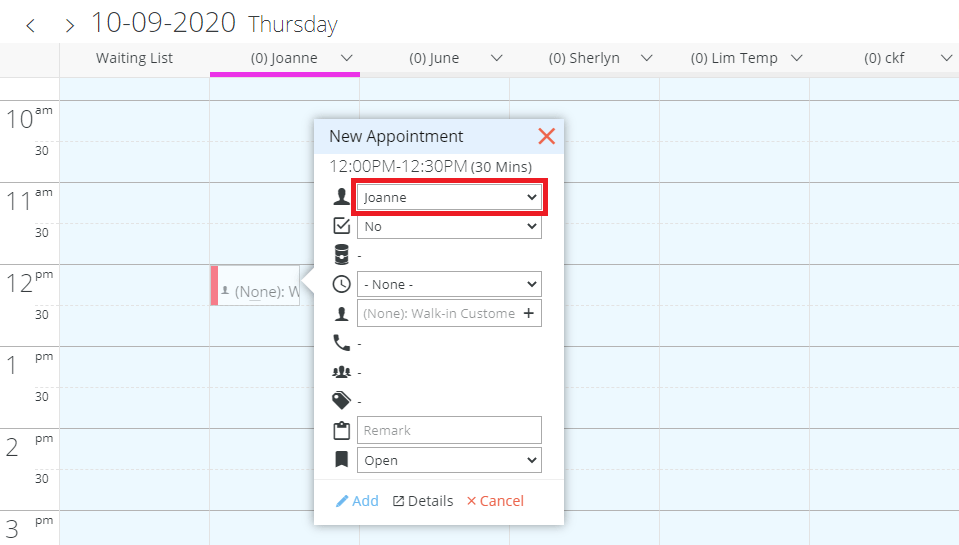 Step 5: Select the employee
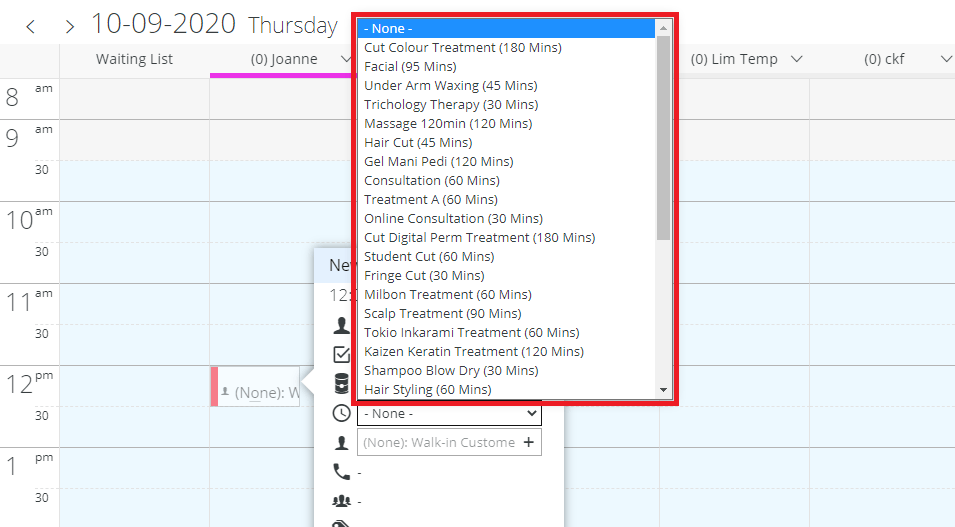
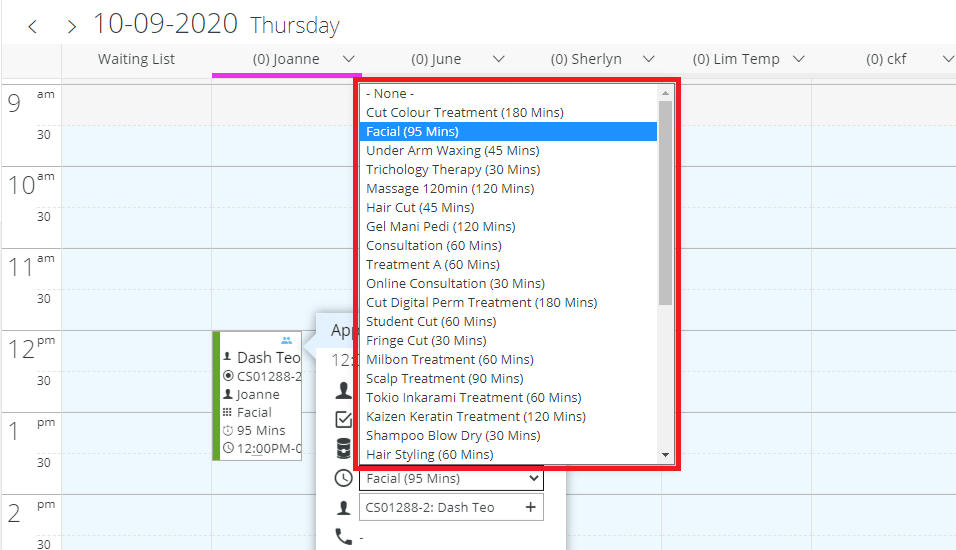
 Step 6: Click and select the programme
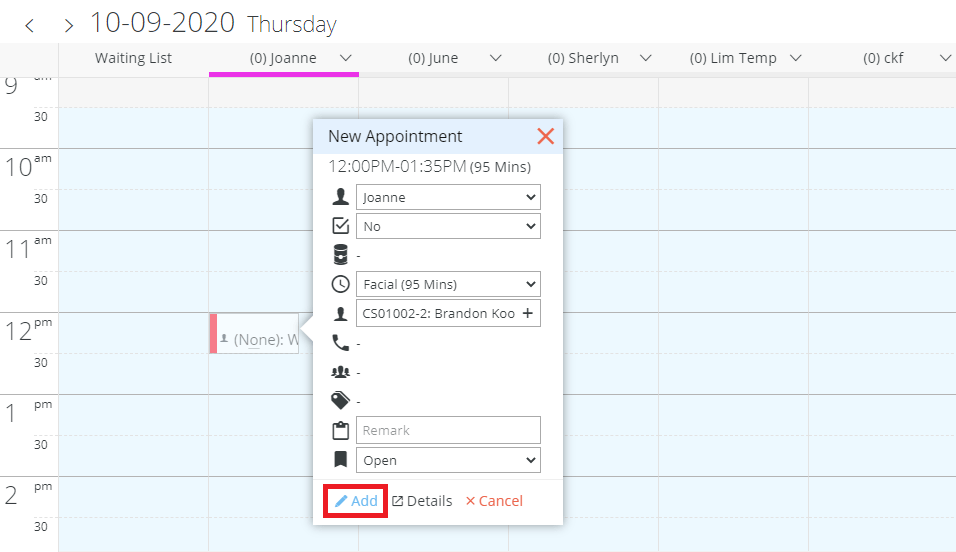
 Step 7: Enter the customer name
 Step 8: Click “ADD”
 Last update: April 2021
Step 2: Select the date
Step 3: Select the time that customer want to booking
Step 4: Click “EMPLOYEE OPTION”
Step 5: Select the employee
Step 6: Click and select the programme
Step 7: Enter the customer name
Step 8: Click “ADD”
Last update: April 2021Step 1: Click “APPOINTMENT BOOK”
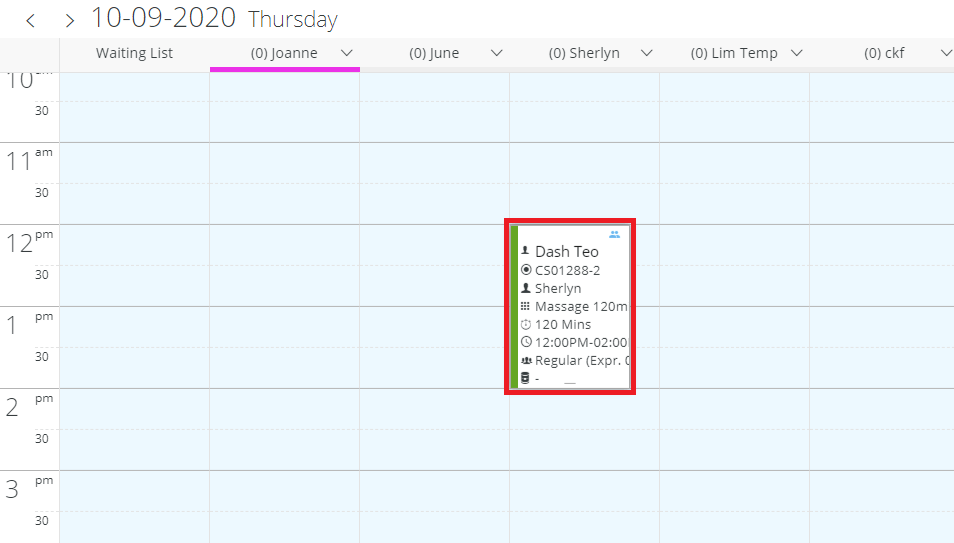
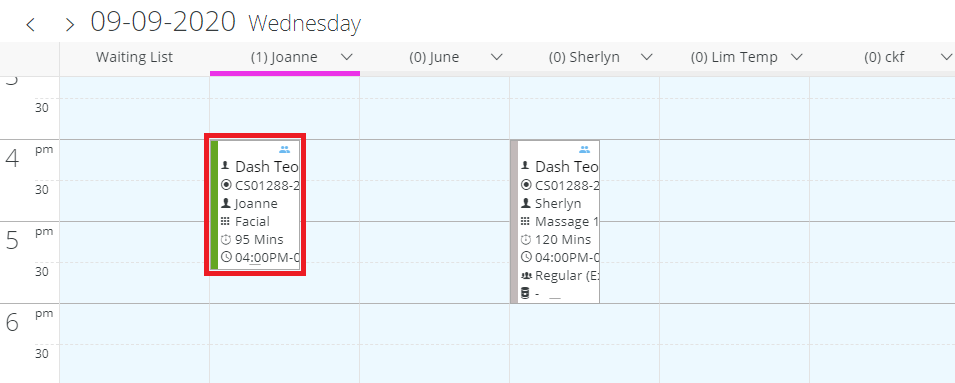
 Step 2: Select the time slot you want to put
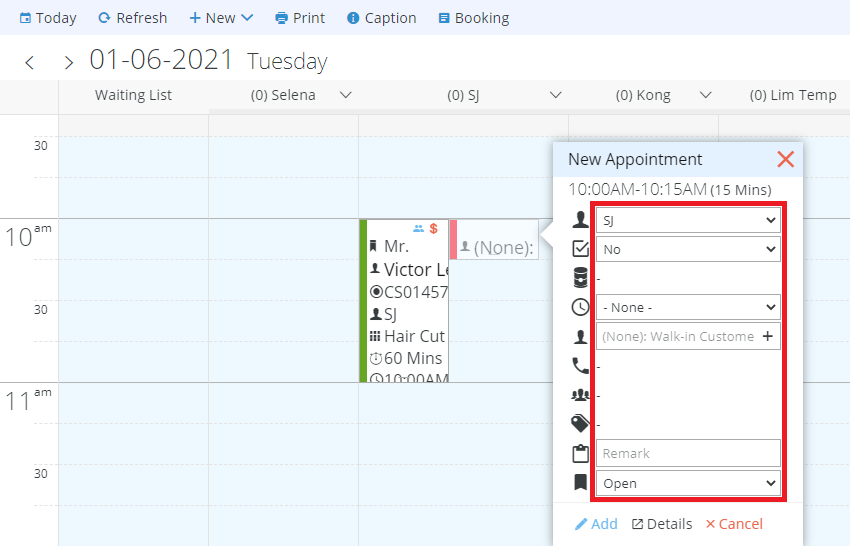
 Step 3: Fill in the customer appointment details
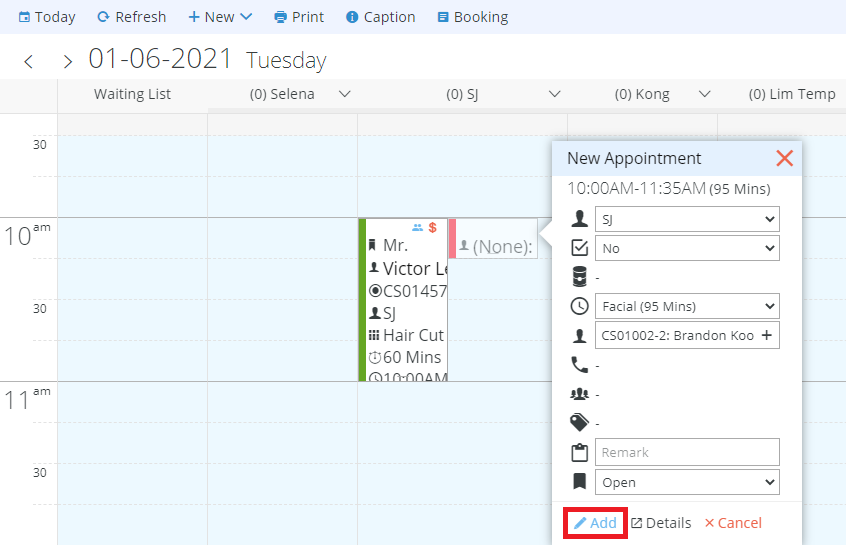
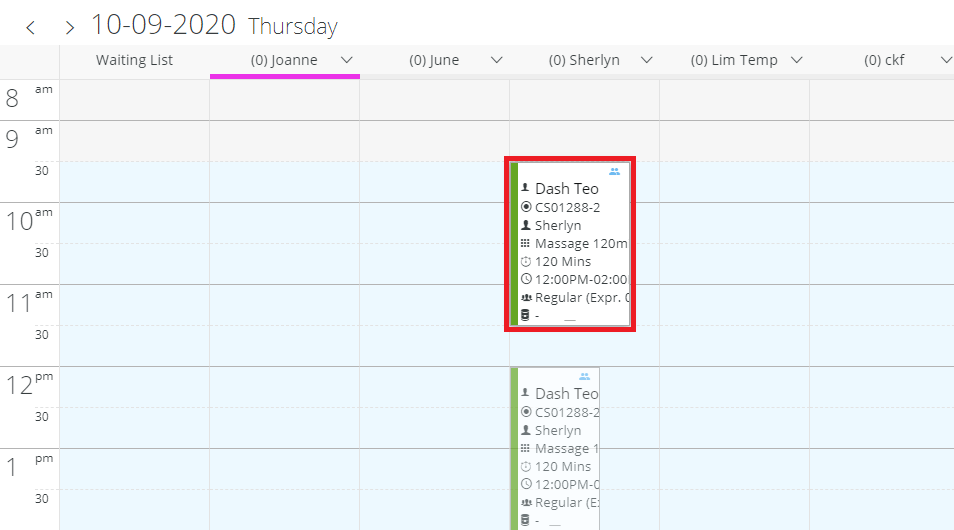
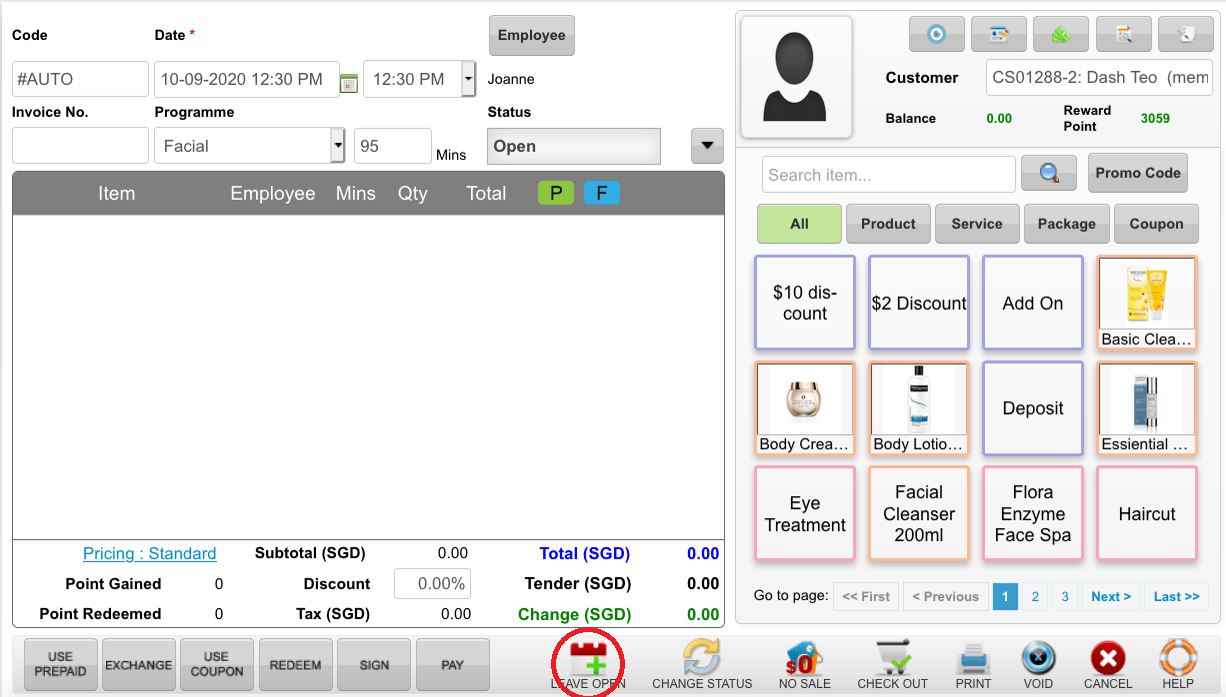
 Step 4: Click “ADD”
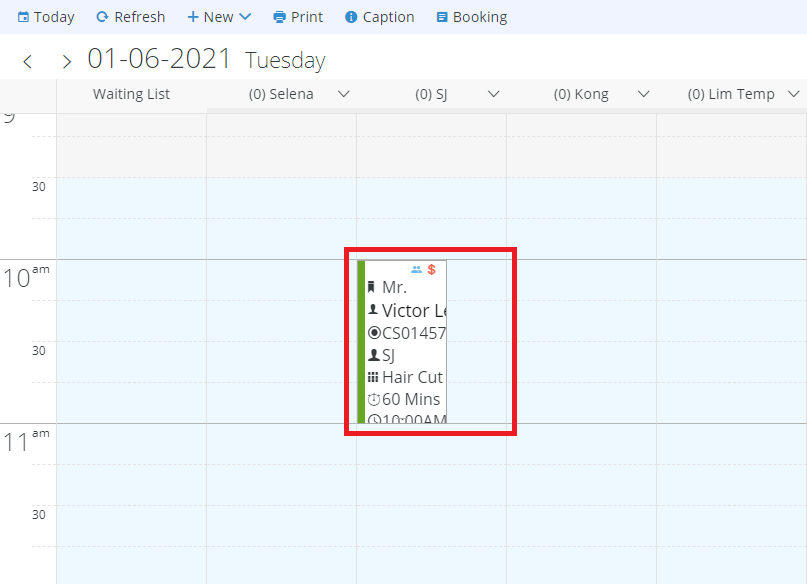
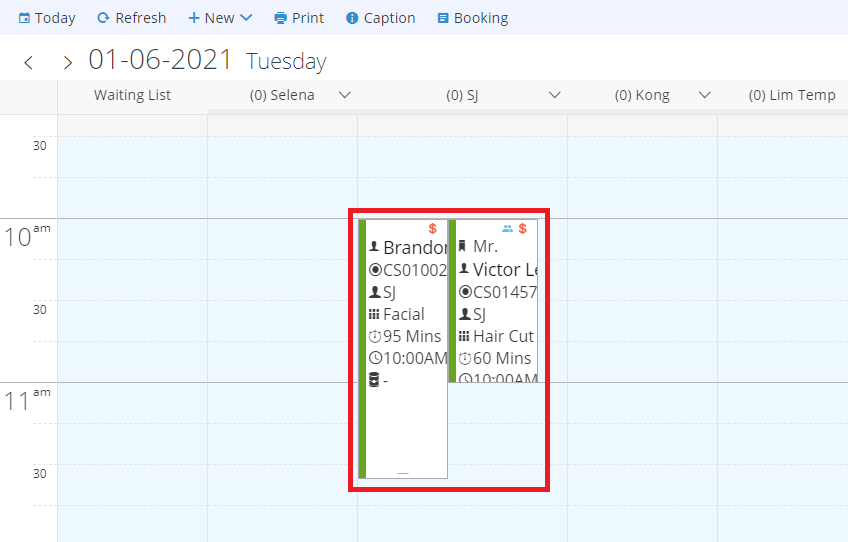
 The appointment is added successfully in the same time slot.
 Last update: April 2021
Step 2: Select the time slot you want to put
Step 3: Fill in the customer appointment details
Step 4: Click “ADD”
The appointment is added successfully in the same time slot.
Last update: April 2021Step 1: Click “APPOINTMENT BOOK”
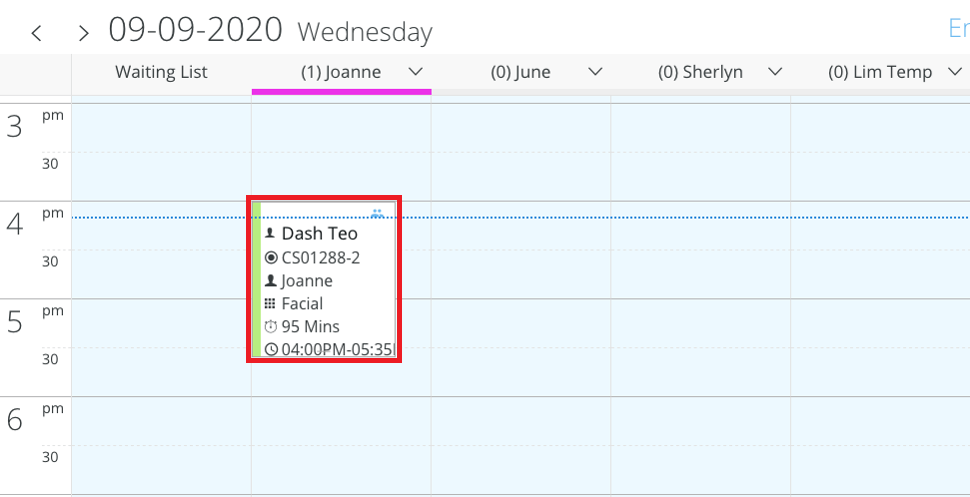
 Step 2: Click the time slot
 Step 3: Click “EMPLOYEE OPTION”
 Step 4: Select the employee want to change
 Step 5: Select the programme want to change
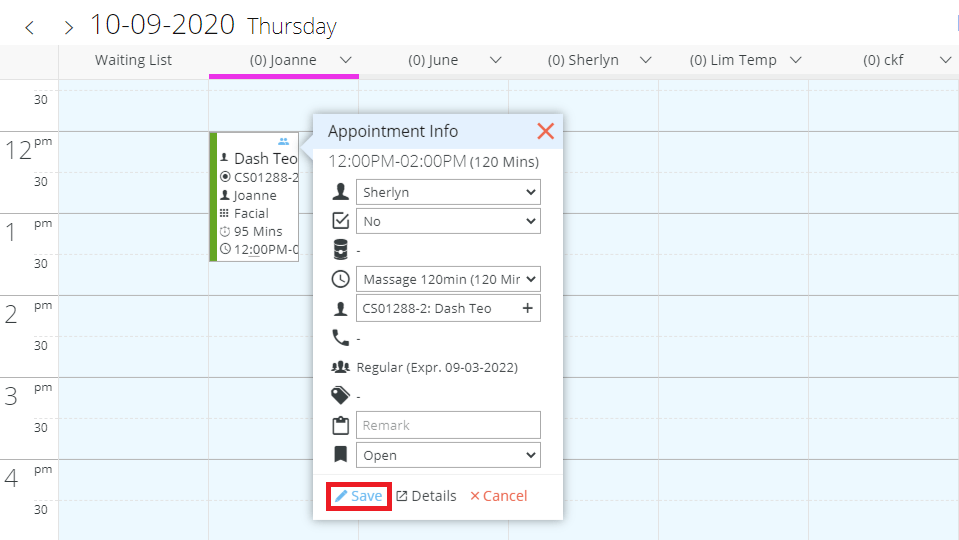
 Step 6: Click “SAVE”
 Step 7: Long click the appointment block and hold for 1 ~ 2 second
 Step 8: Drag and drop the appointment block to the time slot you want
 Last update: April 2021
Step 2: Click the time slot
Step 3: Click “EMPLOYEE OPTION”
Step 4: Select the employee want to change
Step 5: Select the programme want to change
Step 6: Click “SAVE”
Step 7: Long click the appointment block and hold for 1 ~ 2 second
Step 8: Drag and drop the appointment block to the time slot you want
Last update: April 2021Step 1: Click “APPOINTMENT BOOK”
 Step 2: Click the time slot
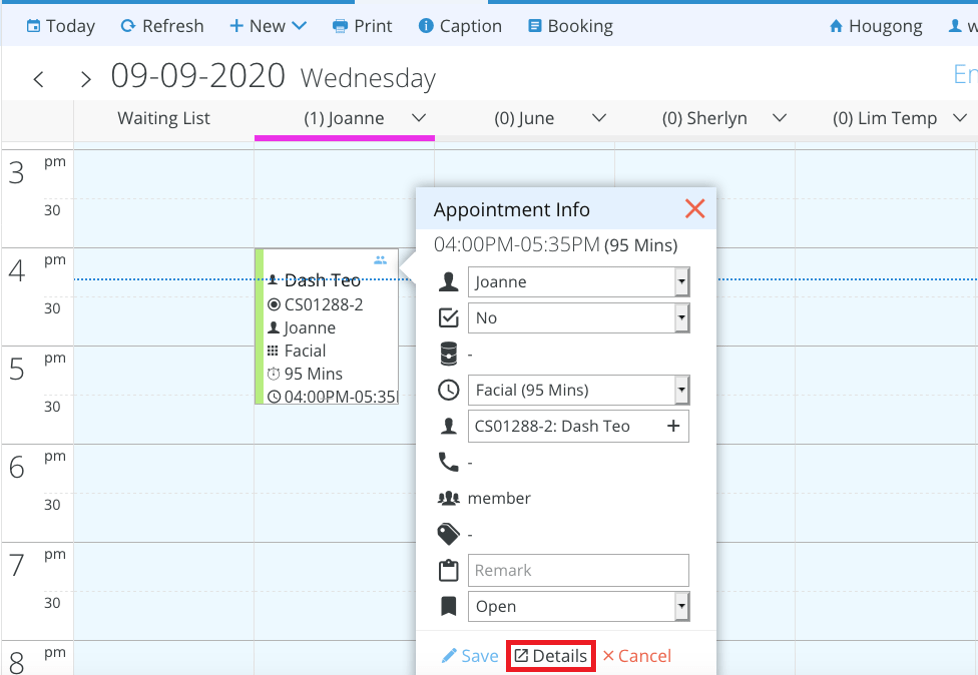
 Step 3: Click “DETAILS”
 Step 4: Select the date want to change
 Step 5: Click “LEAVE OPEN”
 Last update: April 2021
Step 2: Click the time slot
Step 3: Click “DETAILS”
Step 4: Select the date want to change
Step 5: Click “LEAVE OPEN”
Last update: April 2021Step 1: Click “APPOINTMENT BOOK”
 Step 2: Click the time slot
 Step 3: Click “DETAILS”
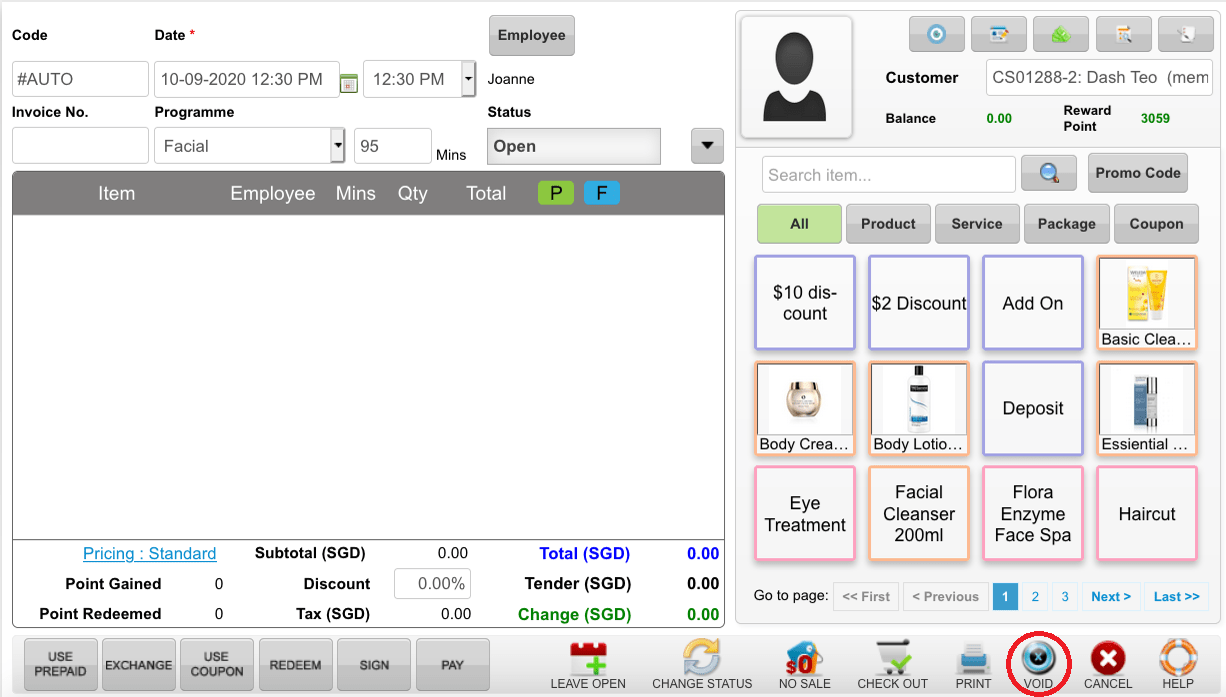
 Step 4: Click “VOID”
 Last update: April 2021
Step 2: Click the time slot
Step 3: Click “DETAILS”
Step 4: Click “VOID”
Last update: April 2021Step 1: Click “APPOINTMENT BOOK”
 Step 2: Click the time slot
 Step 3: Click “STATUS OPTION”
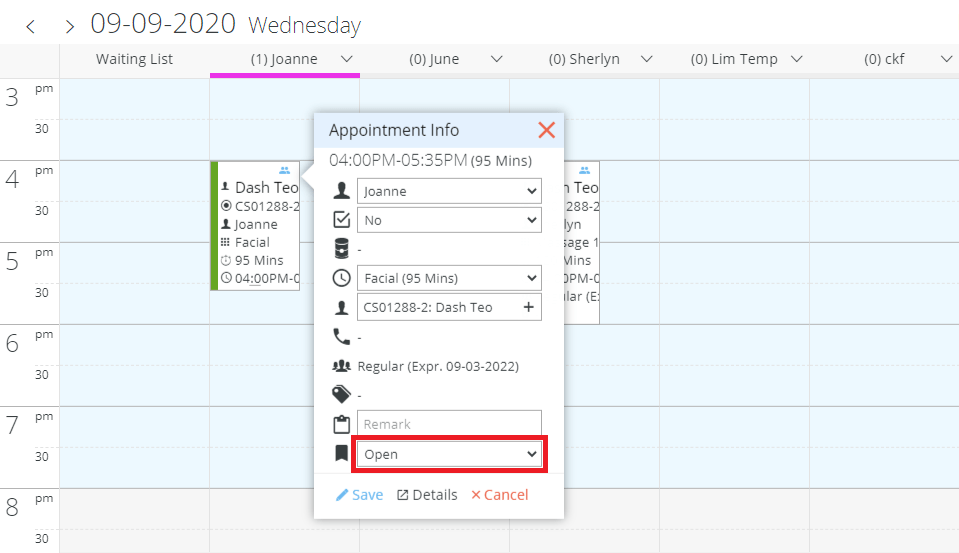 Step 4: Select the status want to change
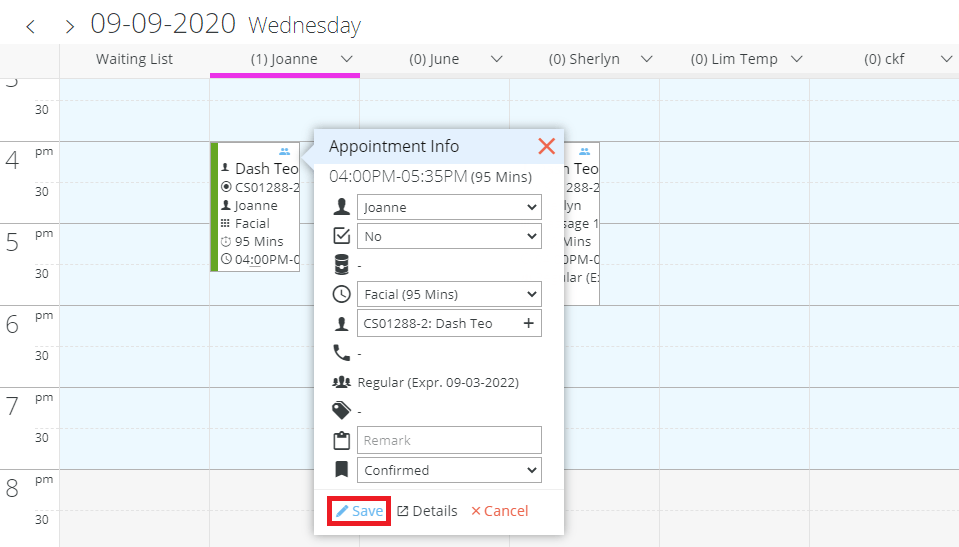
 Step 5: Click “SAVE”
 Last update: April 2021
Step 2: Click the time slot
Step 3: Click “STATUS OPTION”
Step 4: Select the status want to change
Step 5: Click “SAVE”
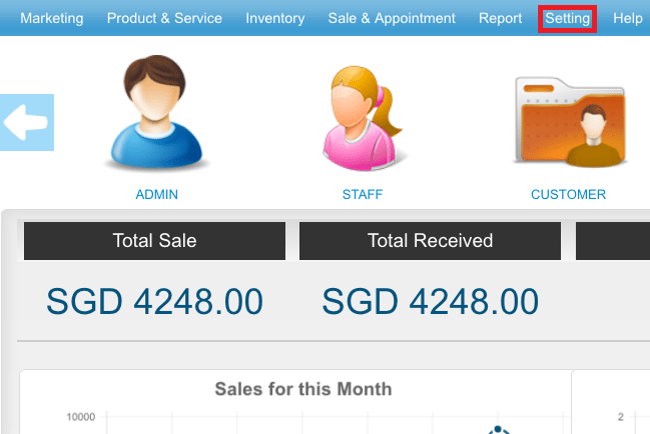
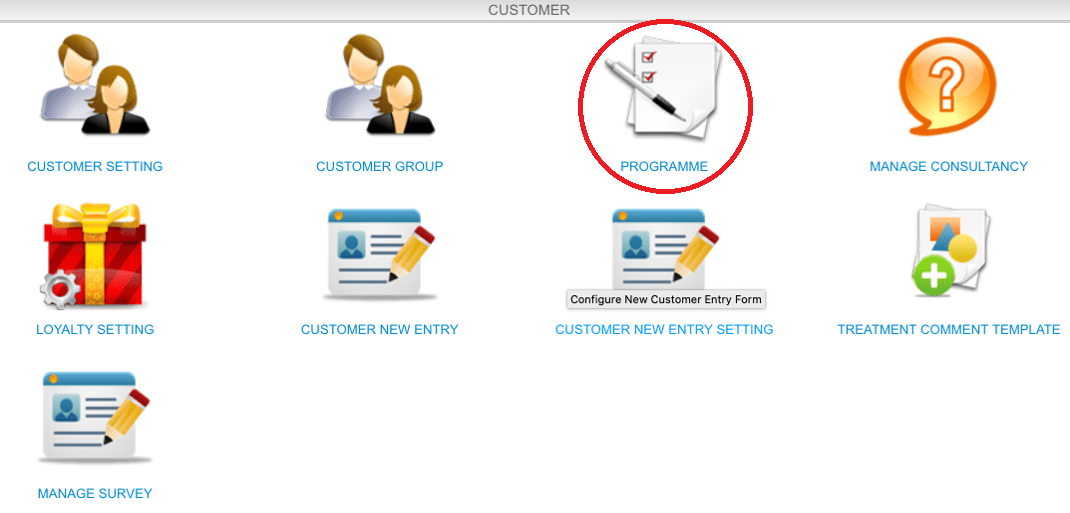
Last update: April 2021Step 1: Click “SETTING”
 Step 2: Click “PROGRAMME”
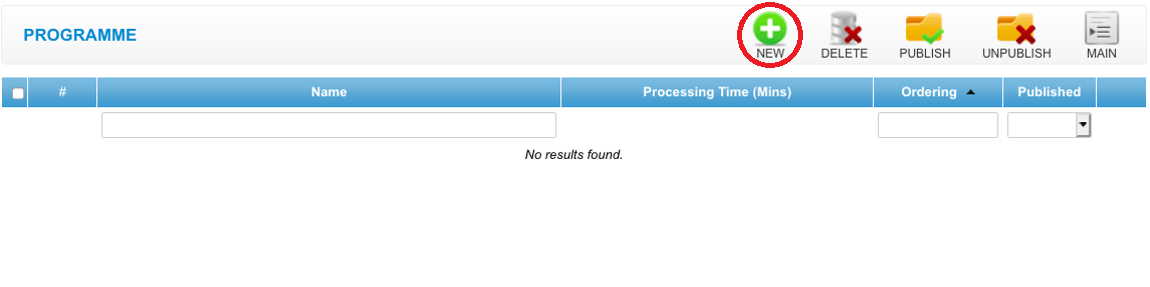
 Step 3: Click “NEW”
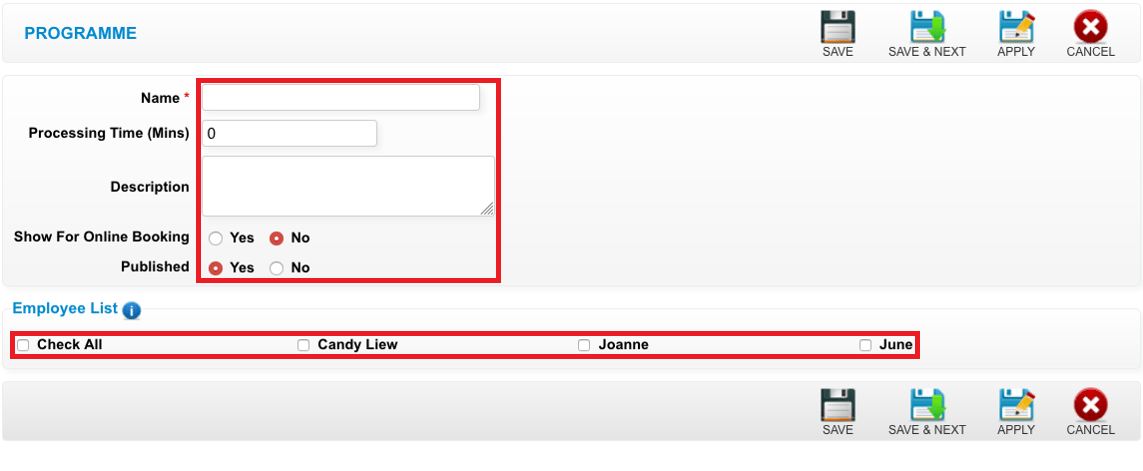
 Step 4: Fill in programme details
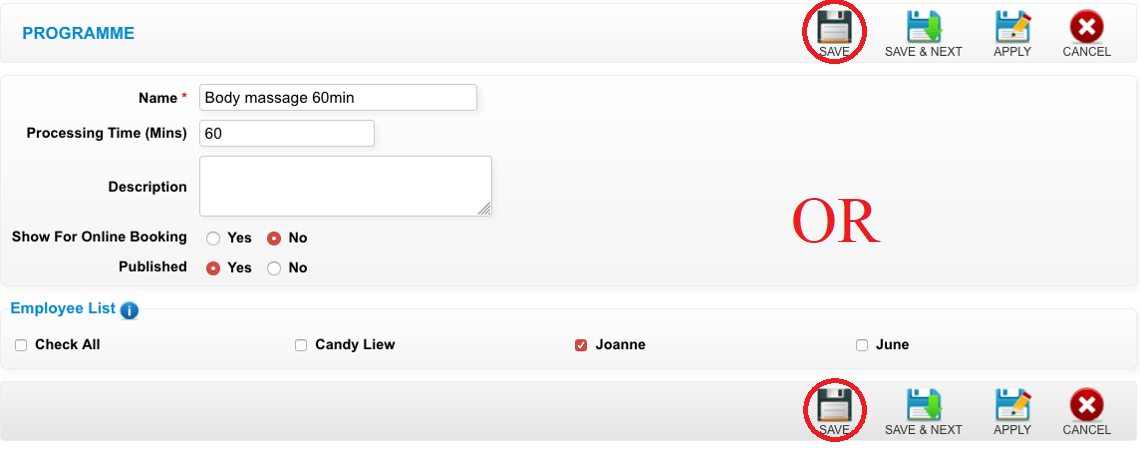
 Step 5: Click “SAVE”
 Last update: April 2021
Step 2: Click “PROGRAMME”
Step 3: Click “NEW”
Step 4: Fill in programme details
Step 5: Click “SAVE”
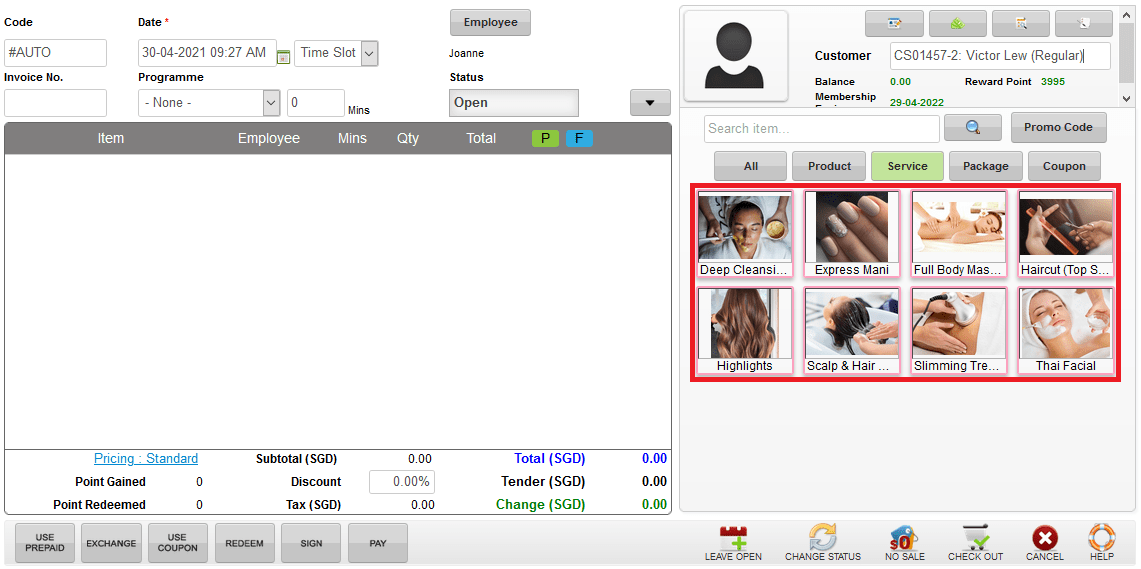
Last update: April 2021Step 1: Click “ADD SALE TICKET”
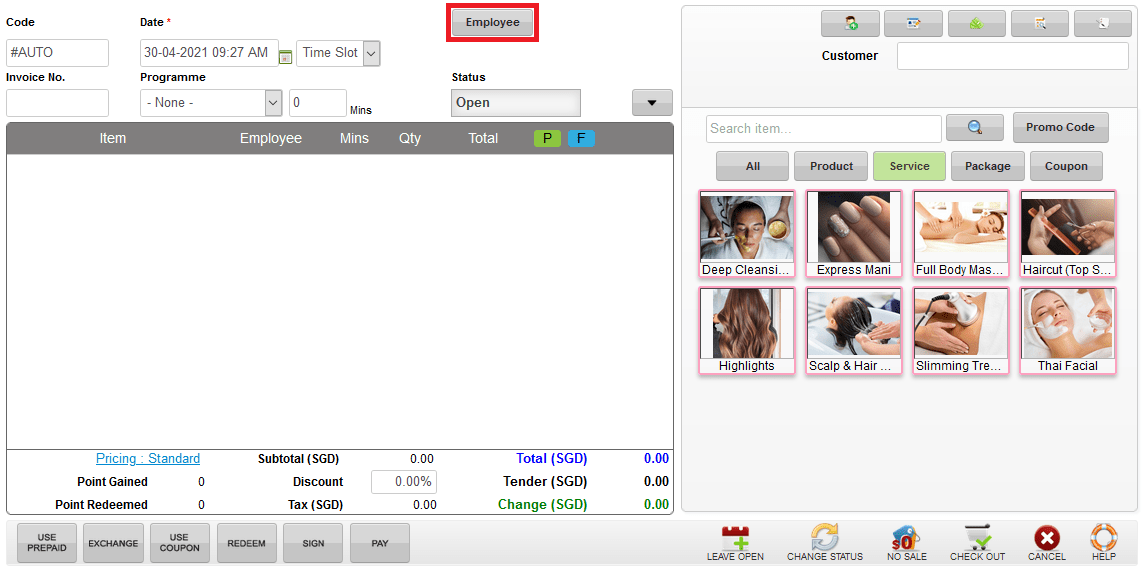
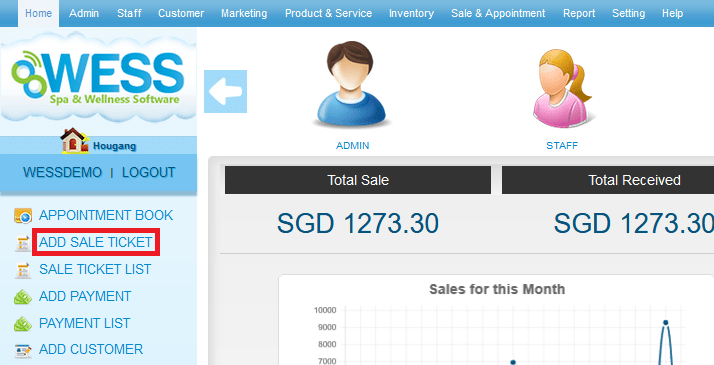 Step 2: Click and select the “EMPLOYEE”
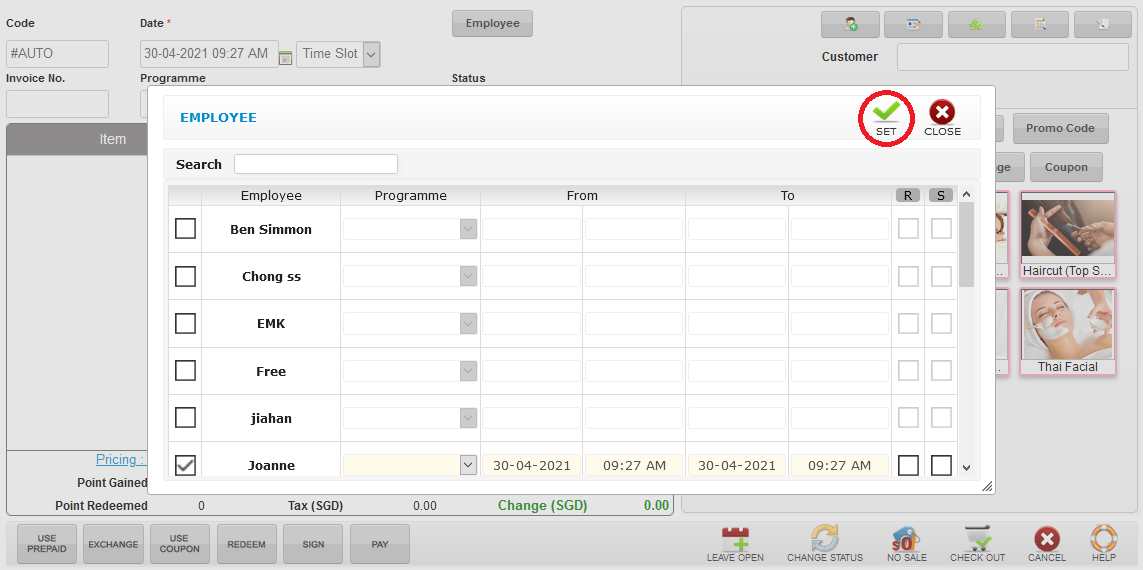
 Step 3: Click “SET”
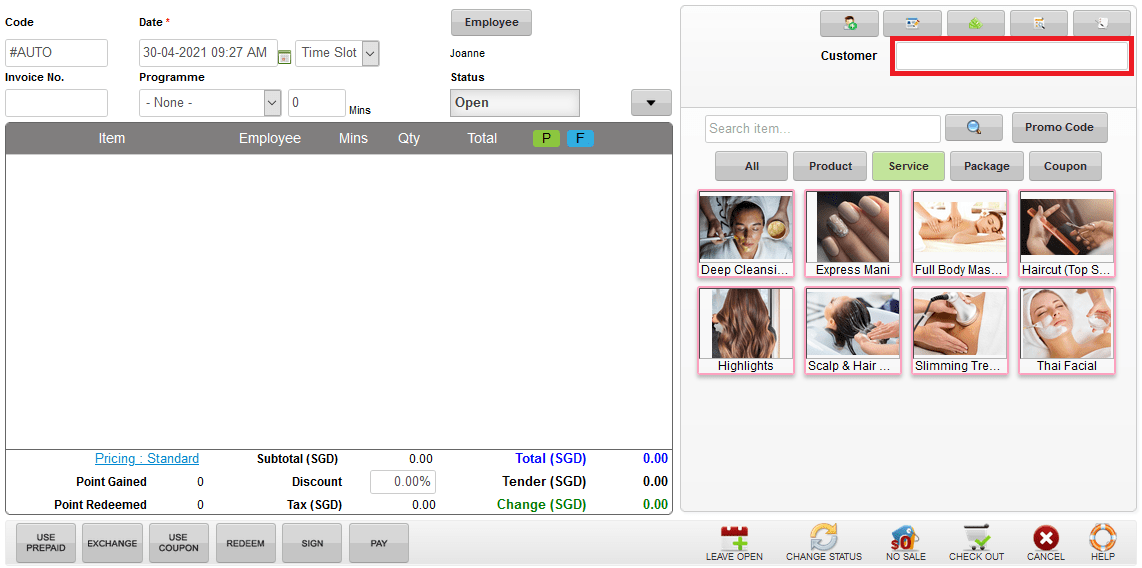
 Step 4: Enter the customer name / code / phone number to search
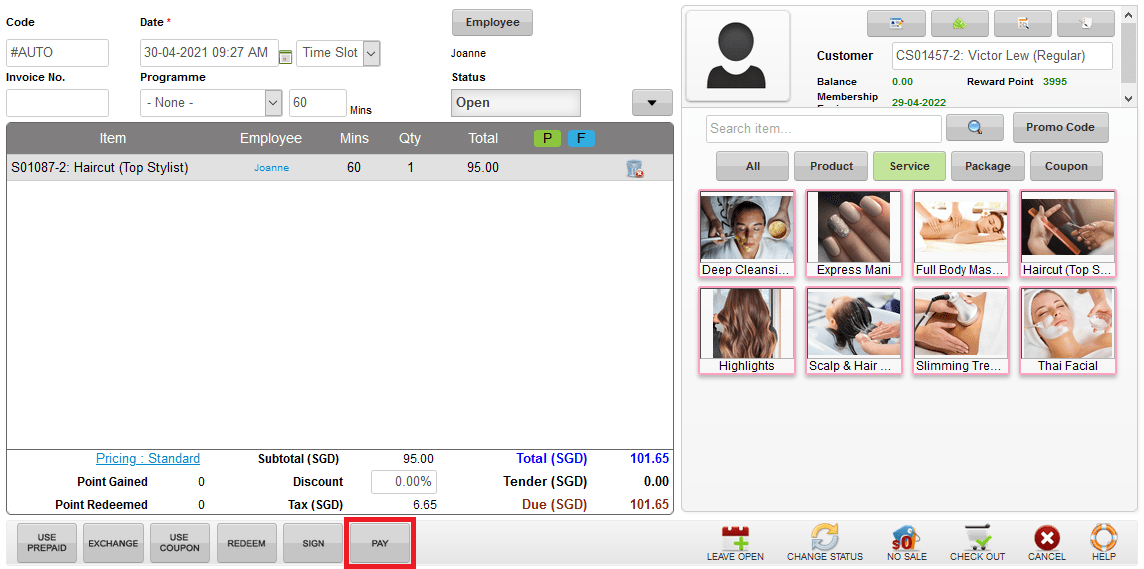
 Step 5: Select the product / service / package / coupon
 Step 6: Click “PAY”
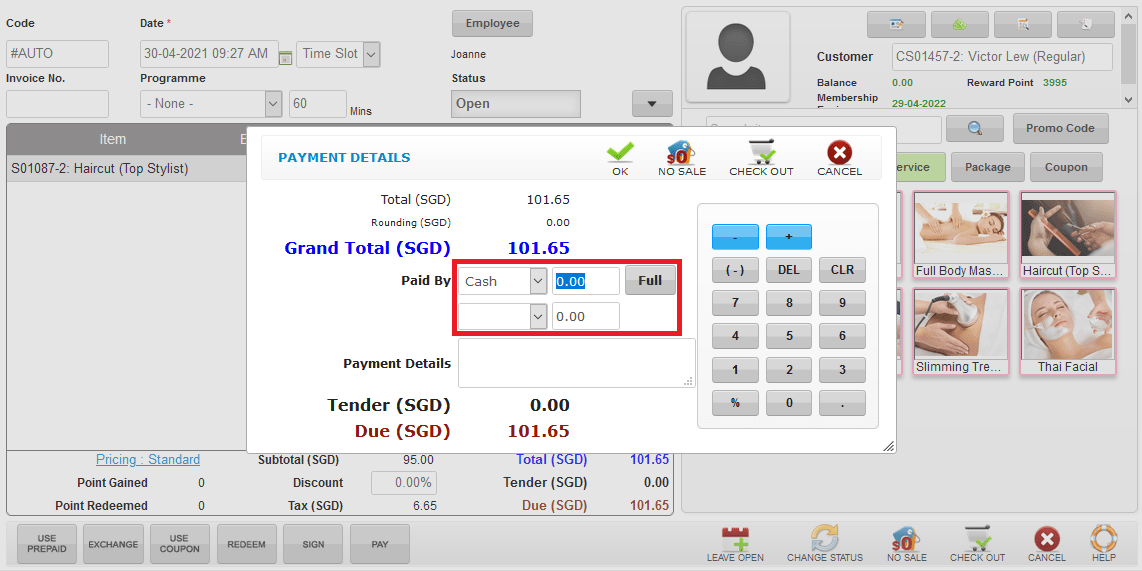
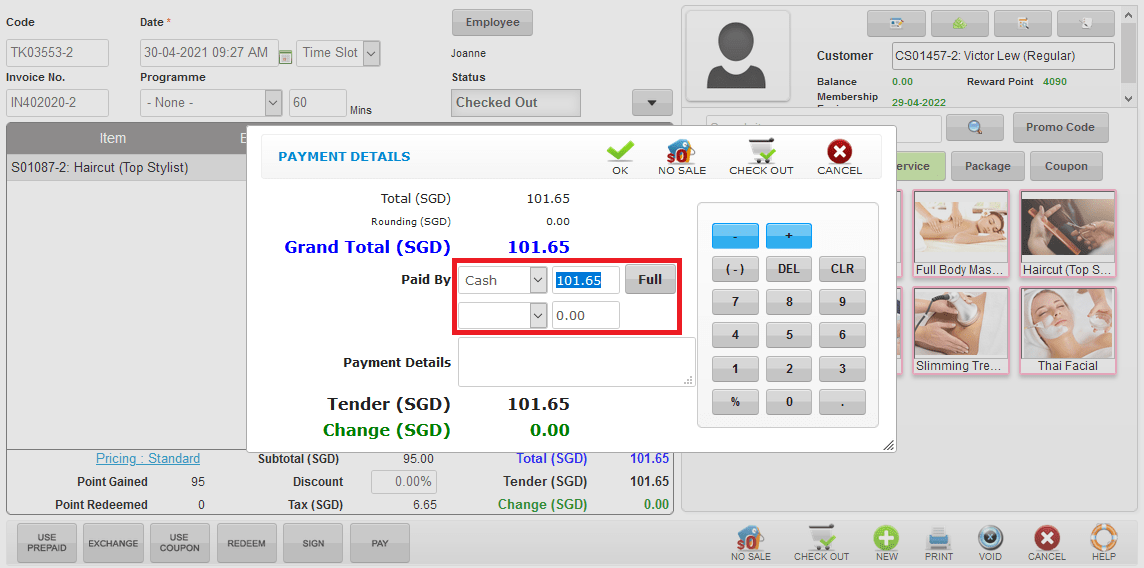
 Step 7: Select the payment method and enter the amount customer paid
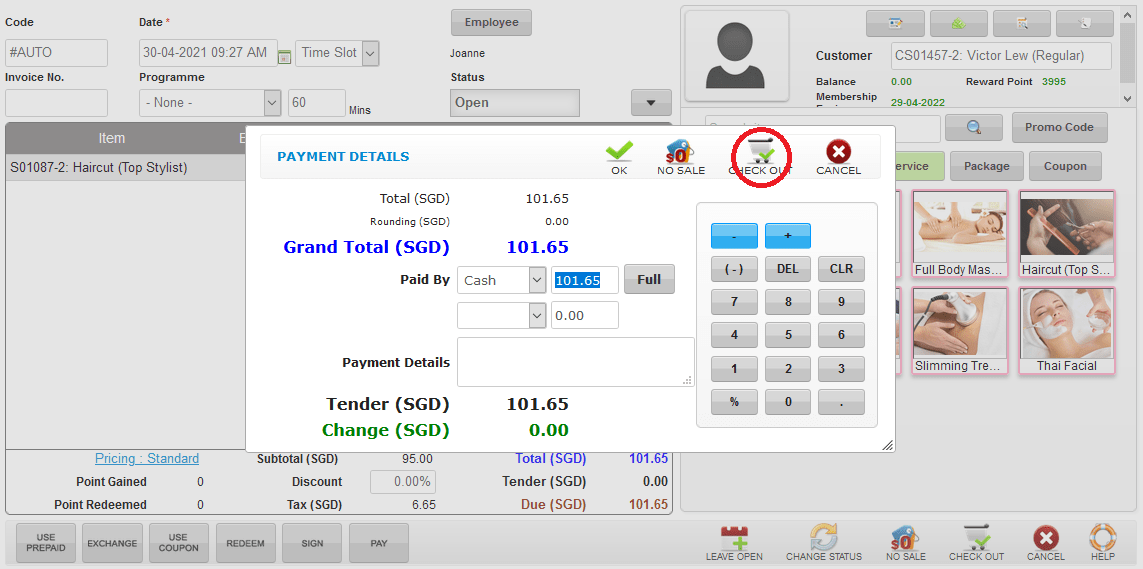
 Step 8: Click “CHECK OUT”
 Step 9: Click “CONFIRM”
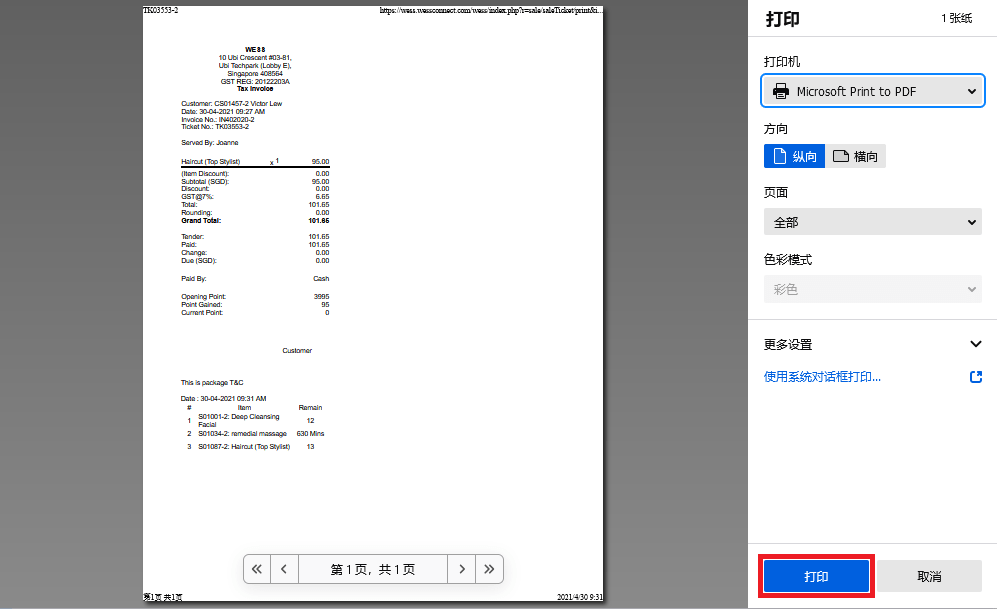
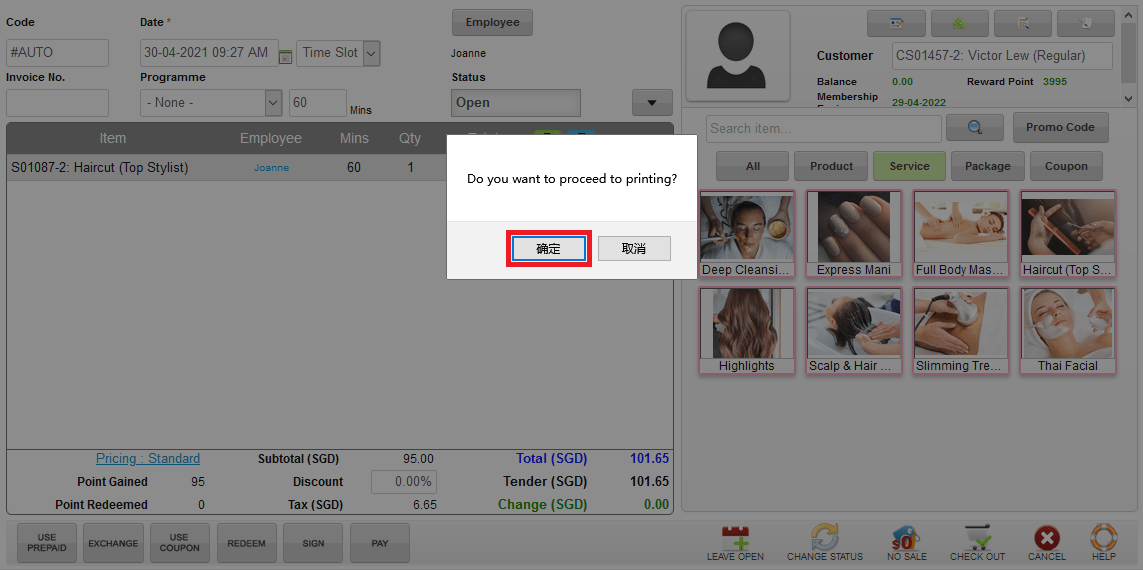 Step 10: Click “PRINT” to print
 Step 11: Click “NEW” to add new order
 Last update: April 2021
Step 2: Click and select the “EMPLOYEE”
Step 3: Click “SET”
Step 4: Enter the customer name / code / phone number to search
Step 5: Select the product / service / package / coupon
Step 6: Click “PAY”
Step 7: Select the payment method and enter the amount customer paid
Step 8: Click “CHECK OUT”
Step 9: Click “CONFIRM”
Step 10: Click “PRINT” to print
Step 11: Click “NEW” to add new order
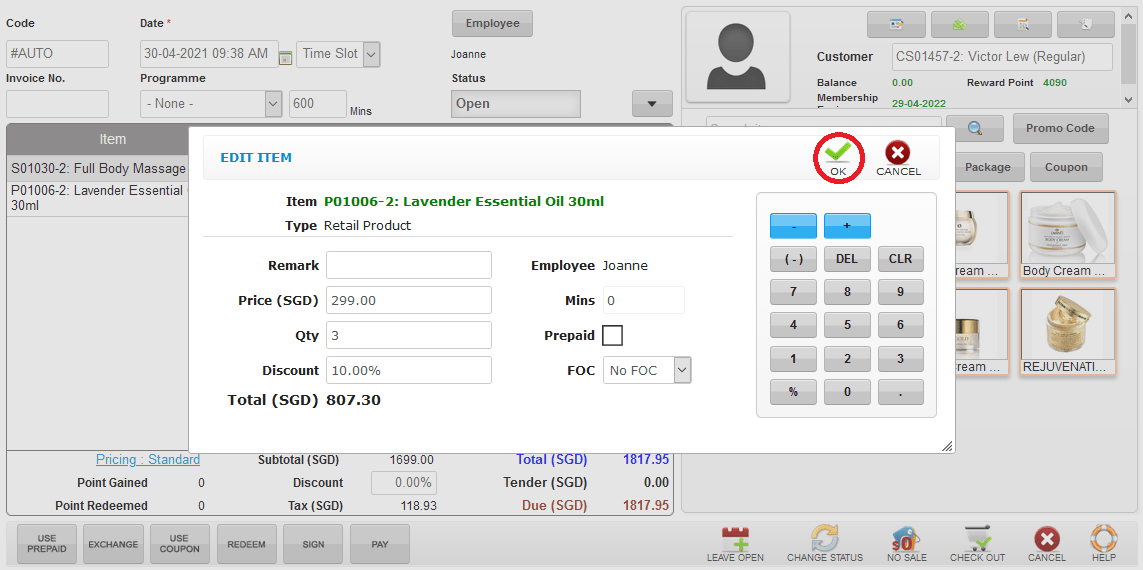
Last update: April 2021Step 1: Select the item
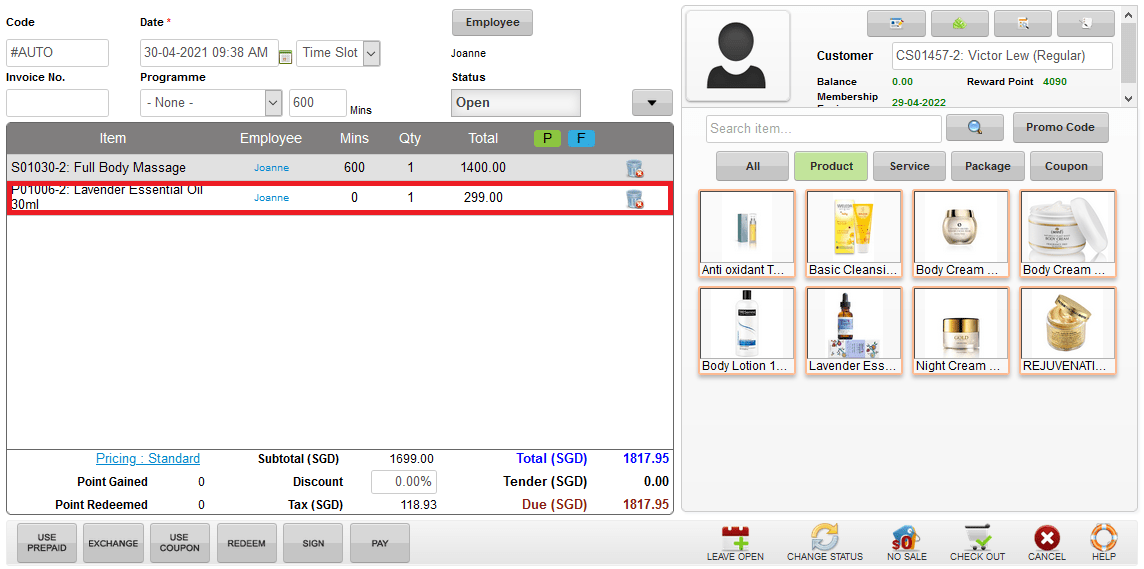 Step 2: You can make the changes if needed
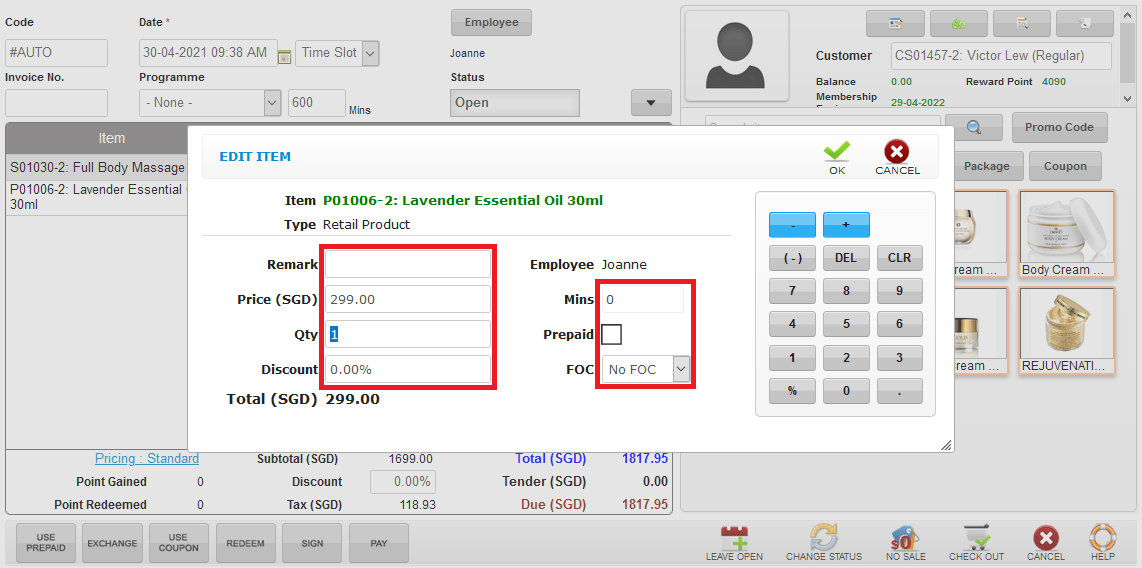 Step 3: Click “OK”
 Last update: April 2021
Step 2: You can make the changes if needed
Step 3: Click “OK”
Last update: April 2021Step 1: Click “SALE TICKET LIST”
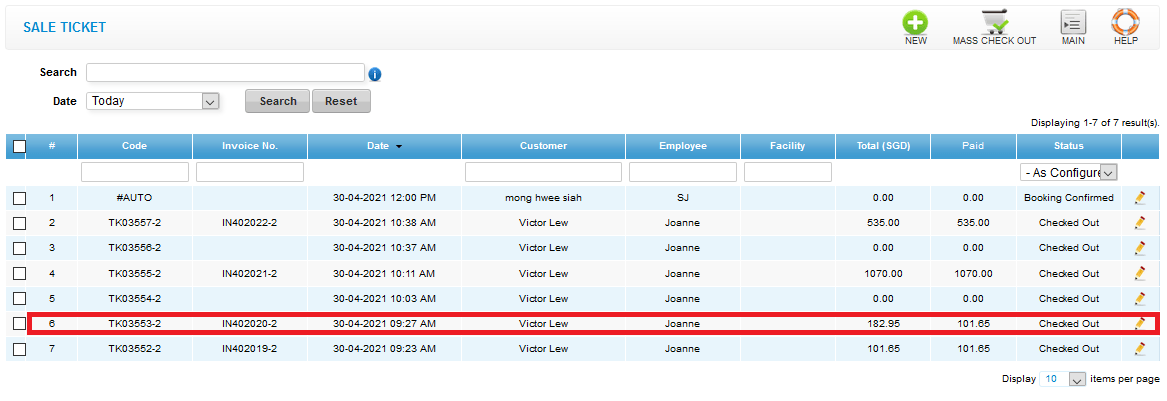
 Step 2: Select the sale ticket record
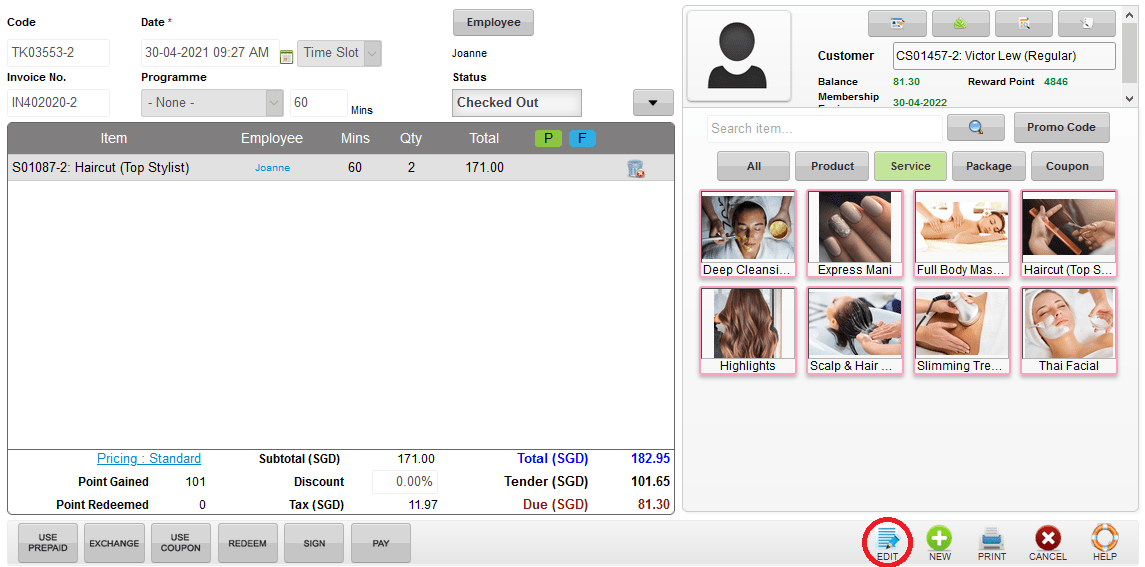
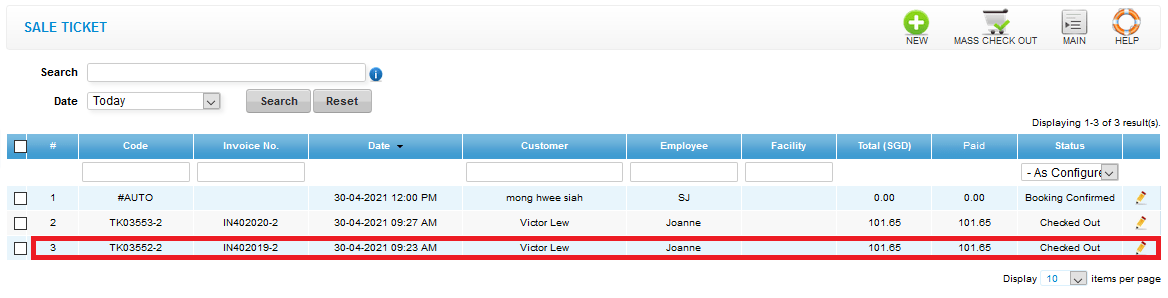 Step 3: Click “EDIT”
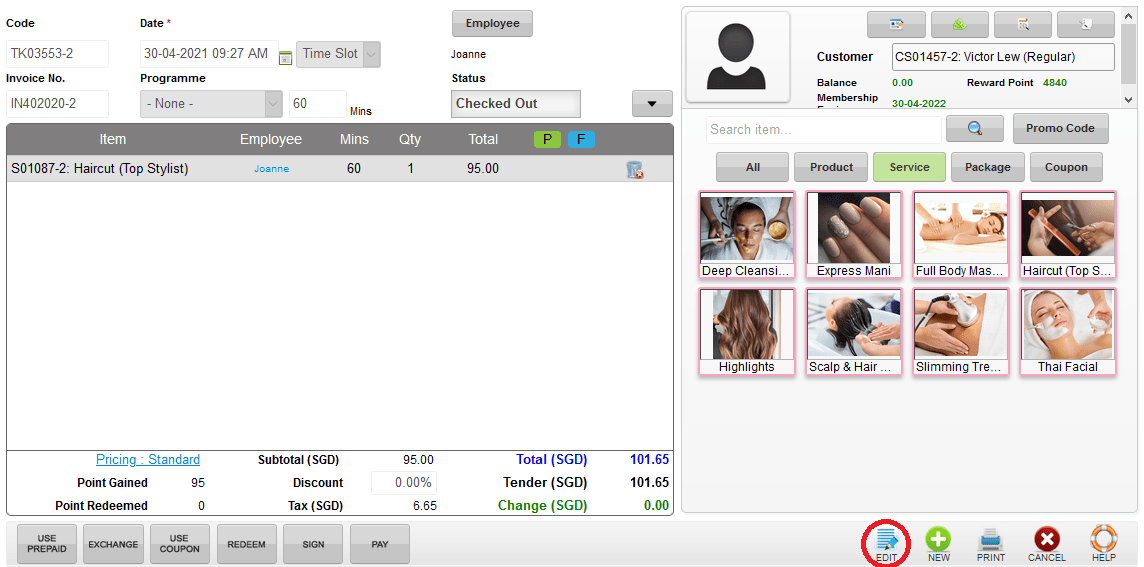 Step 4: You can make the changes if needed
 Step 5: Payment details can change also
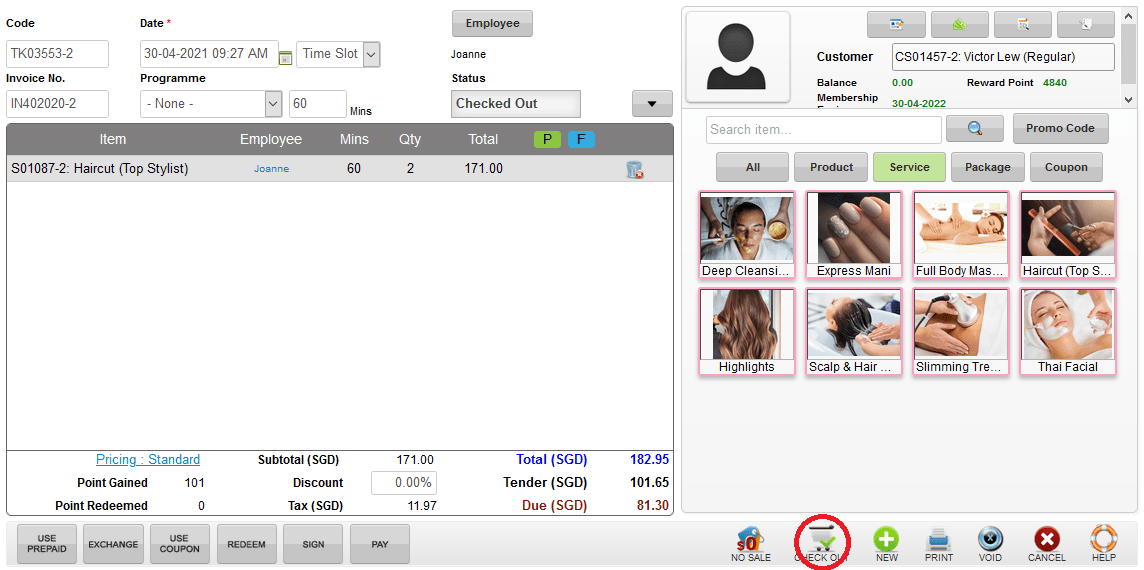
 Step 6: Click “CHECK OUT” to check out again
(*This will not cause the system generate two sale ticket)
Step 6: Click “CHECK OUT” to check out again
(*This will not cause the system generate two sale ticket)
 Last update: April 2021
Step 2: Select the sale ticket record
Step 3: Click “EDIT”
Step 4: You can make the changes if needed
Step 5: Payment details can change also
Step 6: Click “CHECK OUT” to check out again
(*This will not cause the system generate two sale ticket)
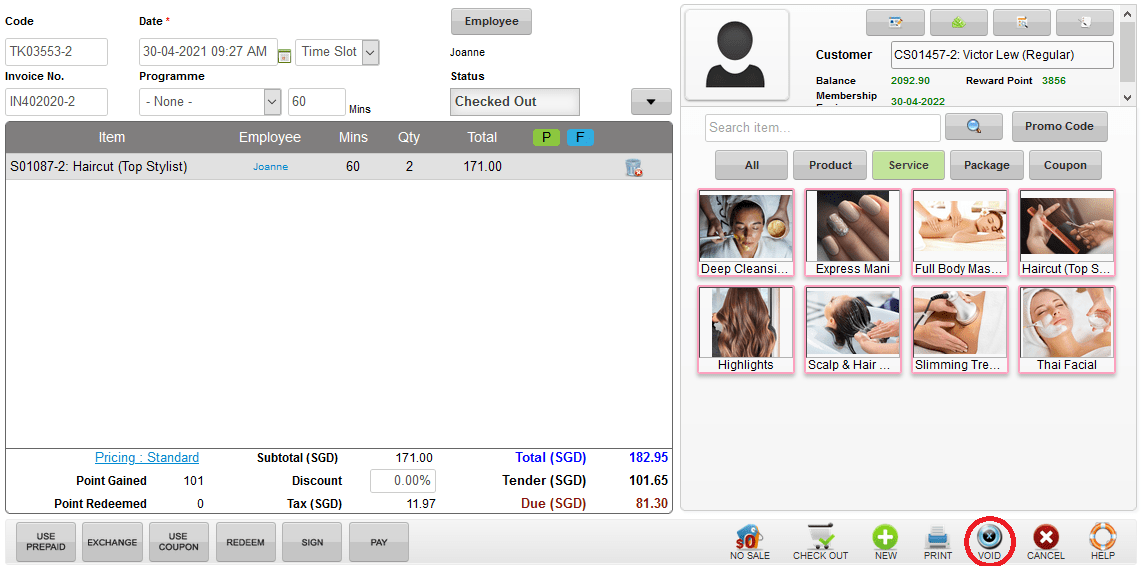
Last update: April 2021Step 1: Click “SALE TICKET LIST”
 Step 2: Select the sale ticket record
 Step 3: Click “EDIT”
 Step 4: Click “VOID”
 Last update: April 2021
Step 2: Select the sale ticket record
Step 3: Click “EDIT”
Step 4: Click “VOID”
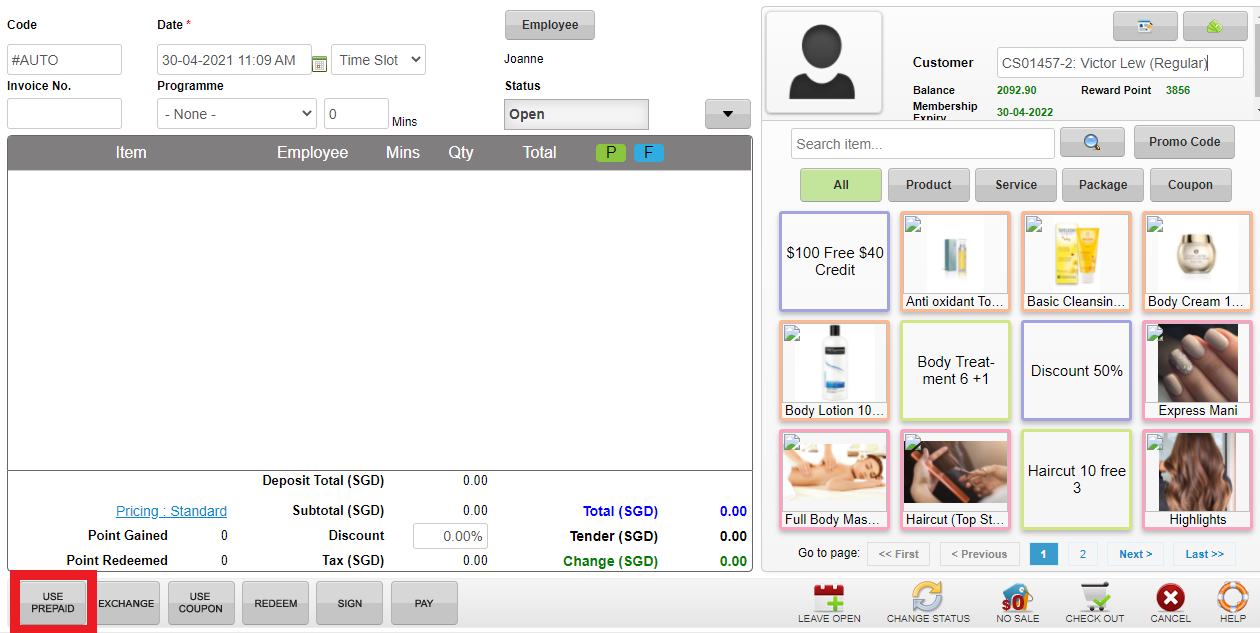
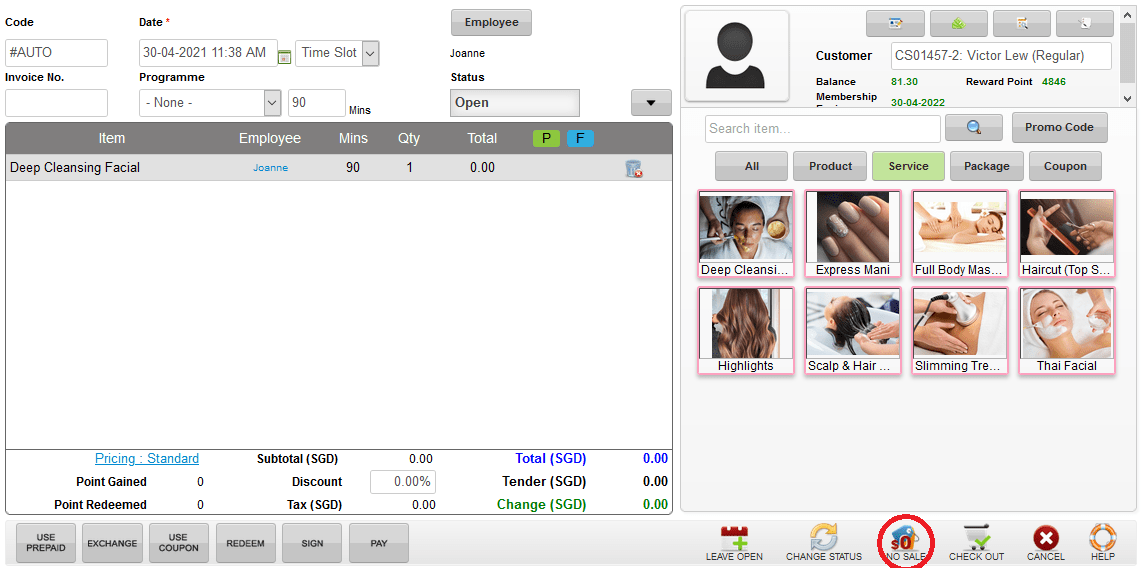
Last update: April 2021Step 1: Click the “EMPLOYEE”
Step 2: Choose the employee and click “SET”
Step 3: Enter the customer name / code / phone number to search
Step 4: Click “USE PREPAID”
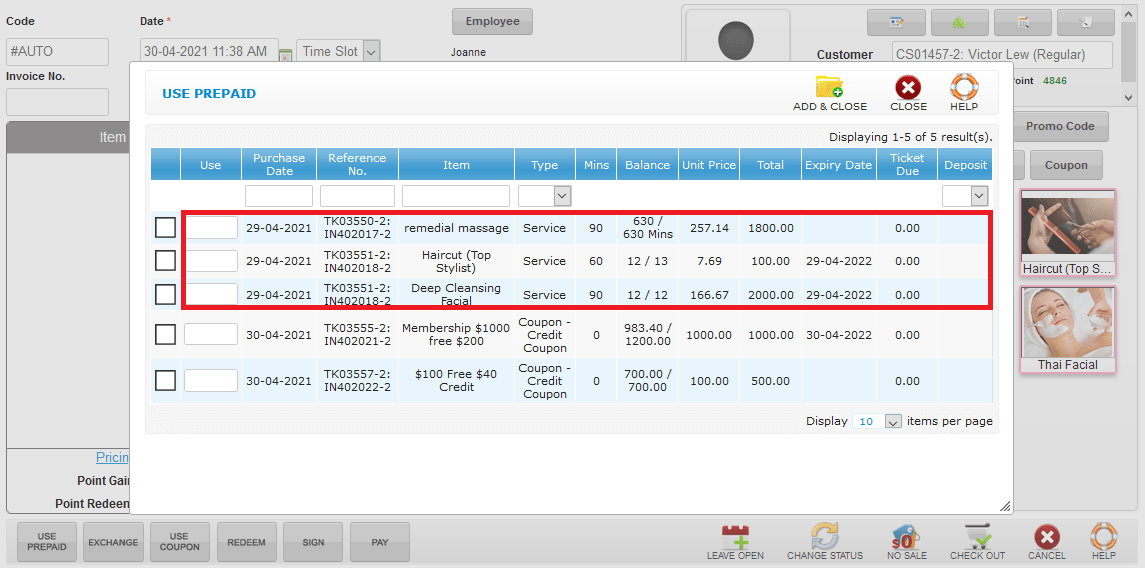
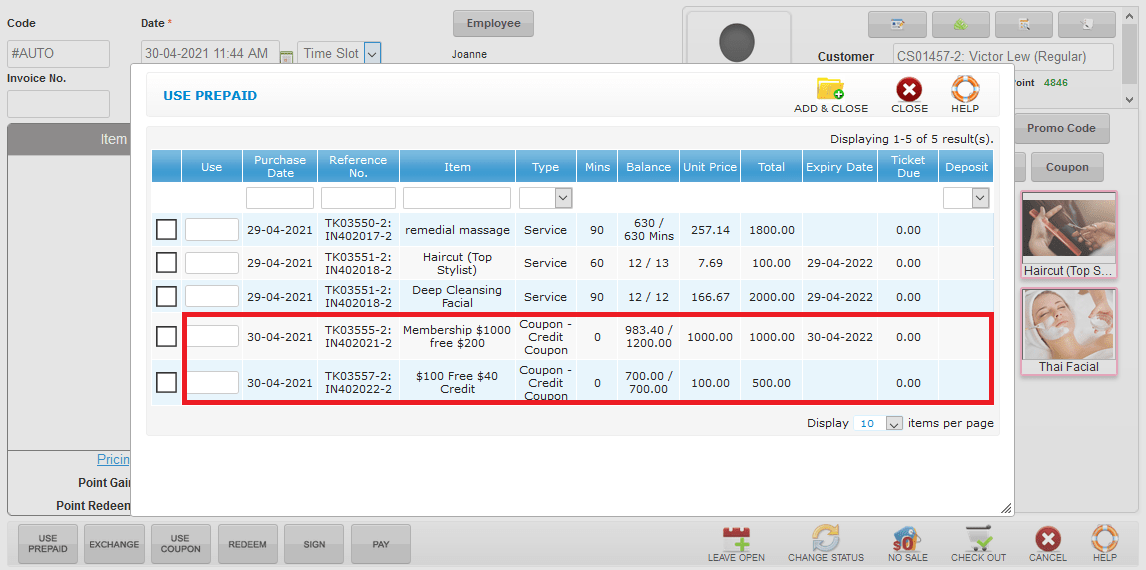
 Step 5: Select the sesion package and enter the quantity
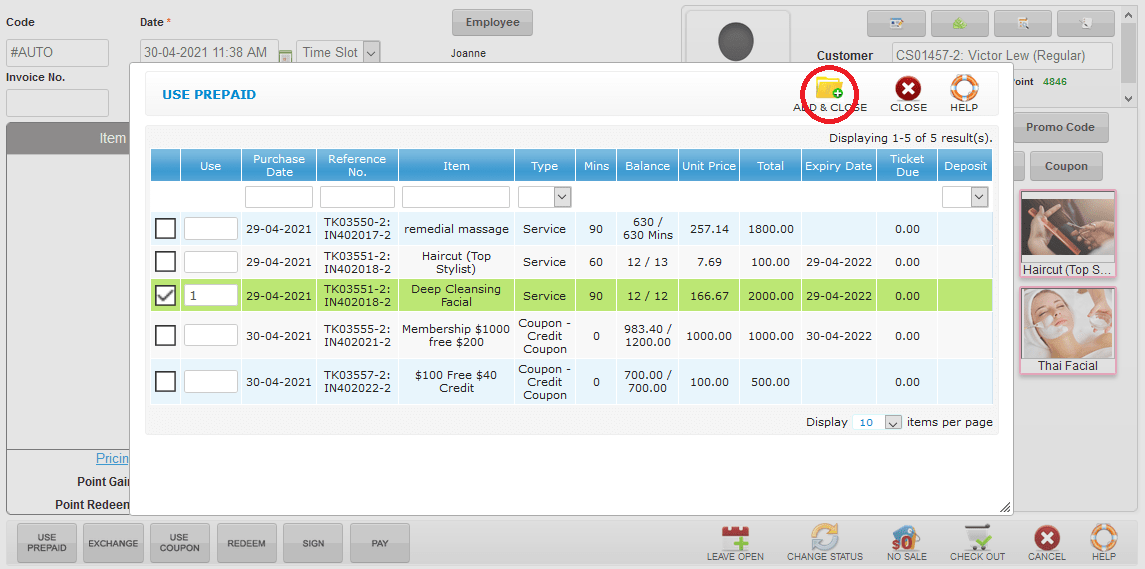
 Step 6: Click “ADD & CLOSE”
 Step 7: Click “NO SALE”
 Last update: April 2021
Step 2: Choose the employee and click “SET”
Step 3: Enter the customer name / code / phone number to search
Step 4: Click “USE PREPAID”
Step 5: Select the sesion package and enter the quantity
Step 6: Click “ADD & CLOSE”
Step 7: Click “NO SALE”
Last update: April 2021Step 1: Click the “EMPLOYEE”
Step 2: Choose the employee and click “SET”
Step 3: Enter the customer name / code / phone number to search
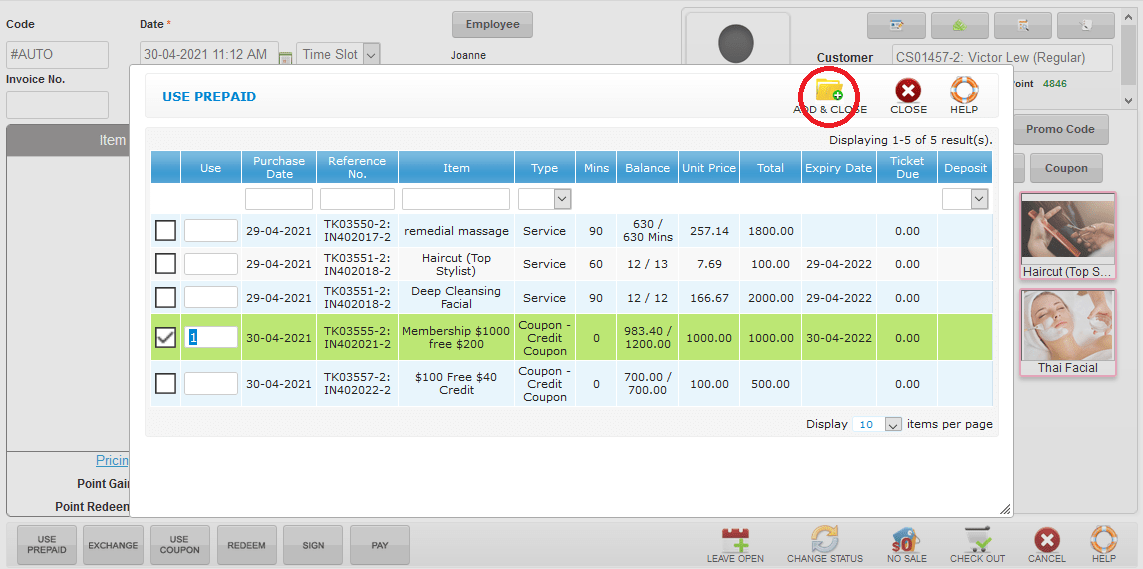
Step 4: Click “USE PREPAID”
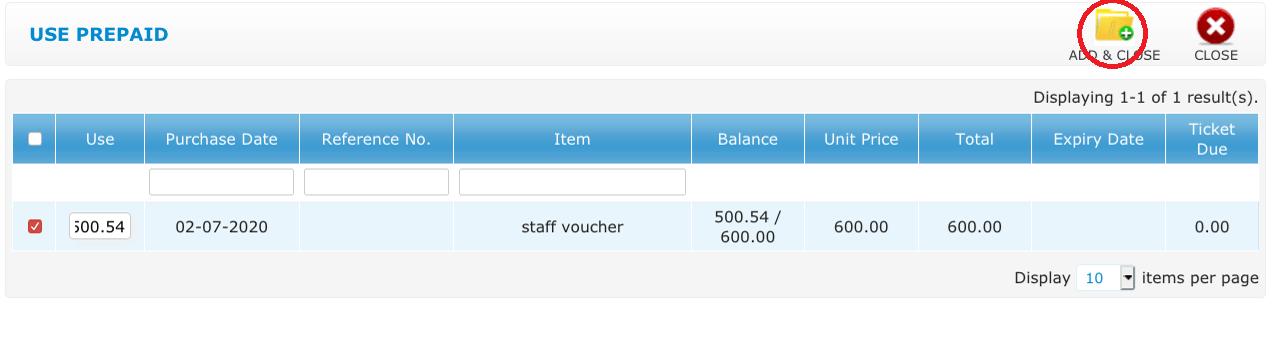
Step 5: Select the credit package and enter the use quantity
 Step 6: Click “ADD & CLOSE”
 Step 7: Search the item by item name / type / section / category and select the item
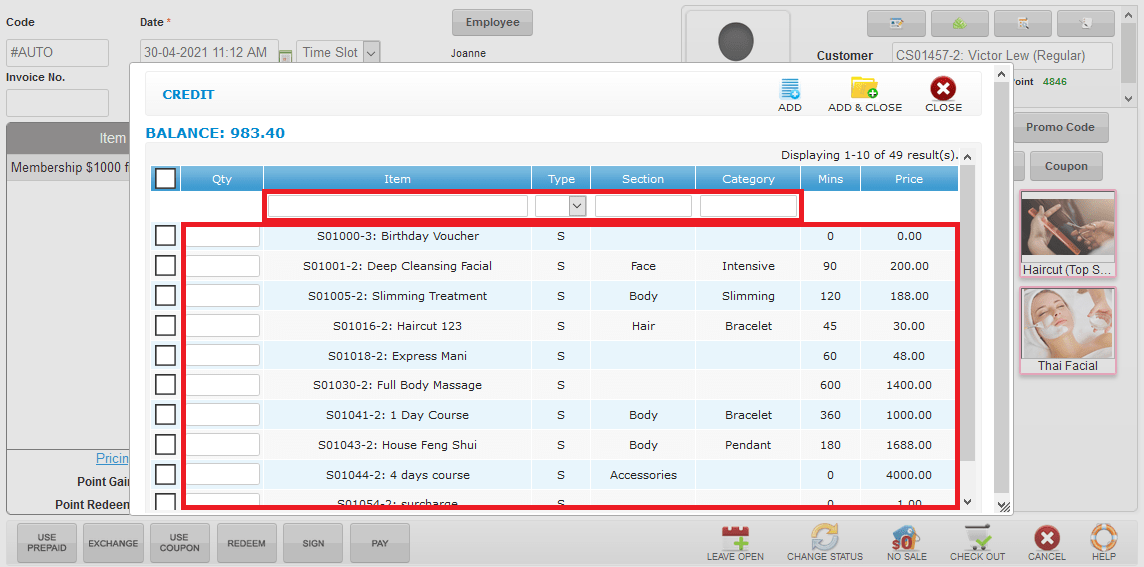 Step 8: Click “ADD & CLOSE”
 Step 9: Click “NO SALE”
 Last update: April 2021
Step 2: Choose the employee and click “SET”
Step 3: Enter the customer name / code / phone number to search
Step 4: Click “USE PREPAID”
Step 5: Select the credit package and enter the use quantity
Step 6: Click “ADD & CLOSE”
Step 7: Search the item by item name / type / section / category and select the item
Step 8: Click “ADD & CLOSE”
Step 9: Click “NO SALE”
Last update: April 2021Step 1: Click “💲”
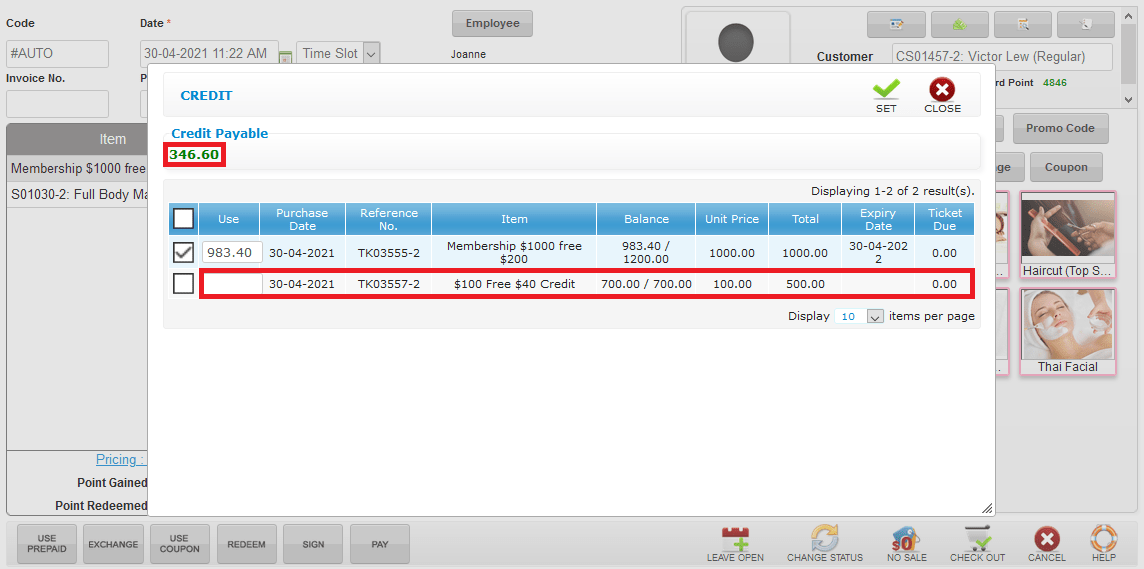
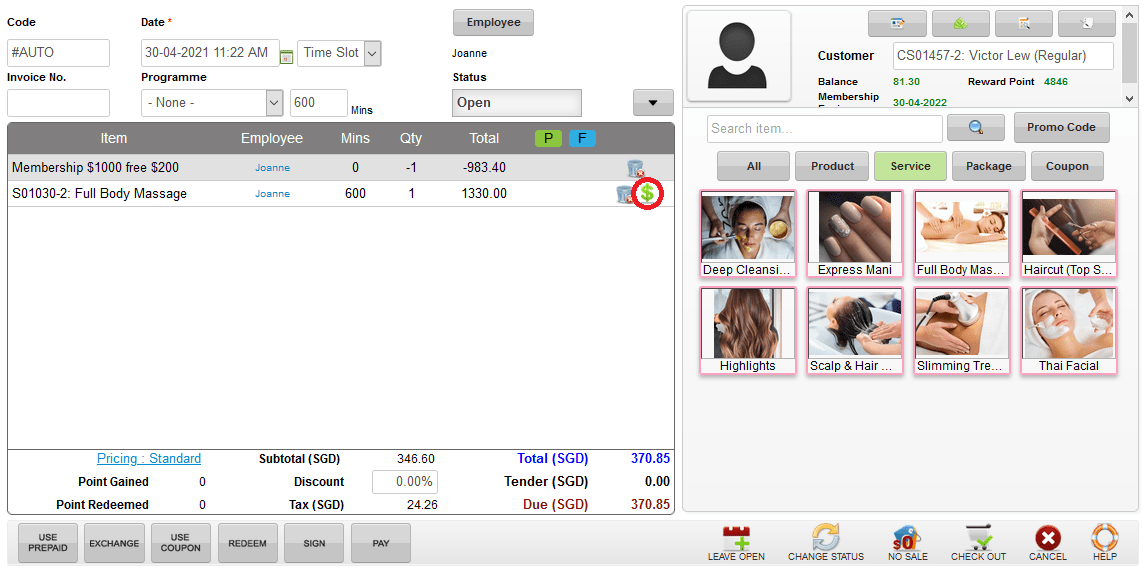 Step 2: Select the credit package and enter the amount that want to use
(*Credit Payable: Amount of the credit need to pay)
Step 2: Select the credit package and enter the amount that want to use
(*Credit Payable: Amount of the credit need to pay)
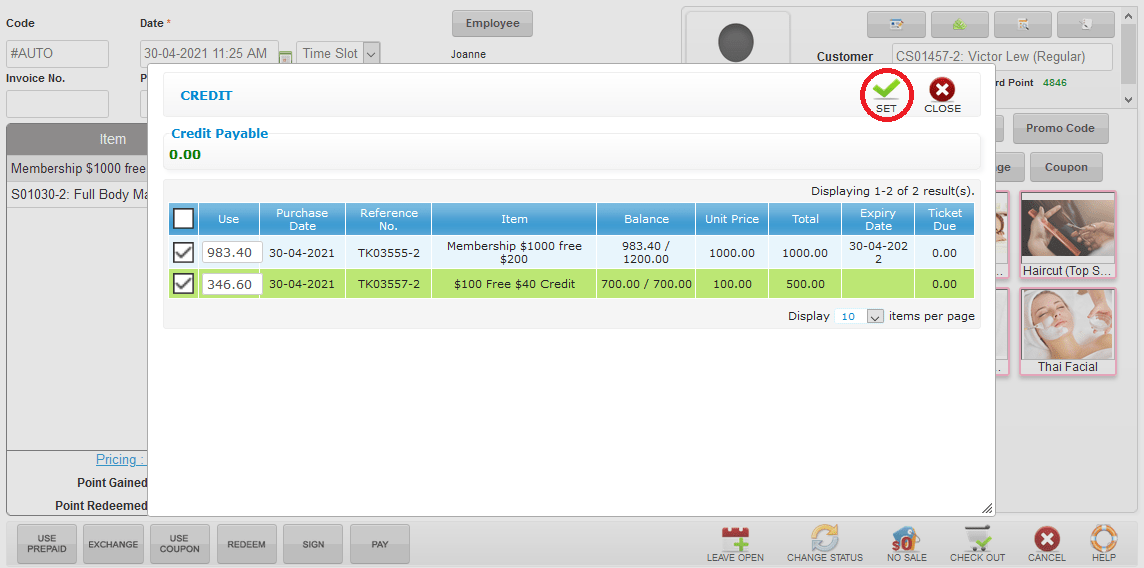
 Step 3: Click “SET”
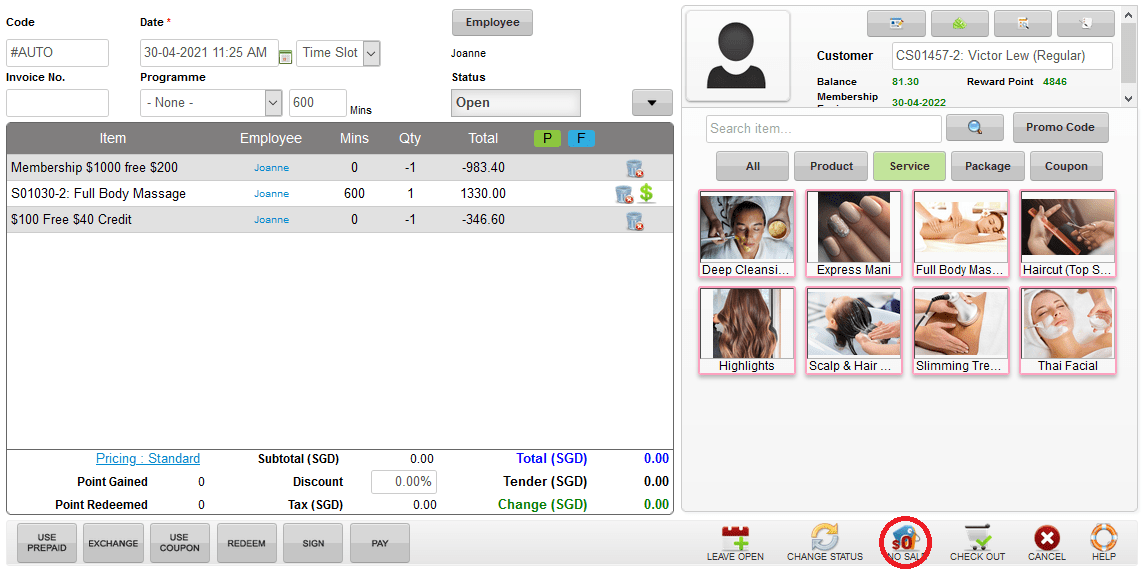
 Step 4: Click “NO SALE”
 Last update: April 2021
Step 2: Select the credit package and enter the amount that want to use
(*Credit Payable: Amount of the credit need to pay)
Step 3: Click “SET”
Step 4: Click “NO SALE”
Last update: April 2021Step 1: Click “USE COUPON”
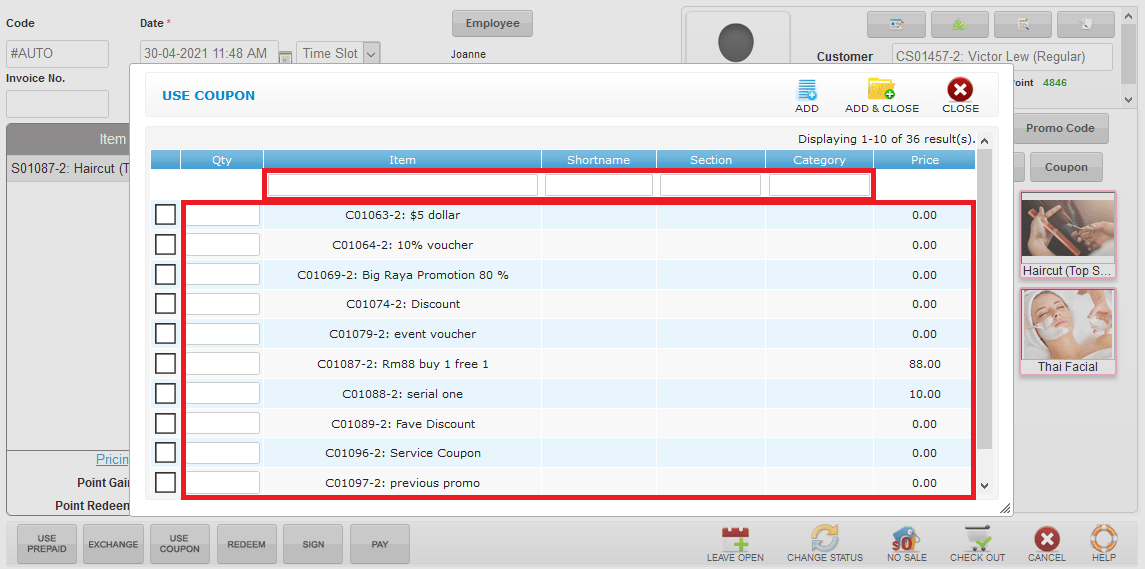
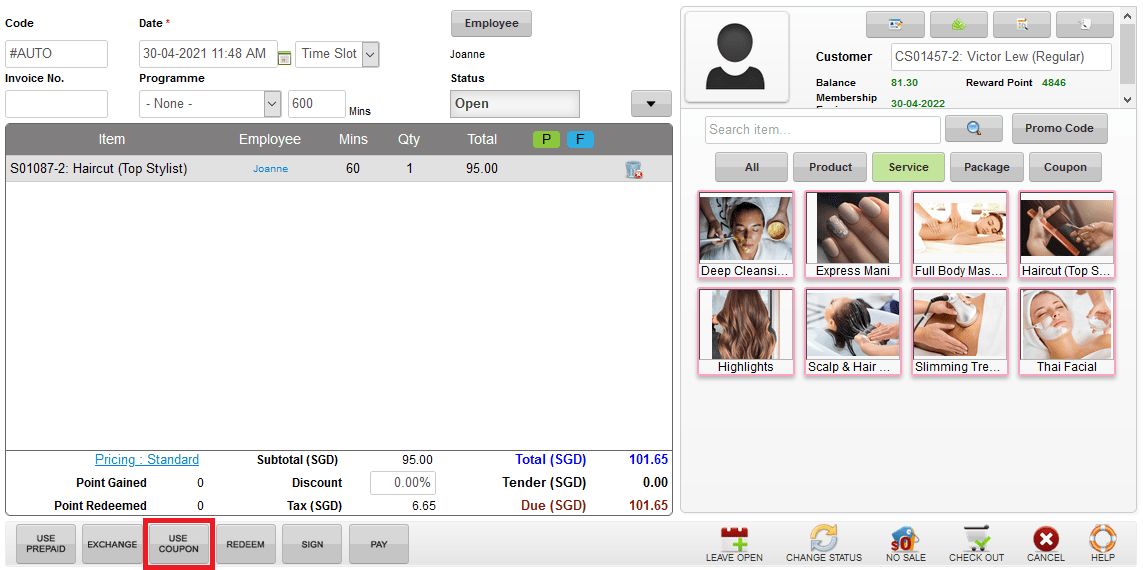 Step 2: Search the item by item name / shortname / section / category and select the coupon
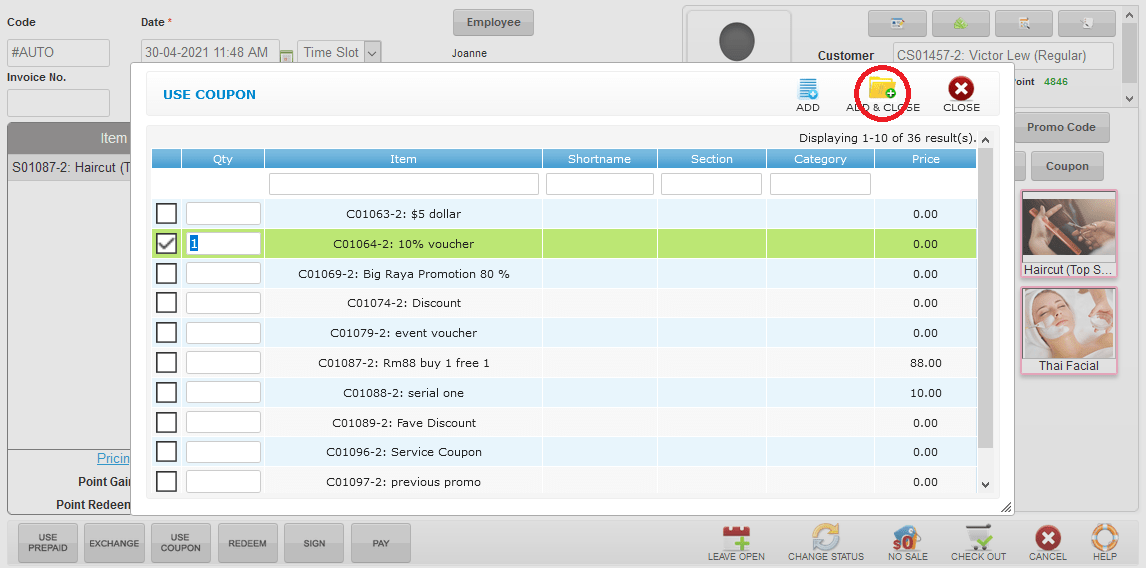
 Step 3: Click “ADD & CLOSE”
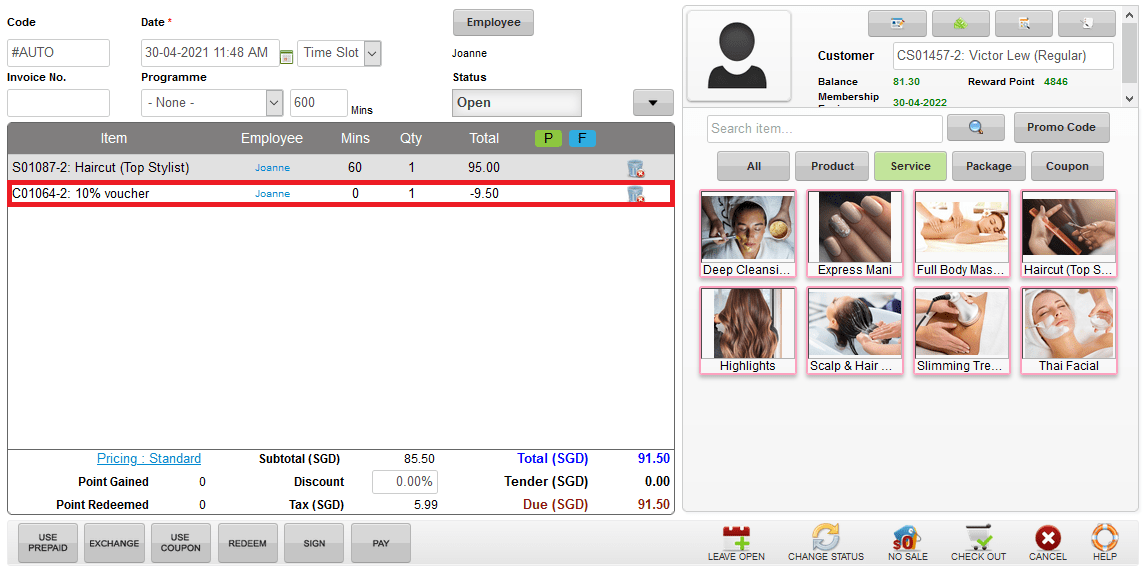
 Step 4: The coupon is applied already
 Last update: April 2021
Step 2: Search the item by item name / shortname / section / category and select the coupon
Step 3: Click “ADD & CLOSE”
Step 4: The coupon is applied already
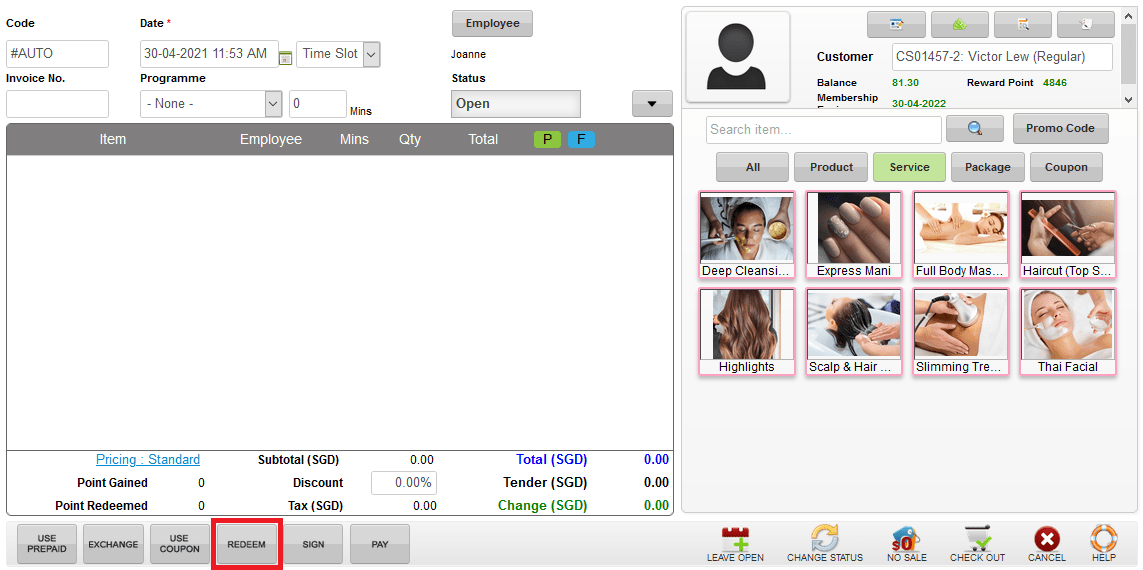
Last update: April 2021Step 1: Click “REEDEM”
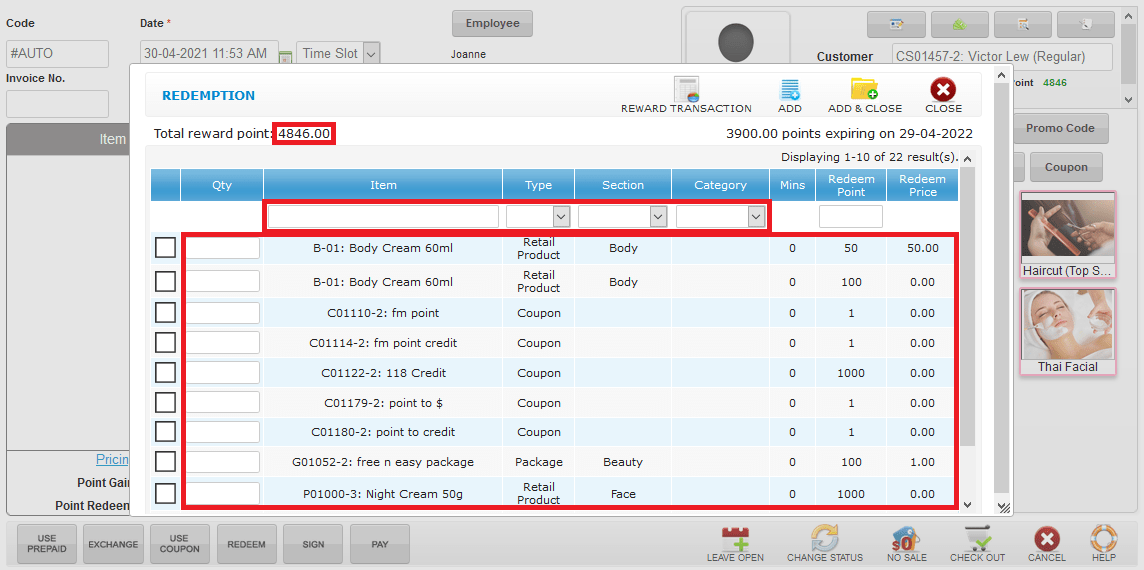
 Step 2: Search the redeem item by item name / type / section / category and select the redeem item
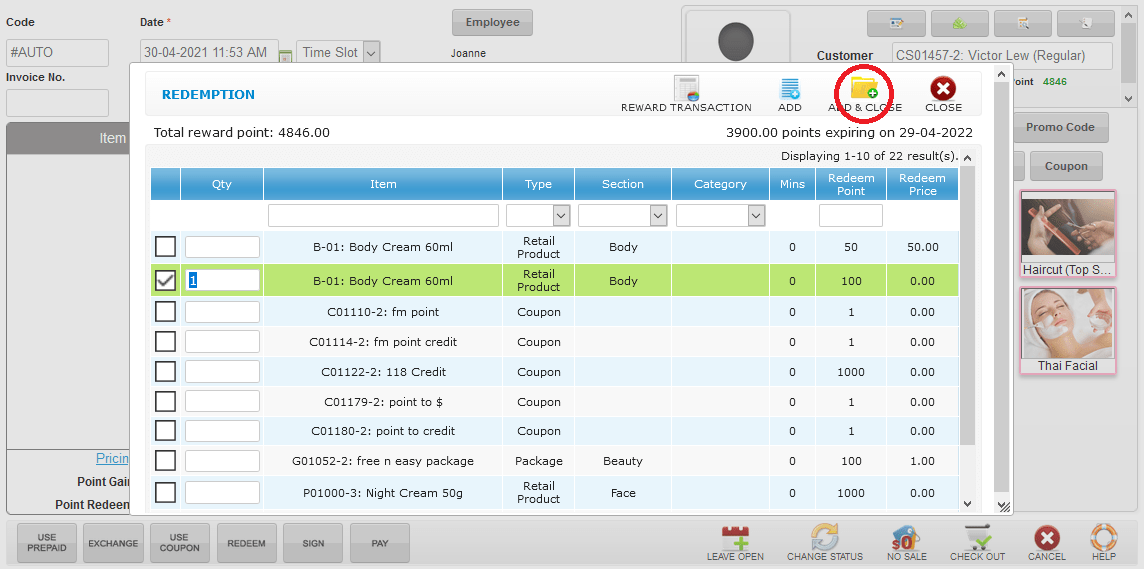
 Step 3: Click “ADD & CLOSE”
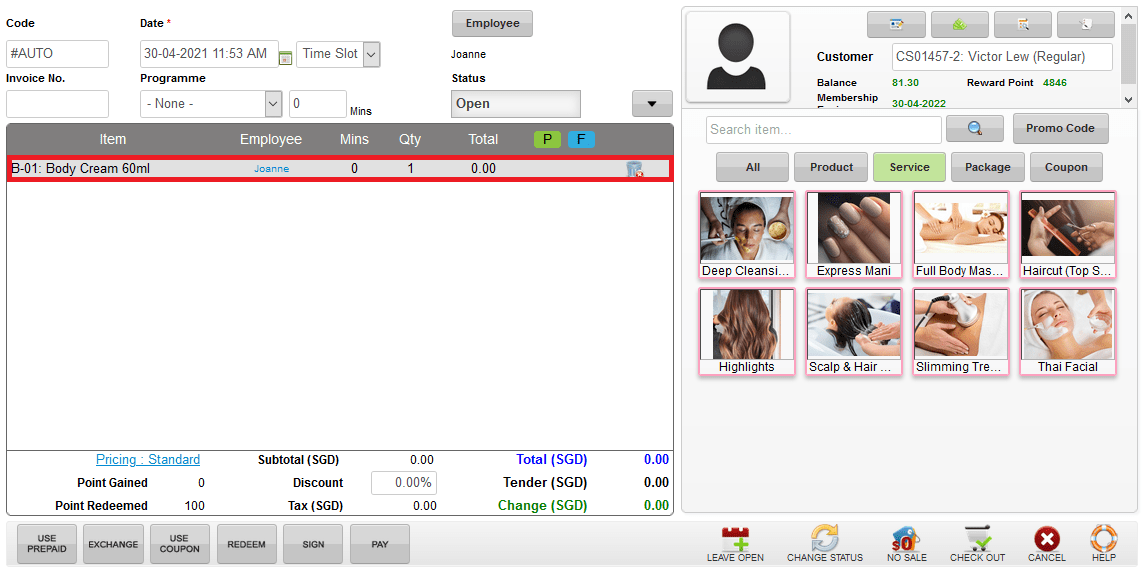
 Step 4: The redeem item is added already
 Last update: April 2021
Step 2: Search the redeem item by item name / type / section / category and select the redeem item
Step 3: Click “ADD & CLOSE”
Step 4: The redeem item is added already
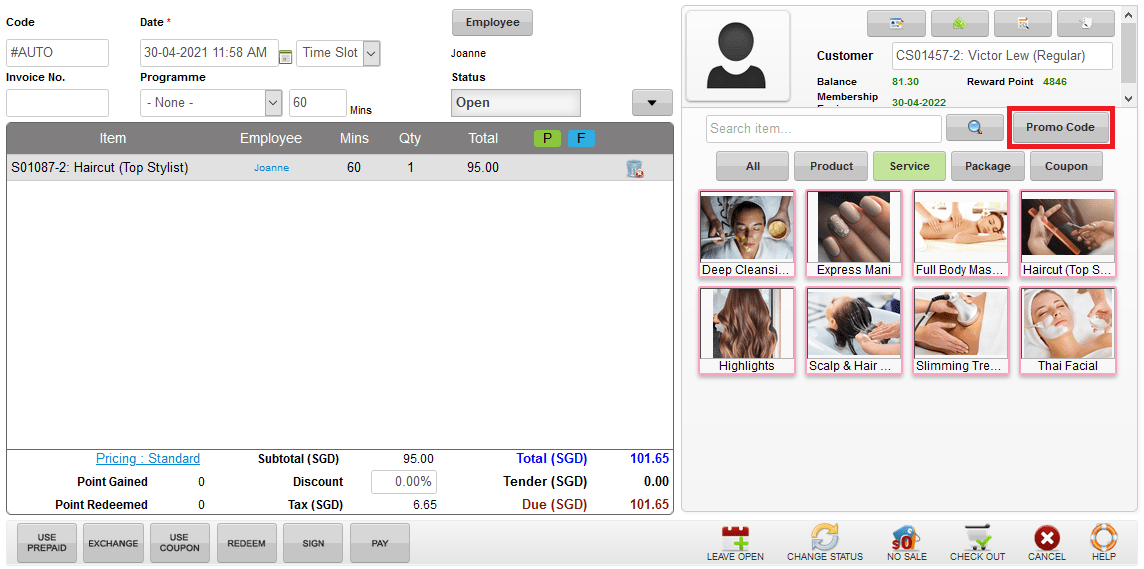
Last update: April 2021Step 1: Click “PROMO CODE”
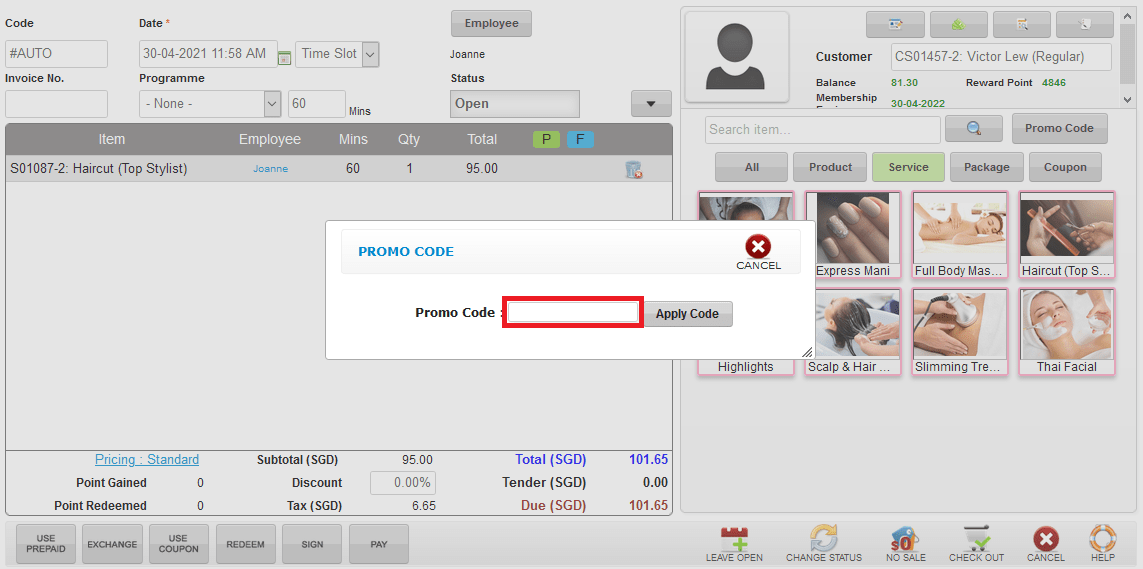
 Step 2: Enter the promo code
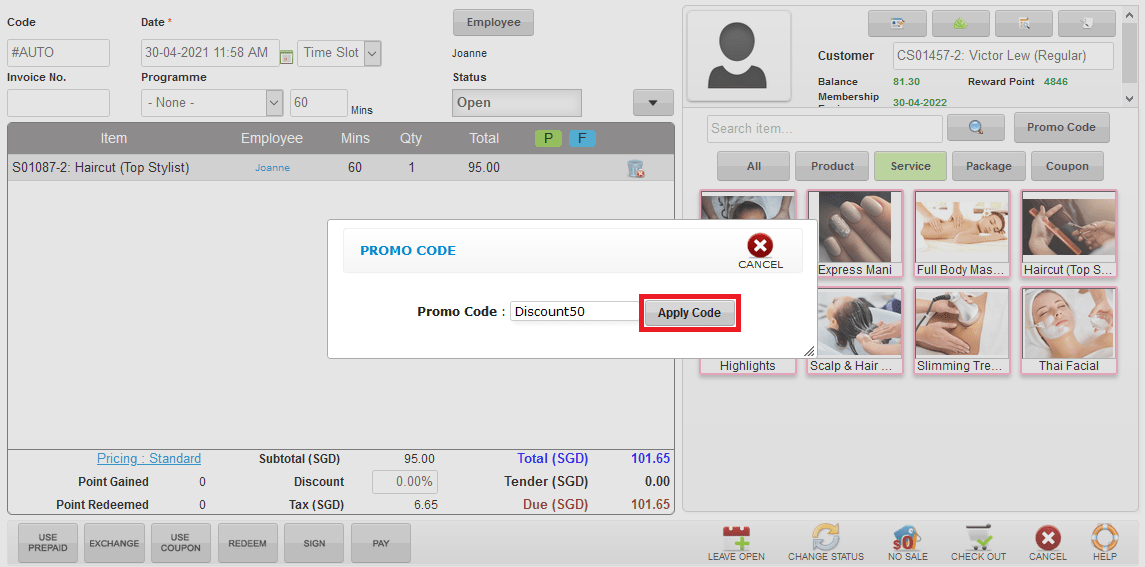
 Step 3: Click “APPLY CODE”
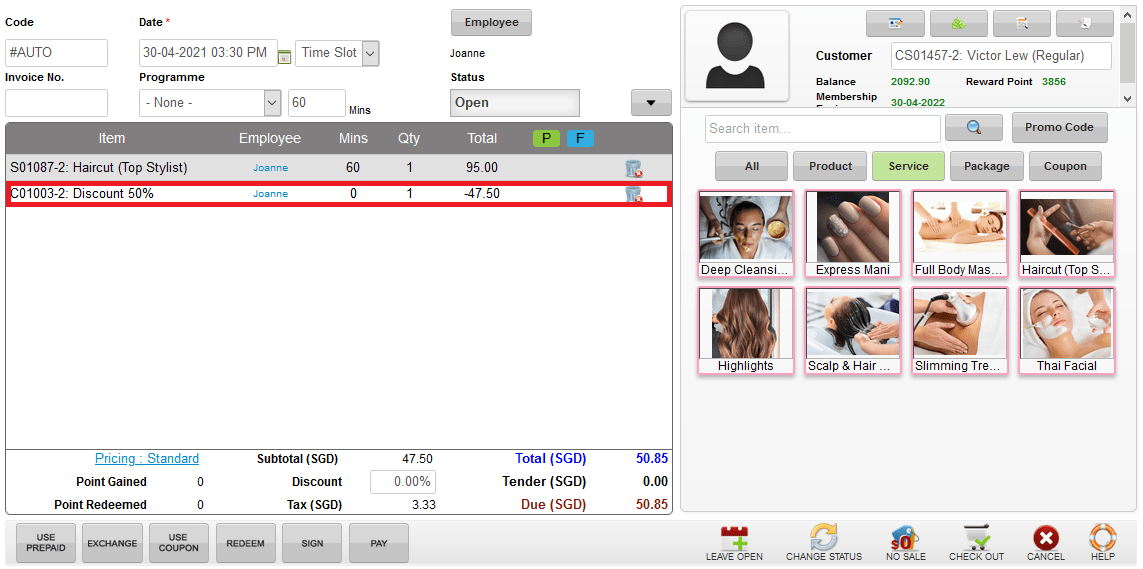
 Step 4: The promo code is applied already
 Last update: April 2021
Step 2: Enter the promo code
Step 3: Click “APPLY CODE”
Step 4: The promo code is applied already
Last update: April 2021Step 1: Select the item want to refund
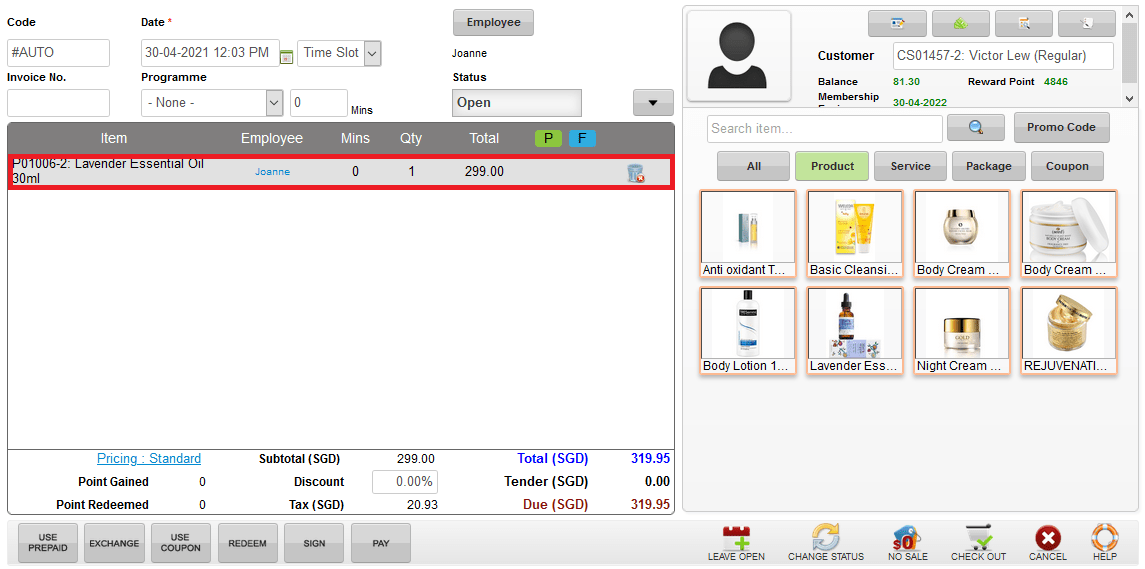 Step 2: Enter the “-N” at Qty (N mean the number of amount)
(*For example: “-2” refund 2 quantity, “-3” refund 3 quantity and so on…)
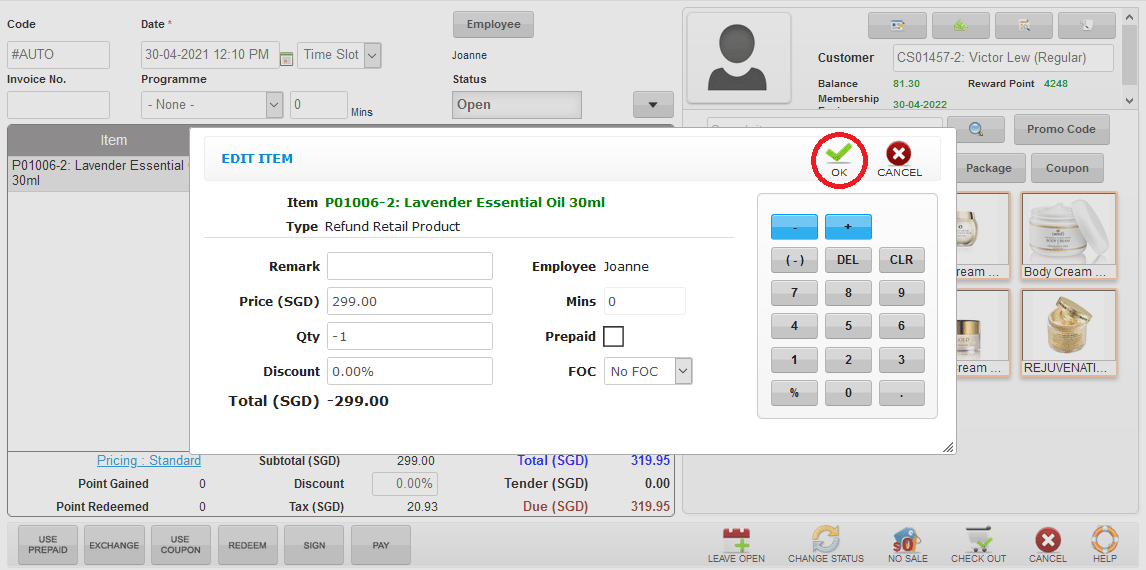
Step 2: Enter the “-N” at Qty (N mean the number of amount)
(*For example: “-2” refund 2 quantity, “-3” refund 3 quantity and so on…)
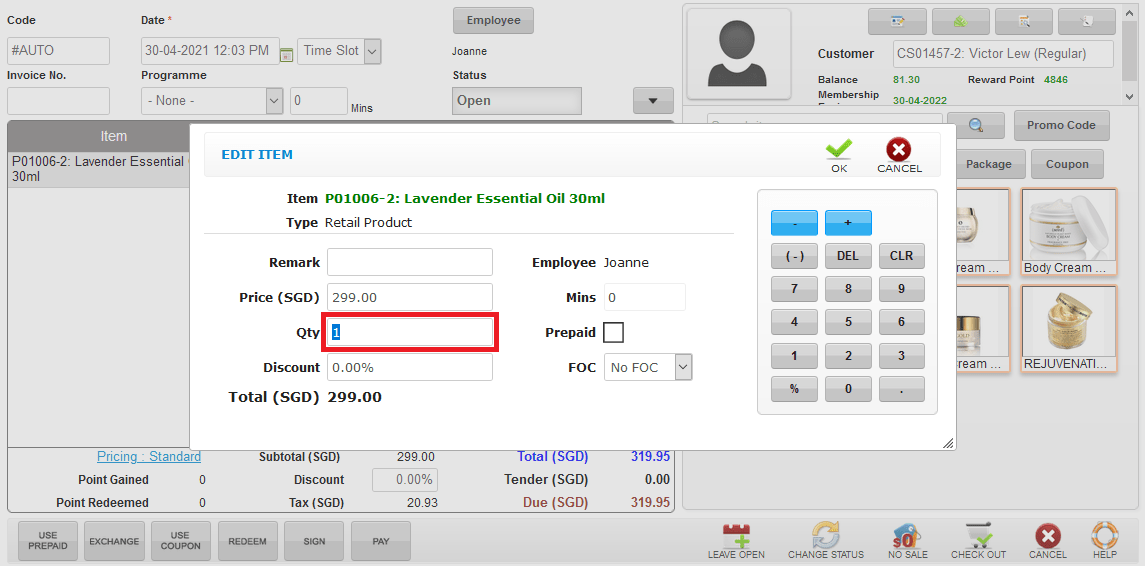 Step 3: Click “OK”
 Step 4: Click “CHECK OUT”
 Last update: April 2021
Step 2: Enter the “-N” at Qty (N mean the number of amount)
(*For example: “-2” refund 2 quantity, “-3” refund 3 quantity and so on…)
Step 3: Click “OK”
Step 4: Click “CHECK OUT”
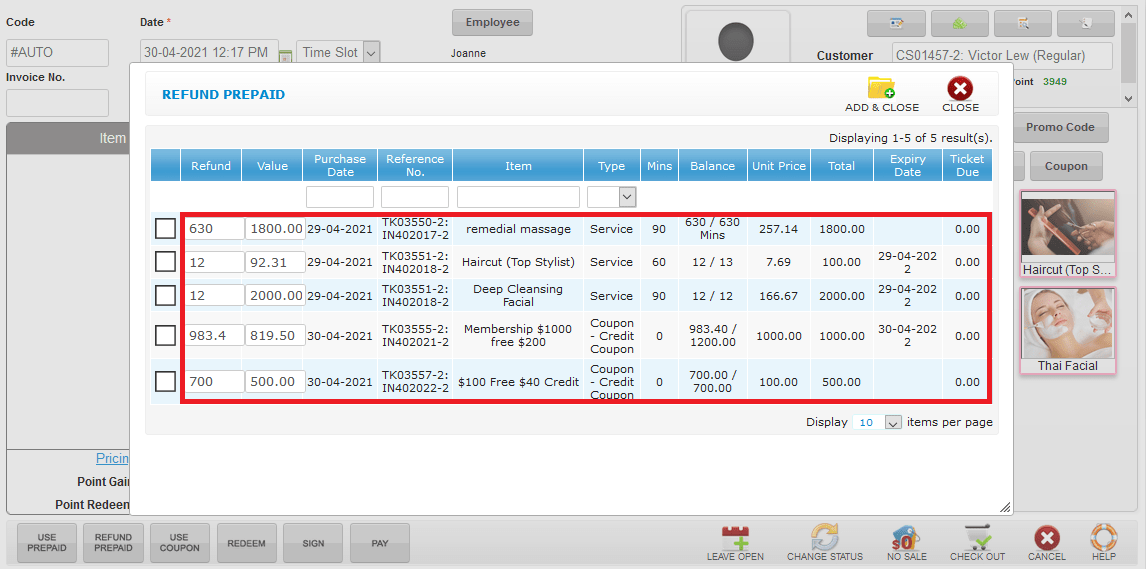
Last update: April 2021Step 1: Click “REFUND PREPAID”
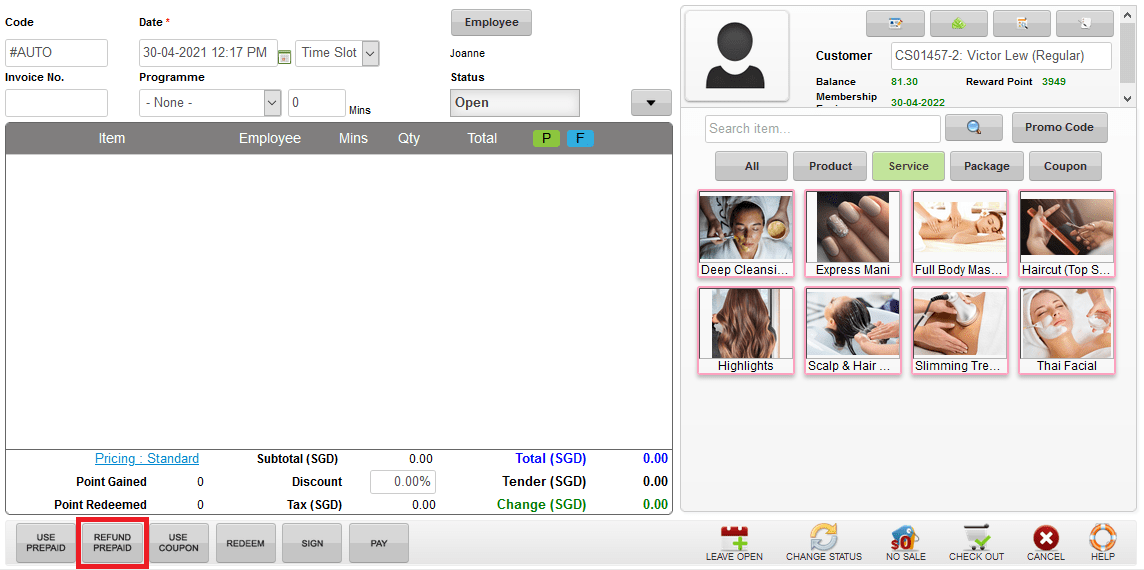 Step 2: Select the prepaid package / prepaid credit want to refund
 Step 3: Click “ADD & CLOSE”
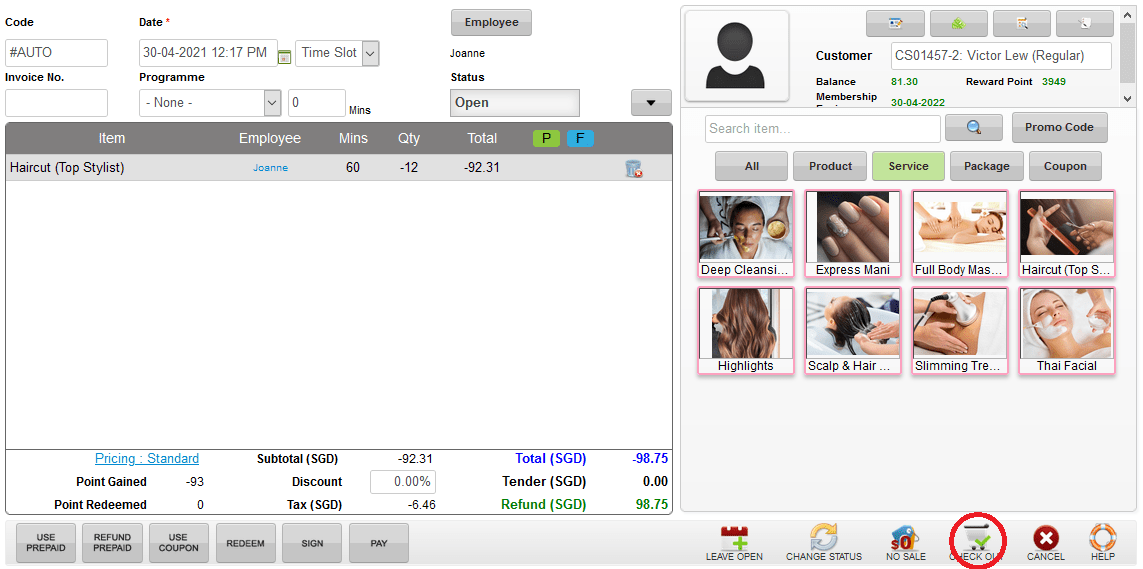
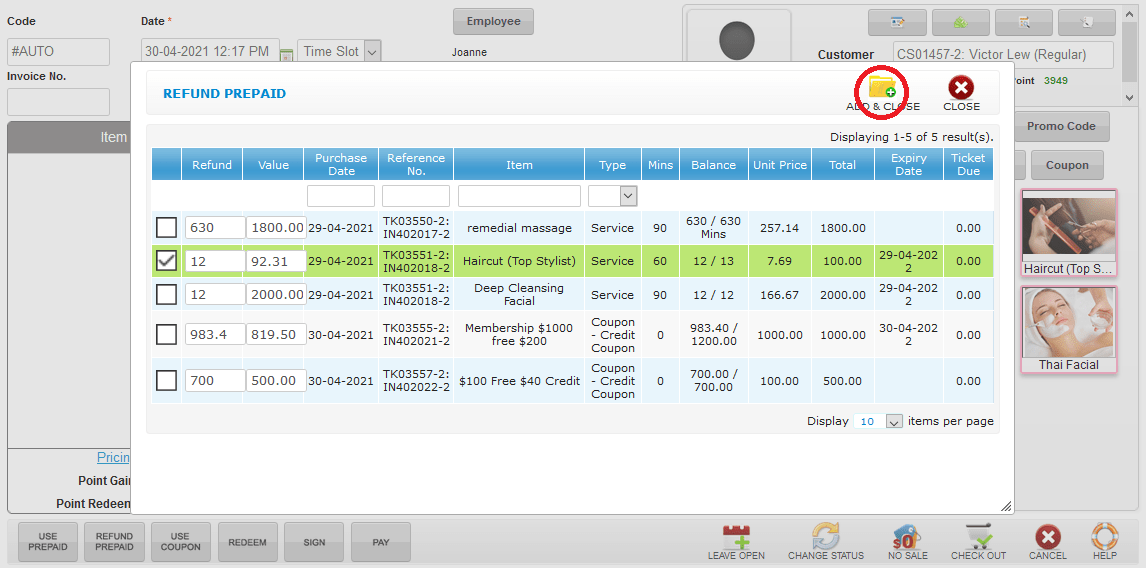 Step 4: Click “CHECK OUT”
 Last update: April 2021
Step 2: Select the prepaid package / prepaid credit want to refund
Step 3: Click “ADD & CLOSE”
Step 4: Click “CHECK OUT”
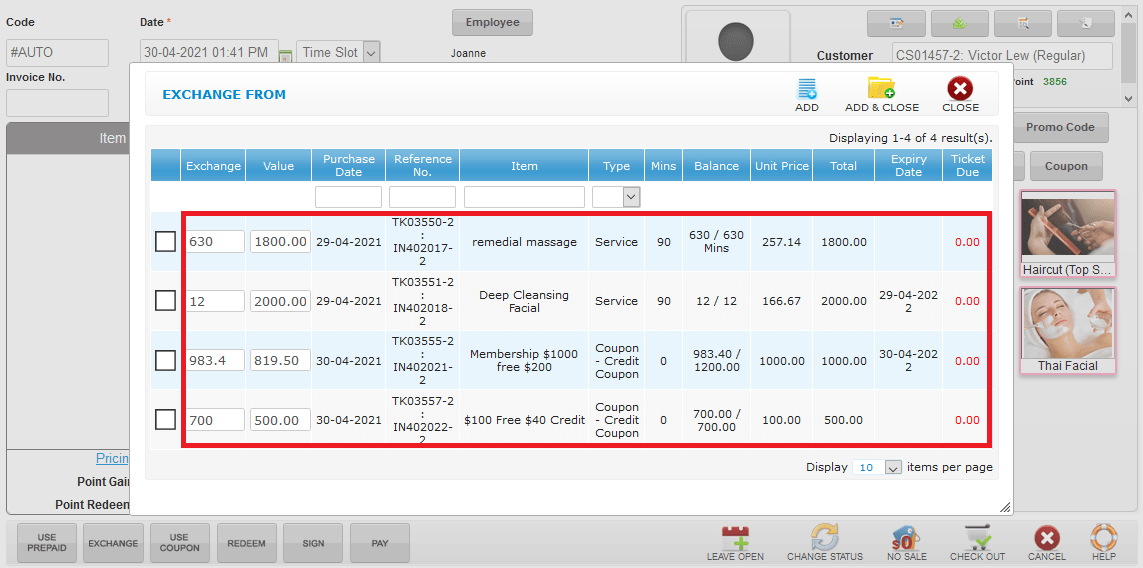
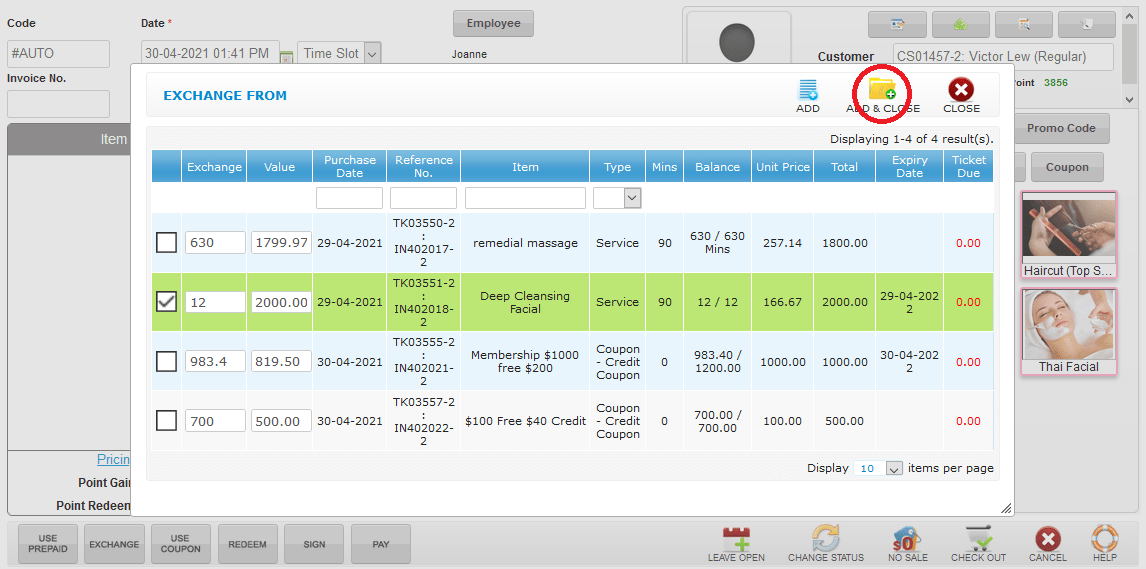
Last update: April 2021Step 1: Click “EXCHANGE”
 Step 2: Select the prepaid package / prepaid credit want to exchange
 Step 3: Click “ADD & CLOSE”
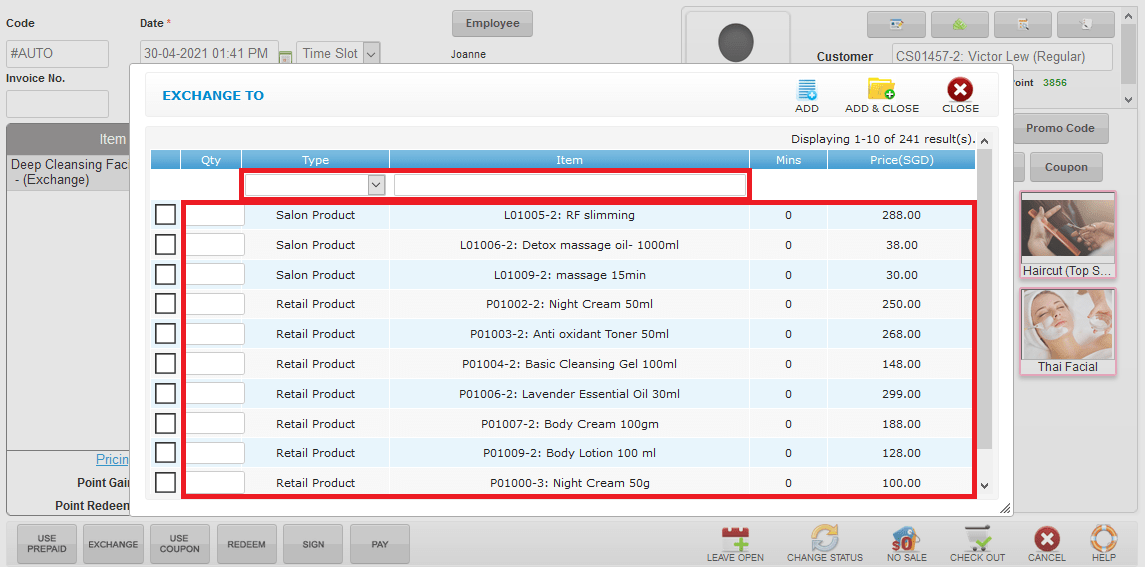
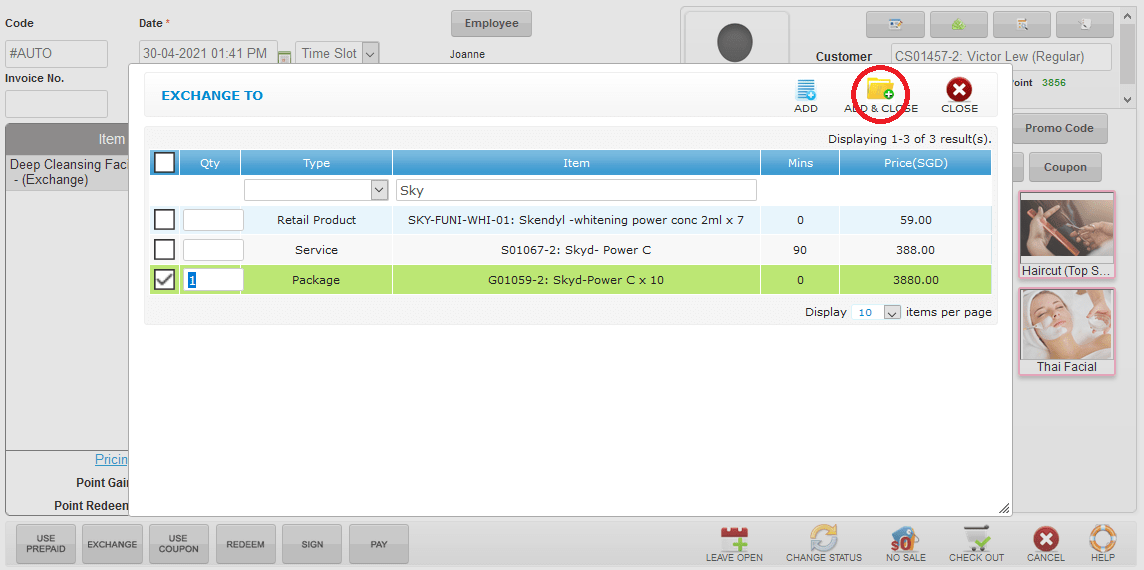
 Step 4: Search the item by item name / type / section / category and select the item want to exchange
 Step 5: Click “ADD & CLOSE”
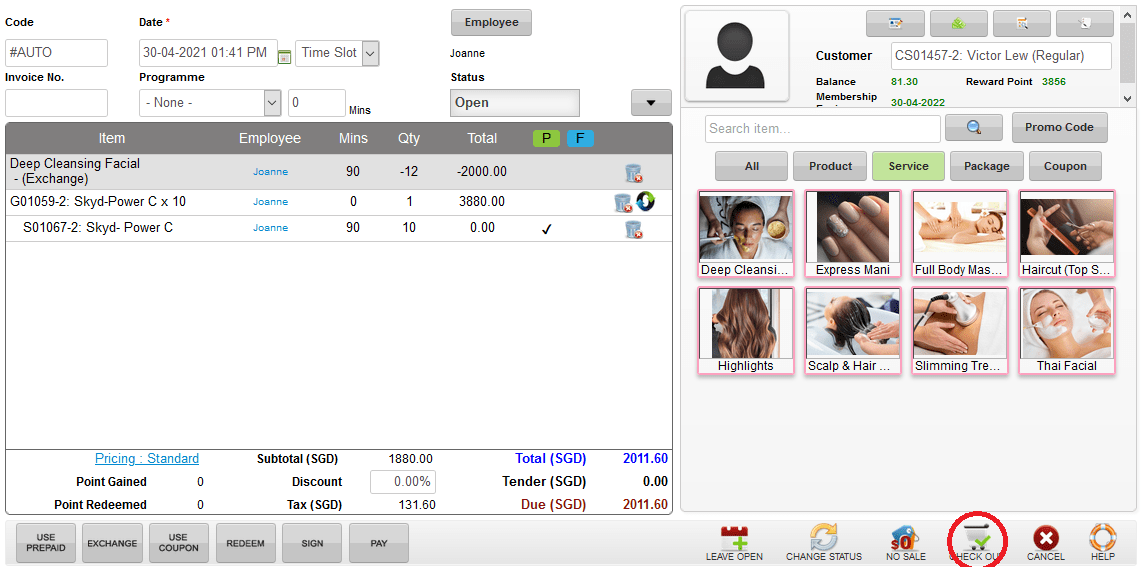
 Step 6: Click “CHECK OUT”
 Last update: April 2021
Step 2: Select the prepaid package / prepaid credit want to exchange
Step 3: Click “ADD & CLOSE”
Step 4: Search the item by item name / type / section / category and select the item want to exchange
Step 5: Click “ADD & CLOSE”
Step 6: Click “CHECK OUT”
Last update: April 2021Step 1: Click “EMAIL”
 Step 2: You can make the changes if needed
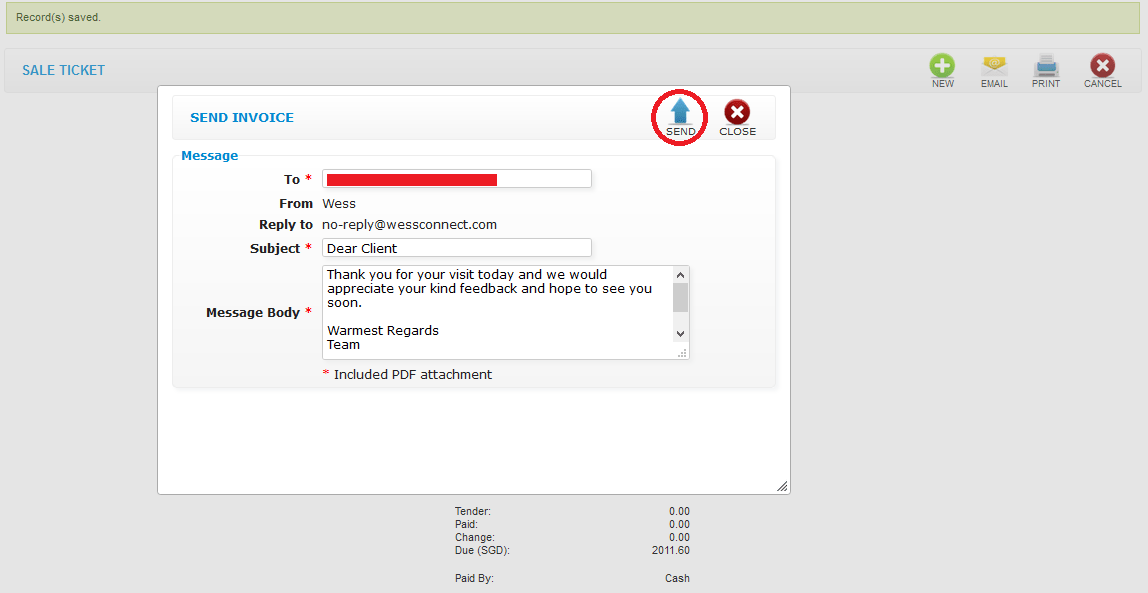
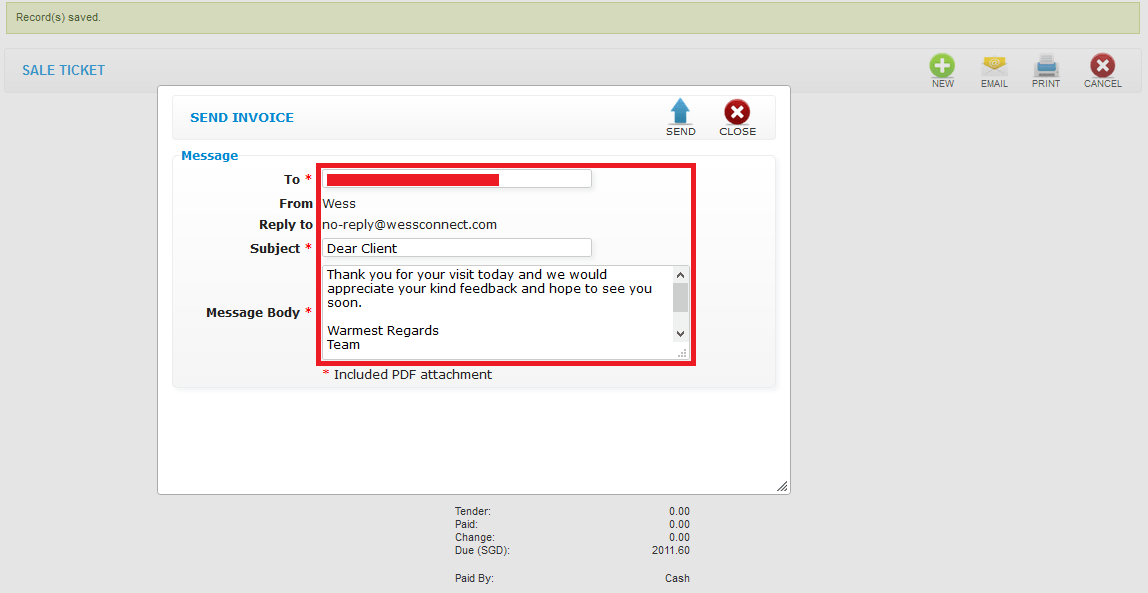 Step 3: Click “SEND” to send
 Last update: April 2021
Step 2: You can make the changes if needed
Step 3: Click “SEND” to send
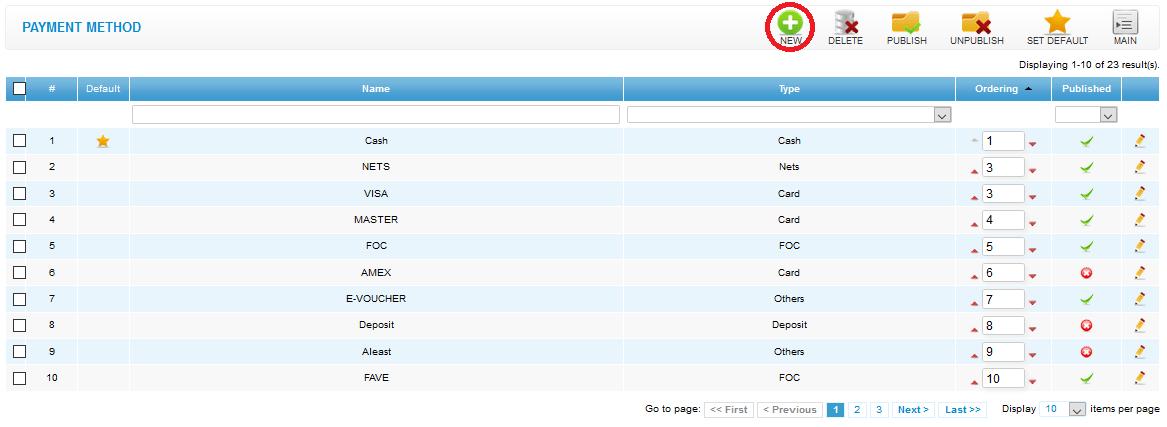
Last update: April 2021Step 1: Click “SETTING”
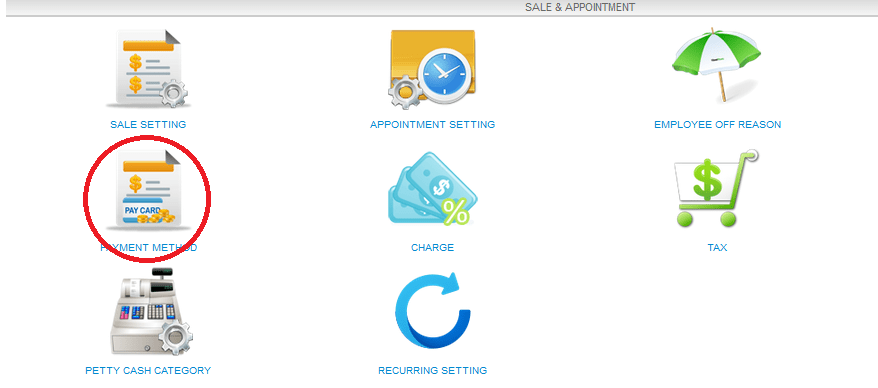
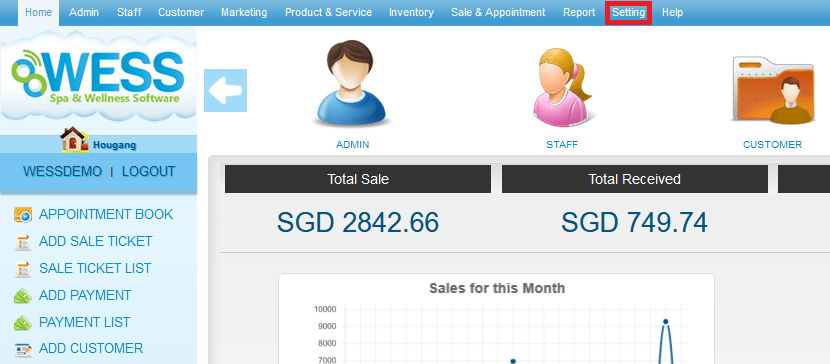 Step 2: Click “PAYMENT METHOD”
 Step 3: Click “NEW”
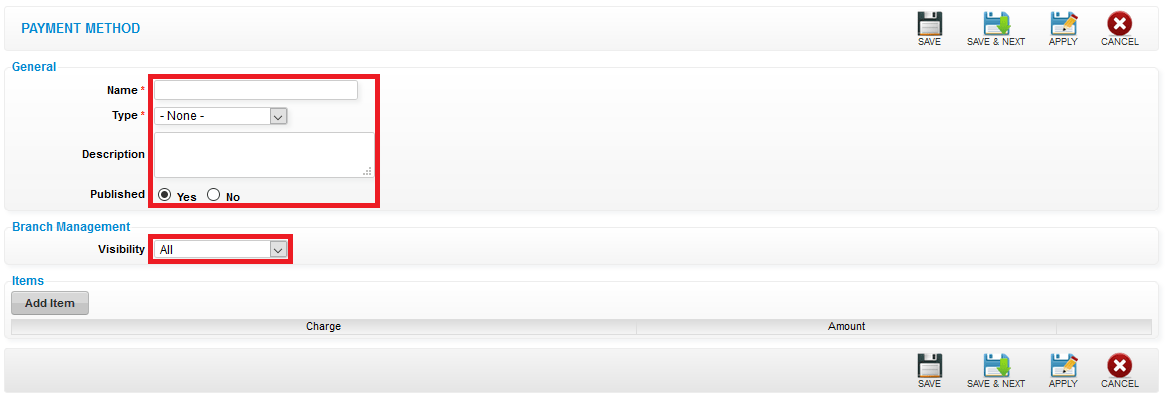
 Step 4: Fill in payment method details
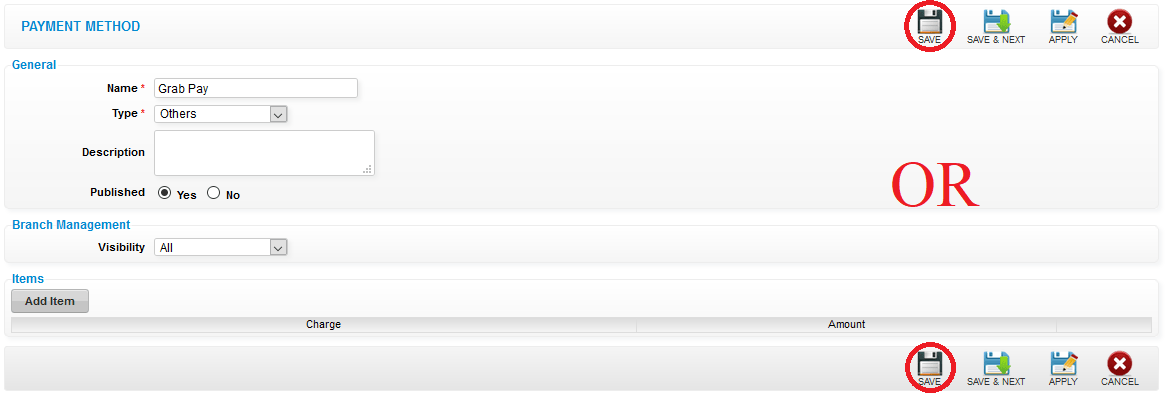
 Step 5: Click “SAVE”
 Last update: April 2021
Step 2: Click “PAYMENT METHOD”
Step 3: Click “NEW”
Step 4: Fill in payment method details
Step 5: Click “SAVE”
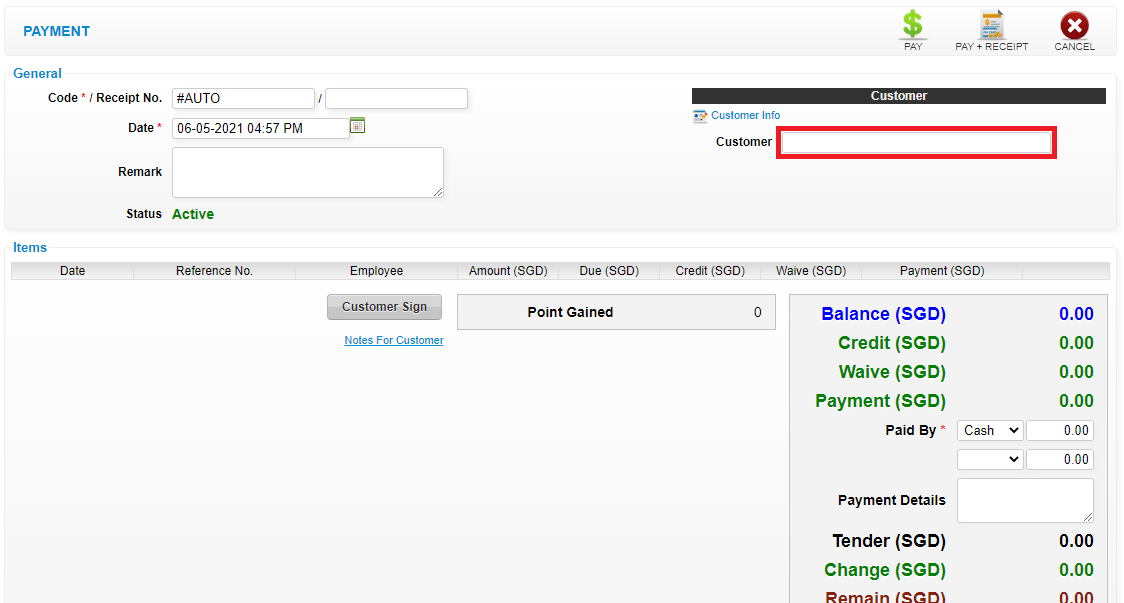
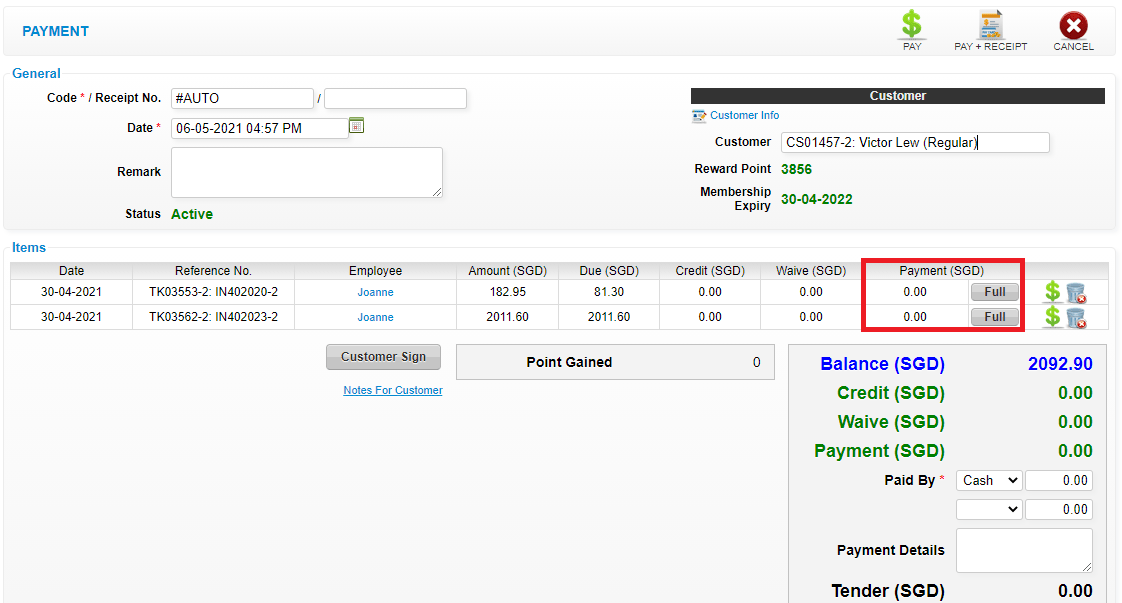
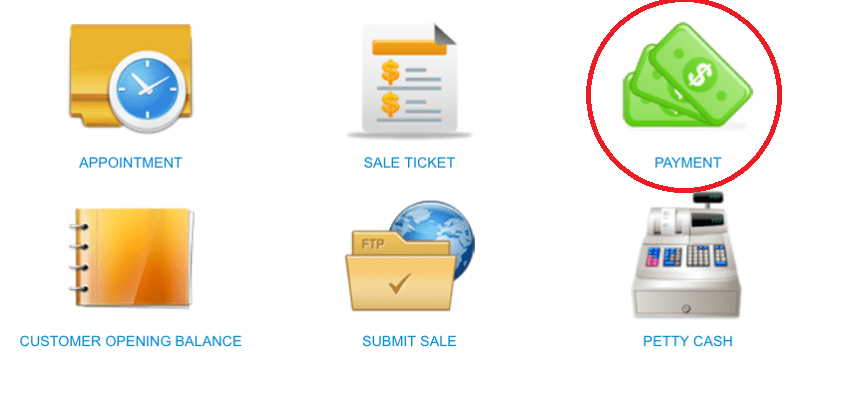
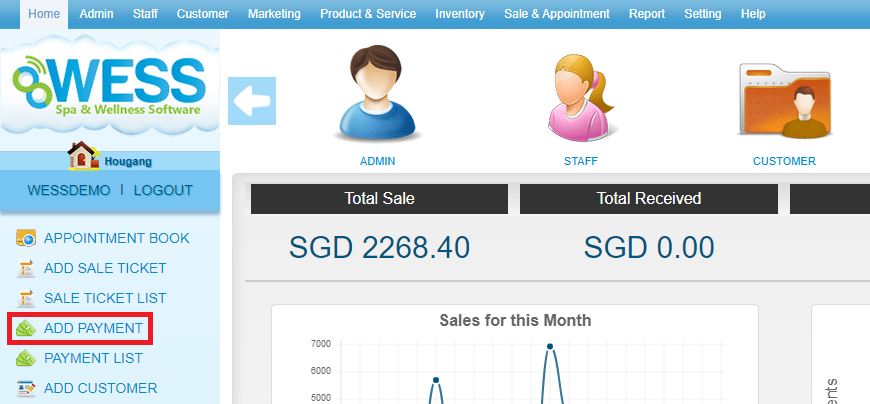
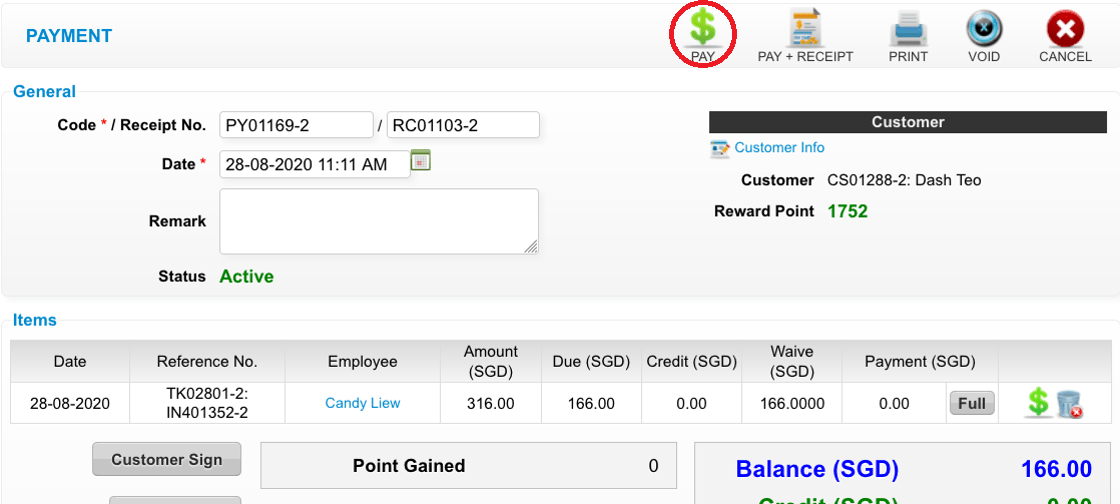
Last update: April 2021Step 1: Click “ADD PAYMENT”
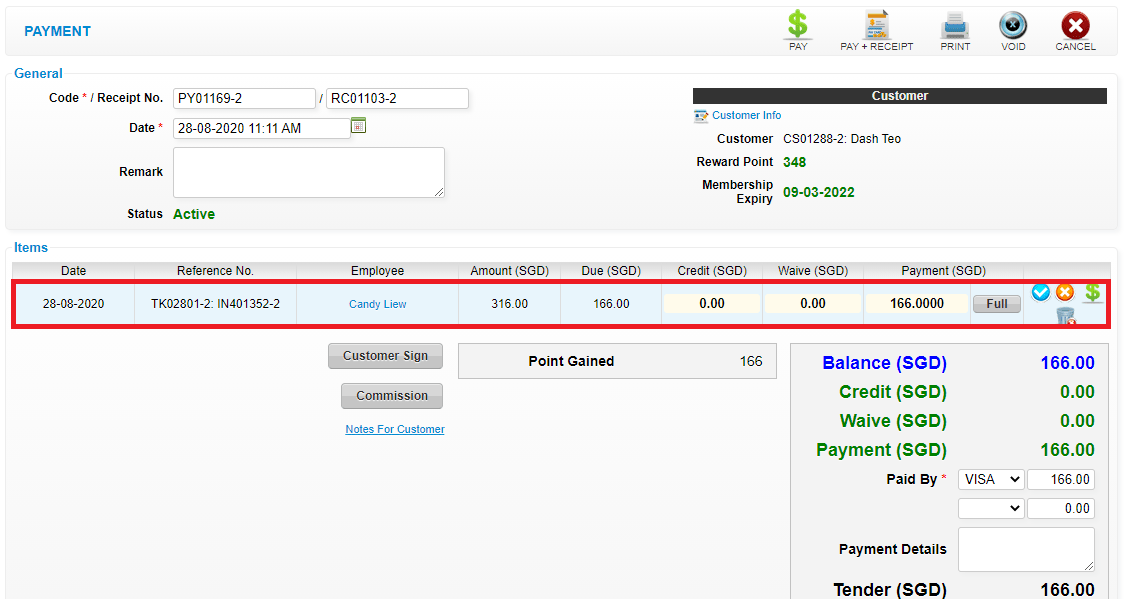
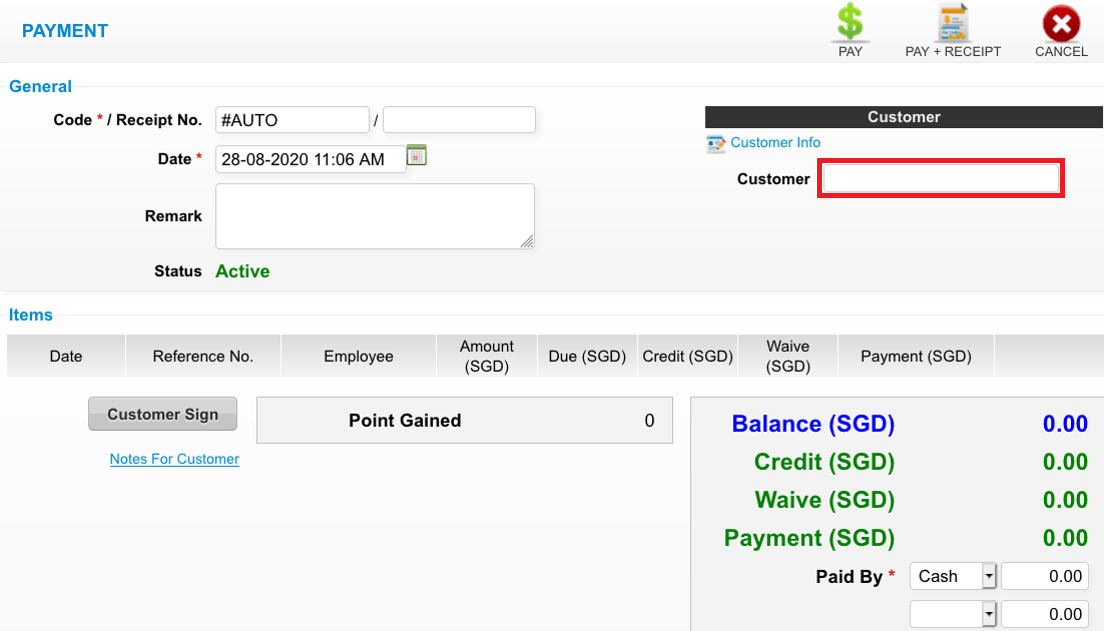
 Step 2: Enter the customer name
 Step 3: Select the item customer want to pay for, click “PAYMENT(SGD)” to enter the payment amount
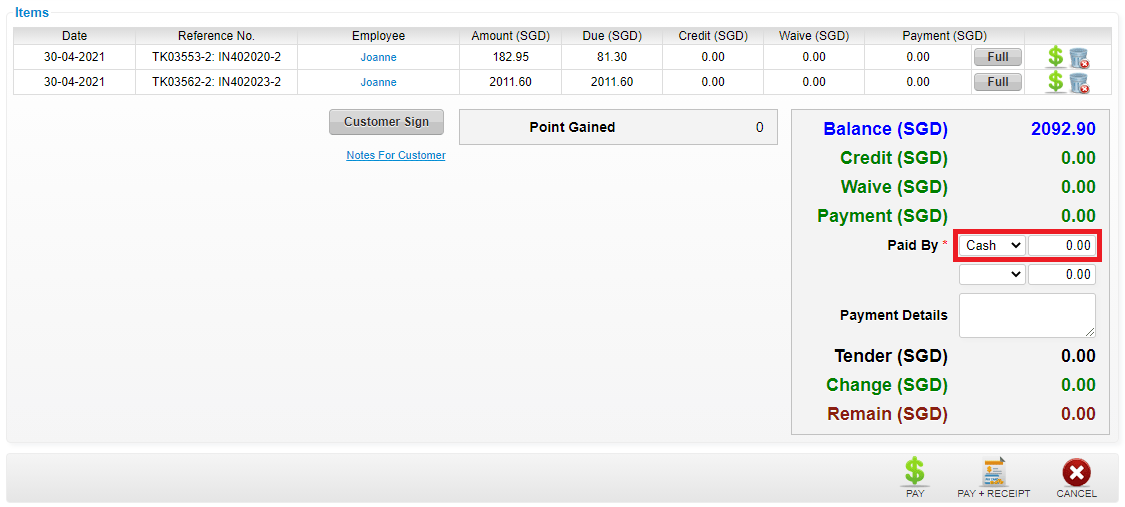
 Step 4: Click and select the payment method and enter the pay amount
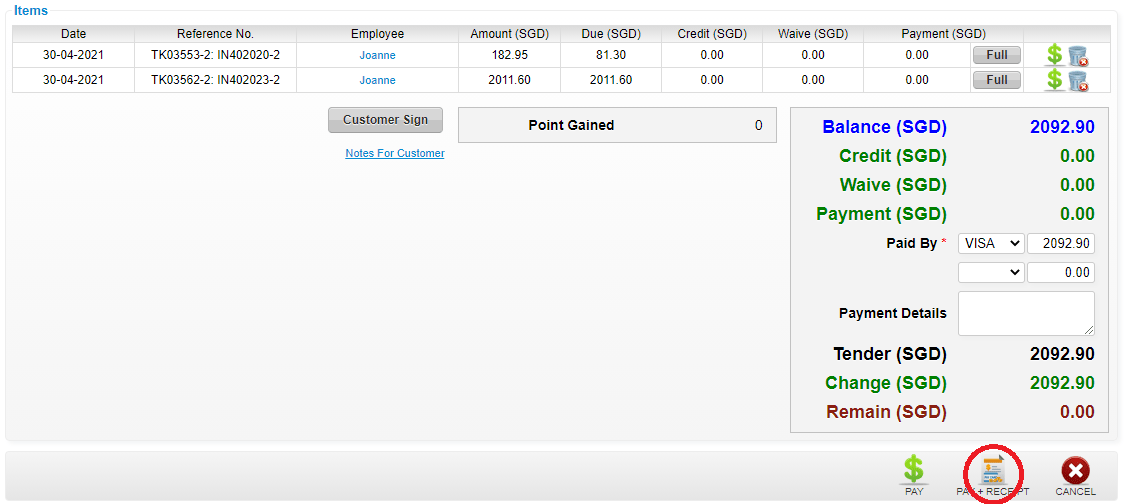
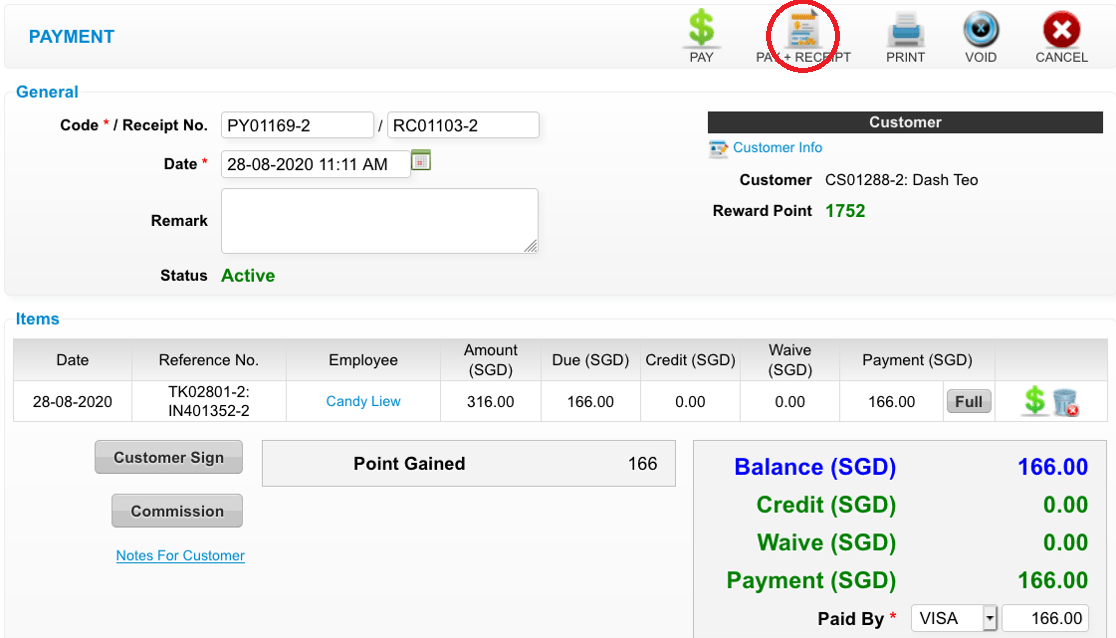
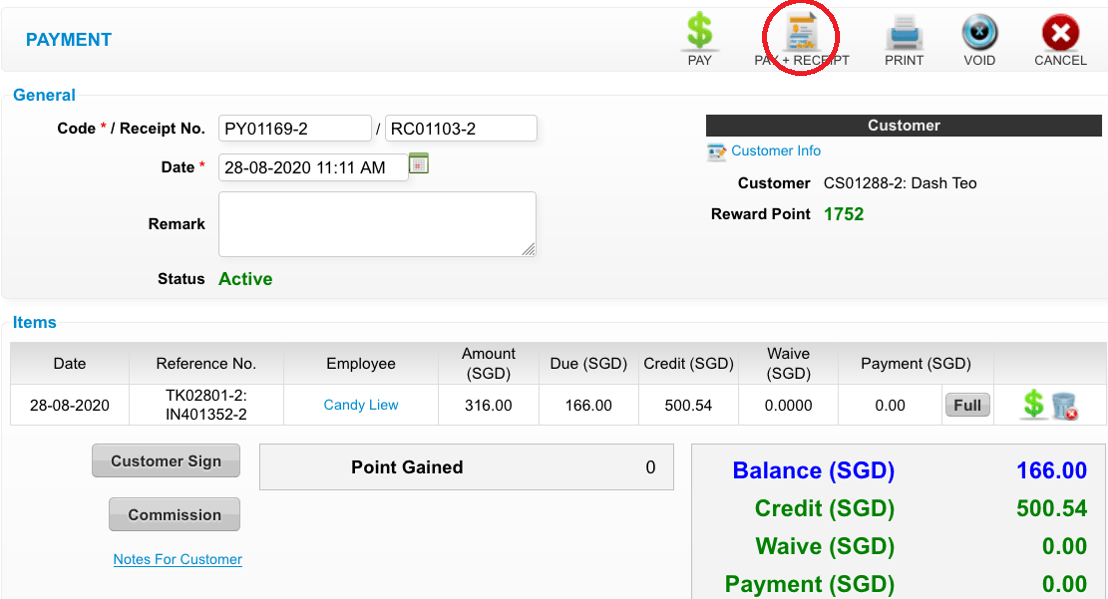
 Step 5: Click “PAY + RECEIPT”
 Last update: April 2021
Step 2: Enter the customer name
Step 3: Select the item customer want to pay for, click “PAYMENT(SGD)” to enter the payment amount
Step 4: Click and select the payment method and enter the pay amount
Step 5: Click “PAY + RECEIPT”
Last update: April 2021Top right corner (Sale Ticket Page)
 Last update: April 2021
Last update: April 2021Step 1: Click “SALE & APPOINTMENT”
 Step 2: Click “PAYMENT”
 Step 3: Select the payment record
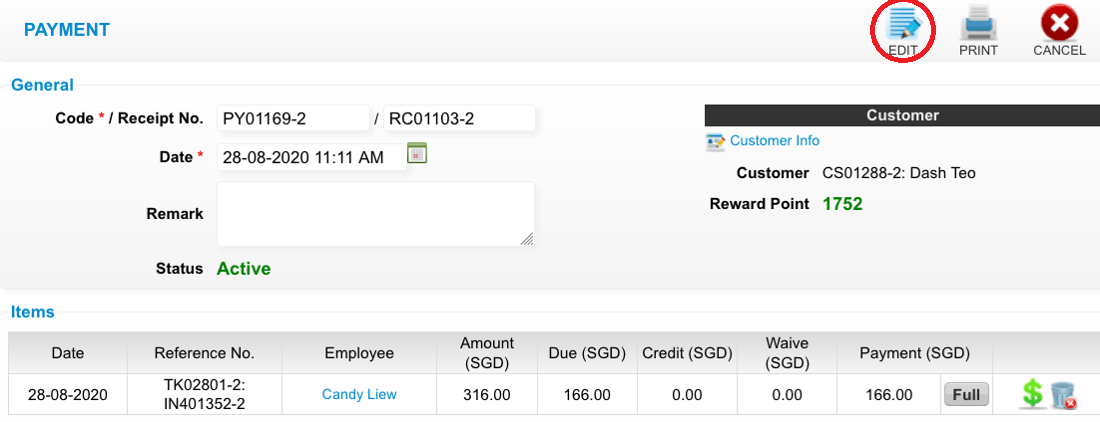
 Step 4: Click “EDIT”
 Step 5: You can make the changes if needed
 Step 6: Click “PAY + RECEIPT”
 Last update: April 2021
Step 2: Click “PAYMENT”
Step 3: Select the payment record
Step 4: Click “EDIT”
Step 5: You can make the changes if needed
Step 6: Click “PAY + RECEIPT”
Last update: April 2021Step 1: Click “SALE & APPOINTMENT”
 Step 2: Click “PAYMENT”
 Step 3: Select the payment record
 Step 4: Click “EDIT”
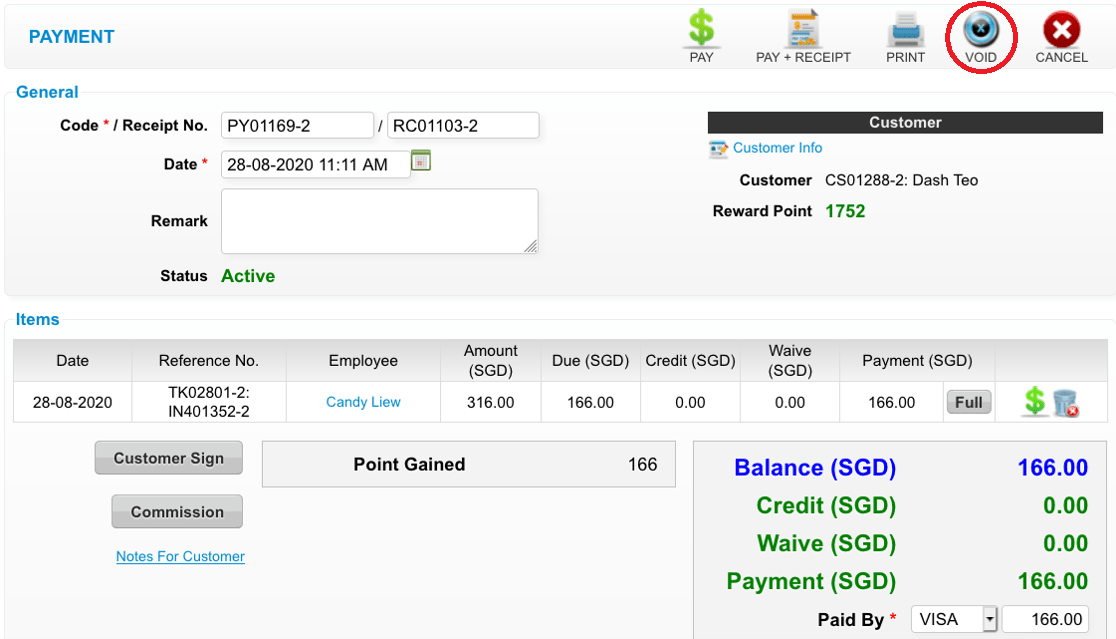
 Step 5: Click “VOID”
 Last update: April 2021
Step 2: Click “PAYMENT”
Step 3: Select the payment record
Step 4: Click “EDIT”
Step 5: Click “VOID”
Last update: April 2021Step 1: Click “ADD PAYMENT”
 Step 2: Enter the customer name
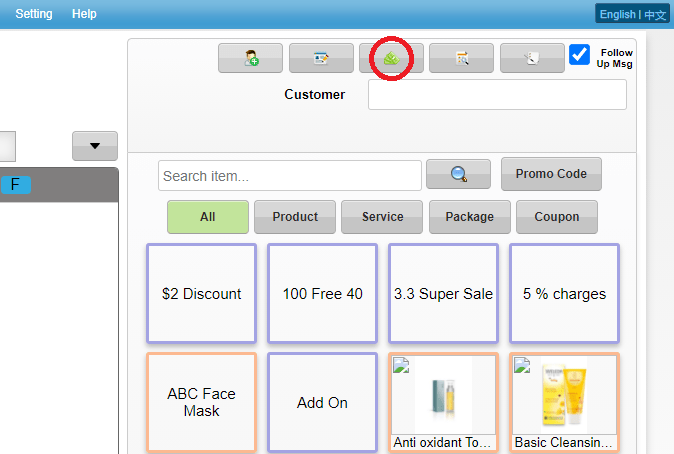
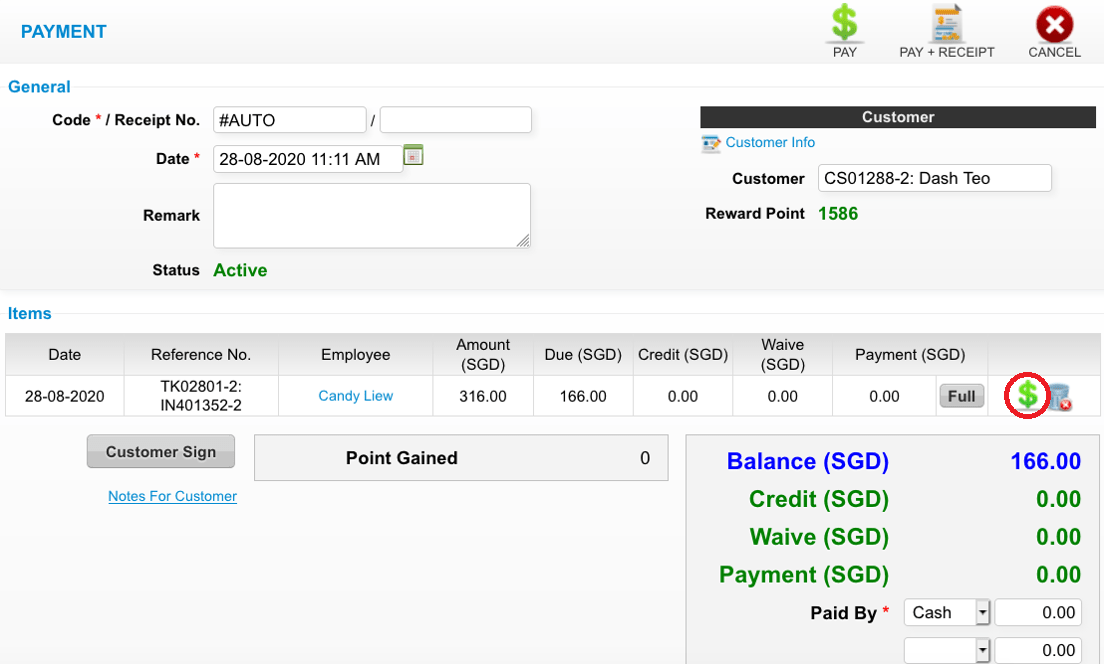
 Step 3: Click “💲”
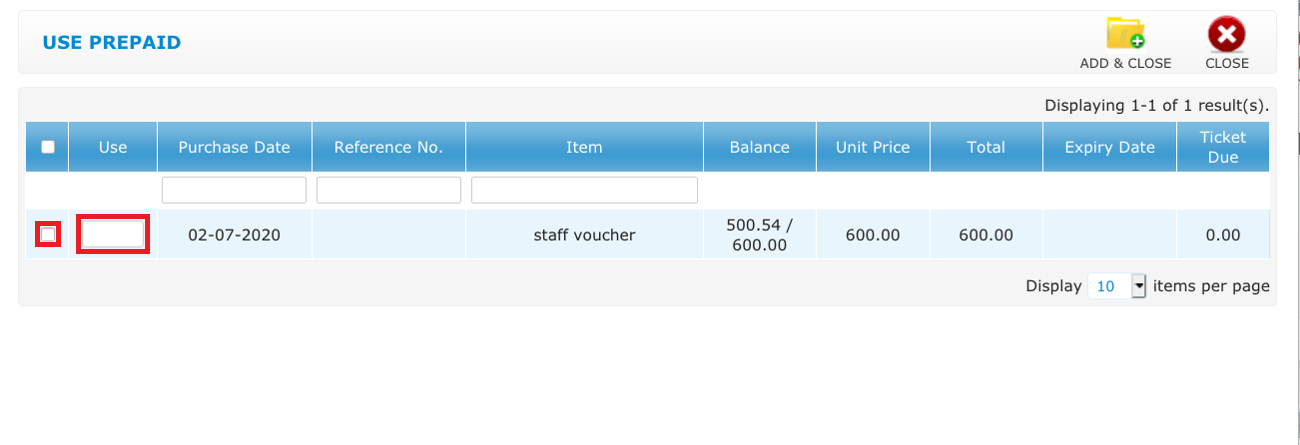
 Step 4: Tick and enter the credit amount
 Step 5: Click “ADD & CLOSE”
 Step 6: Click “PAY + RECEIPT”
 Last update: April 2021
Step 2: Enter the customer name
Step 3: Click “💲”
Step 4: Tick and enter the credit amount
Step 5: Click “ADD & CLOSE”
Step 6: Click “PAY + RECEIPT”
Last update: April 2021Step 1: Click “ADD PAYMENT”
 Step 2: Enter the customer name
 Step 3: Click and enter the waive amount
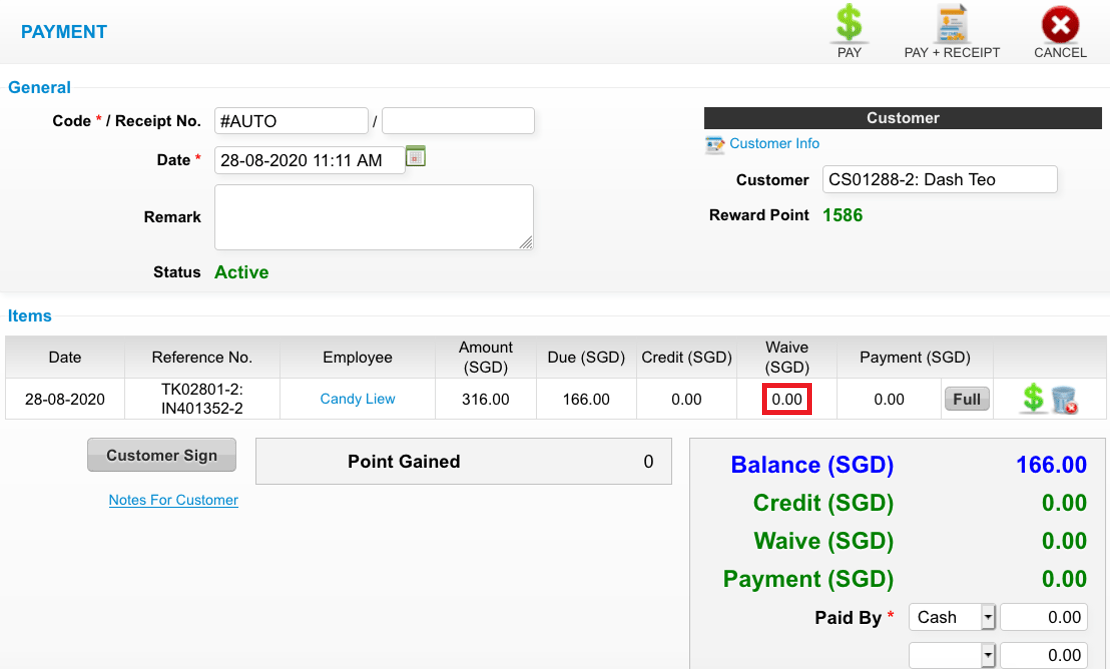 Step 4: Click “PAY”
 Last update: April 2021
Step 2: Enter the customer name
Step 3: Click and enter the waive amount
Step 4: Click “PAY”
Last update: April 2021Step 1: Click “SALE & APPOINTMENT”
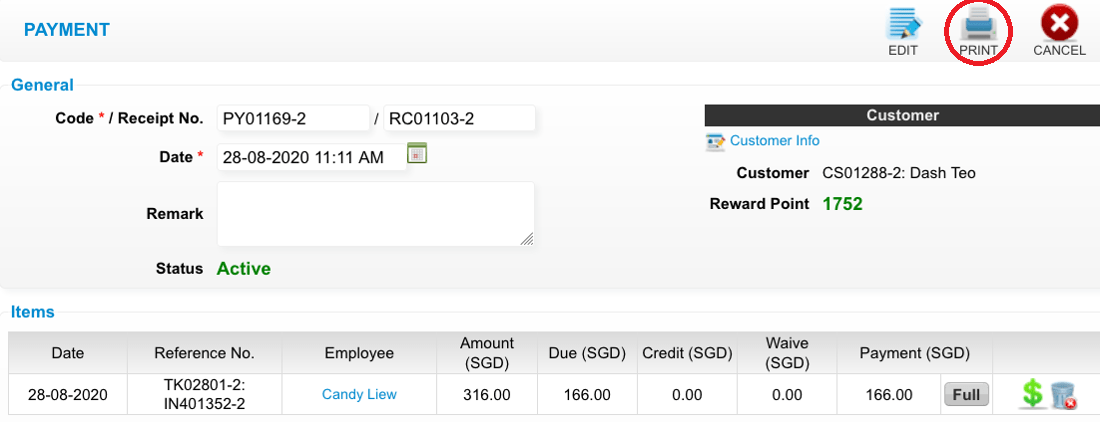
Step 2: Click “PAYMENT”
Step 3: Select the payment record
Step 4: Click “PRINT” to reprint
 Last update: April 2021
Step 2: Click “PAYMENT”
Step 3: Select the payment record
Step 4: Click “PRINT” to reprint
Last update: April 2021Step 1: Click “SALE & APPOINTMENT”
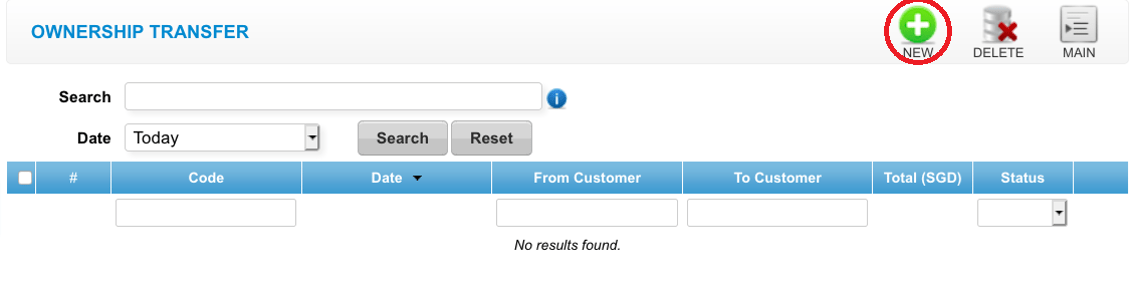
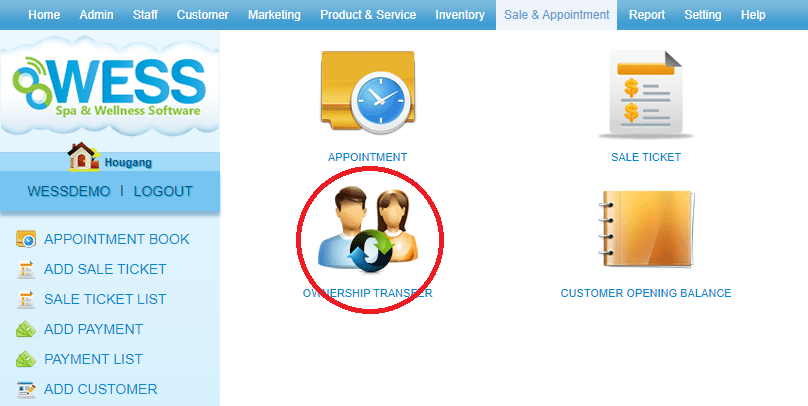
 Step 2: Click “OWNERSHIP TRANSFER”
 Step 3: Click “NEW”
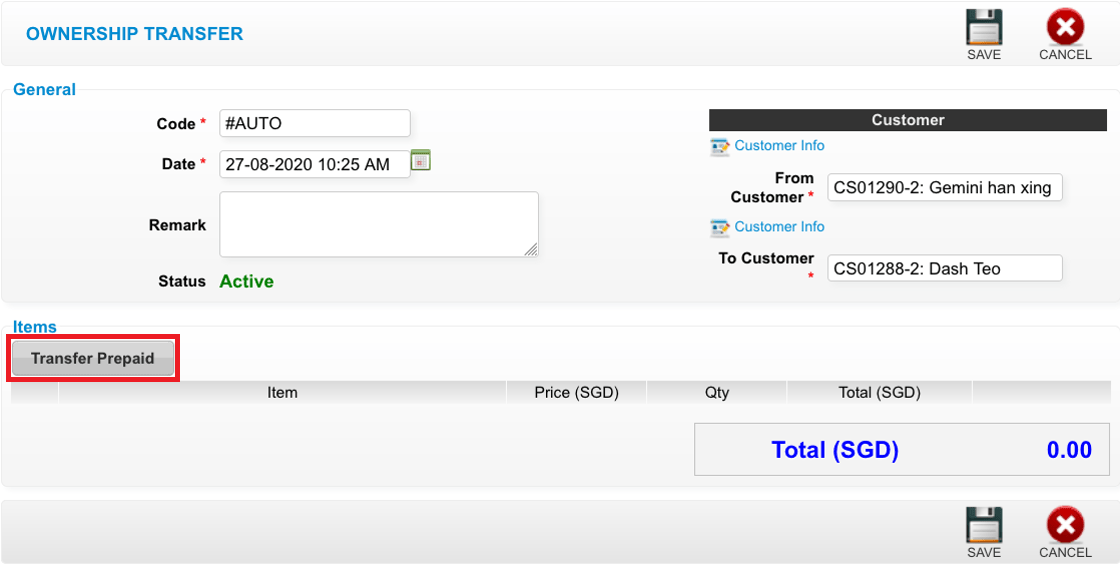
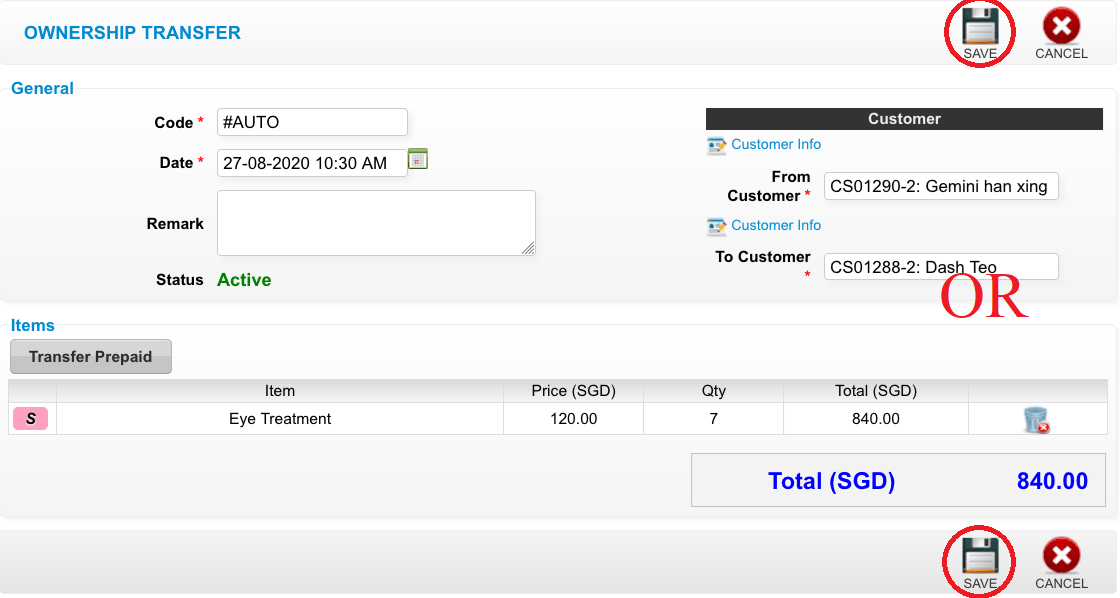
 Step 4: Enter the customer name
 Step 5: Click “TRANSFER PREPAID”
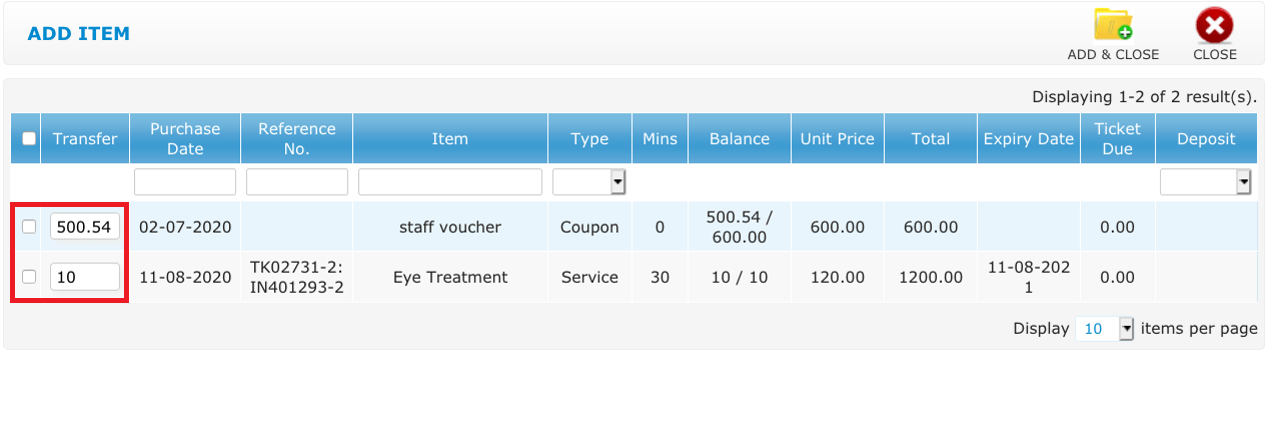
 Step 6: Tick and enter the quantity that want to transfer
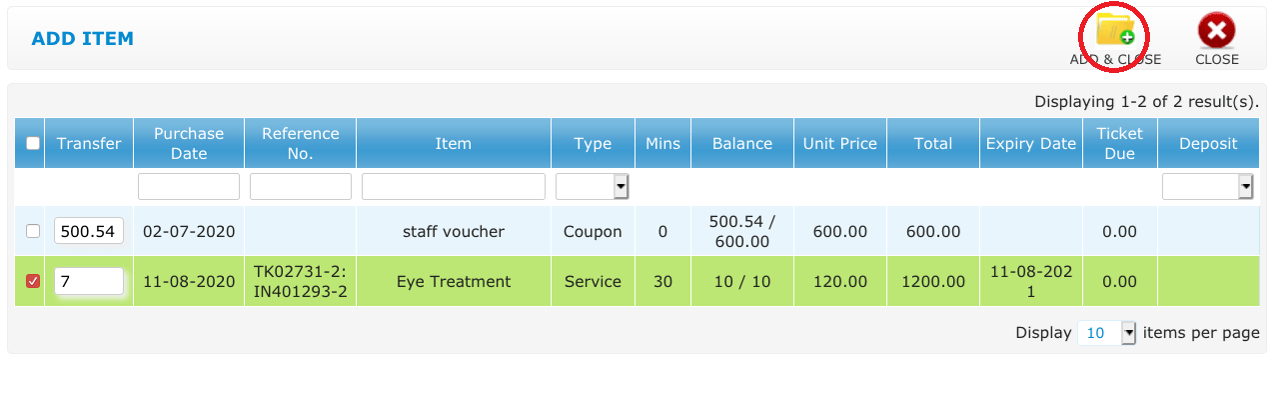
 Step 7: Click “ADD & CLOSE”
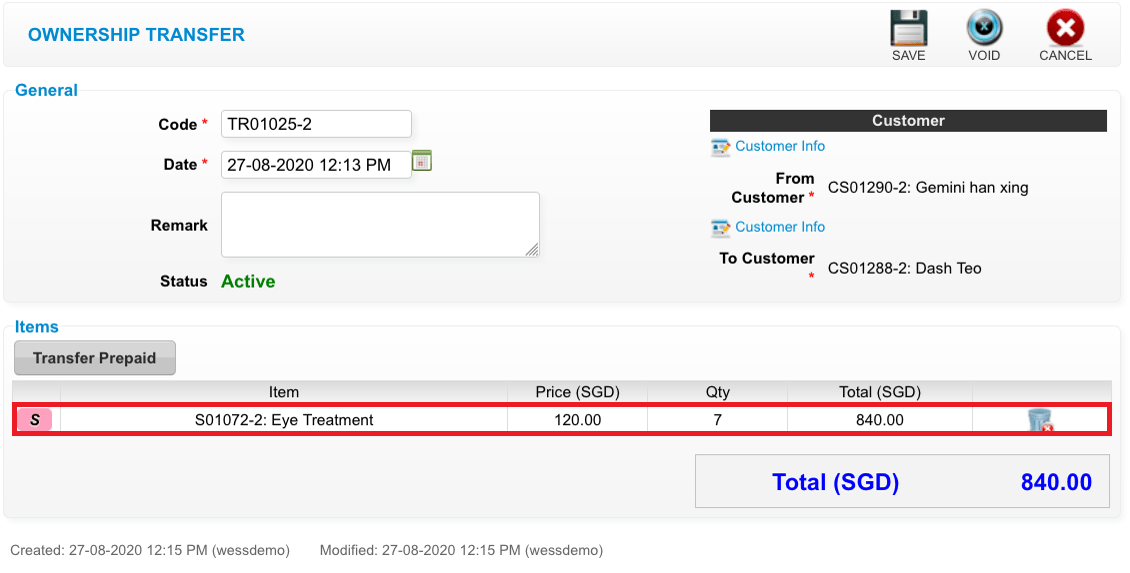
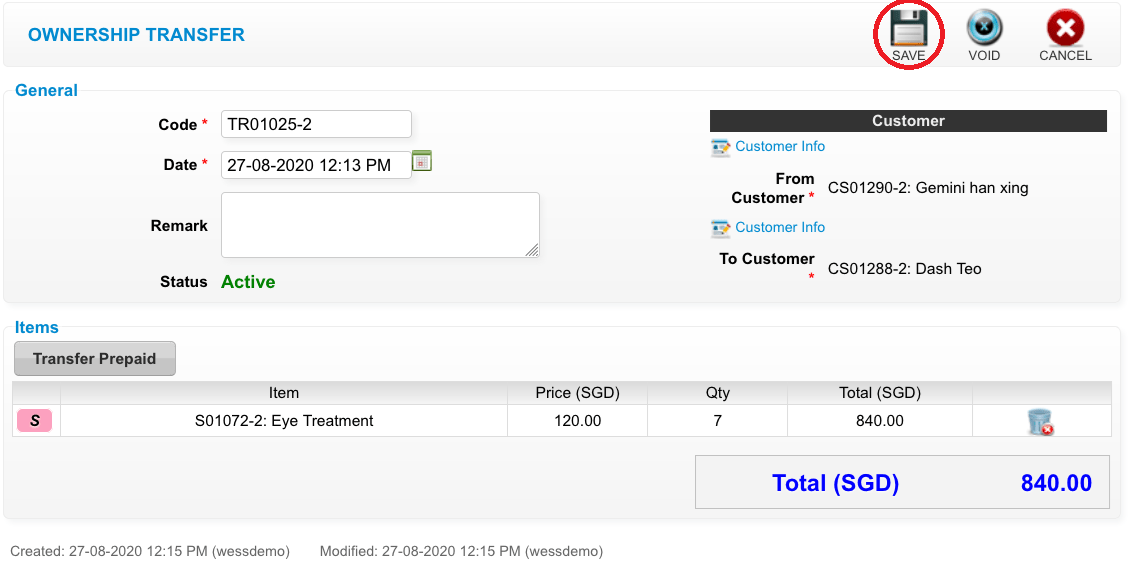
 Step 8: Click “SAVE”
 Last update: April 2021
Step 2: Click “OWNERSHIP TRANSFER”
Step 3: Click “NEW”
Step 4: Enter the customer name
Step 5: Click “TRANSFER PREPAID”
Step 6: Tick and enter the quantity that want to transfer
Step 7: Click “ADD & CLOSE”
Step 8: Click “SAVE”
Last update: April 2021Step 1: Click “SALE APPOINTMENT”
 Step 2: Click “OWNERSHIP TRANSFER”
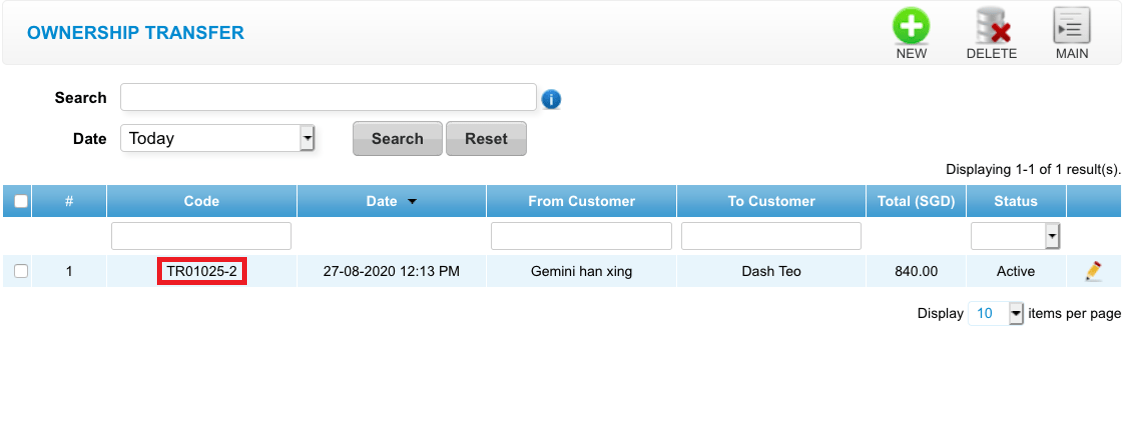
 Step 3: Select the record
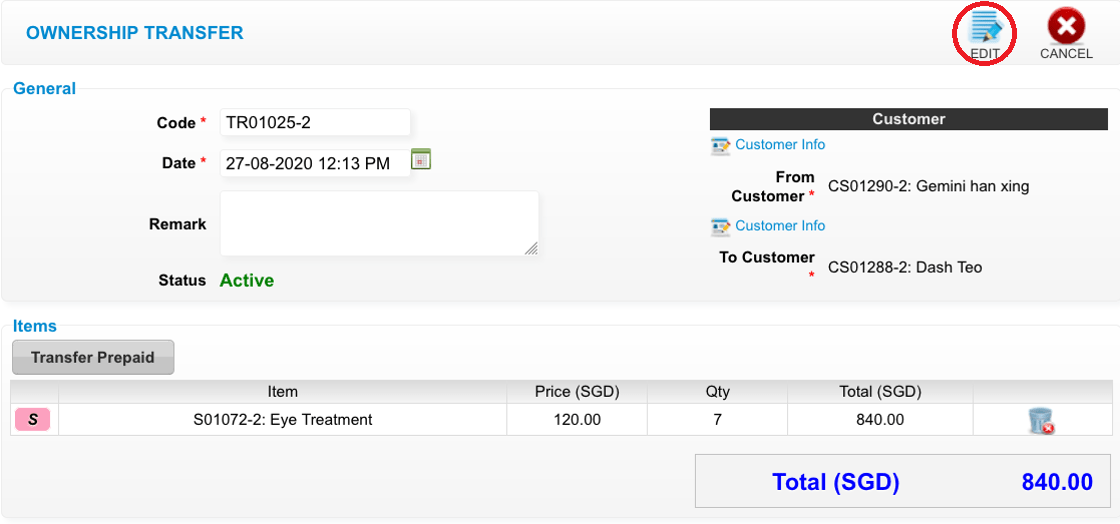
 Step 4: Click “EDIT”
 Step 5: You can make the changes if needed
 Step 6: Click “SAVE”
 Last update: April 2021
Step 2: Click “OWNERSHIP TRANSFER”
Step 3: Select the record
Step 4: Click “EDIT”
Step 5: You can make the changes if needed
Step 6: Click “SAVE”
Last update: April 2021Step 1: Click “SALE & APPOINTMENT”
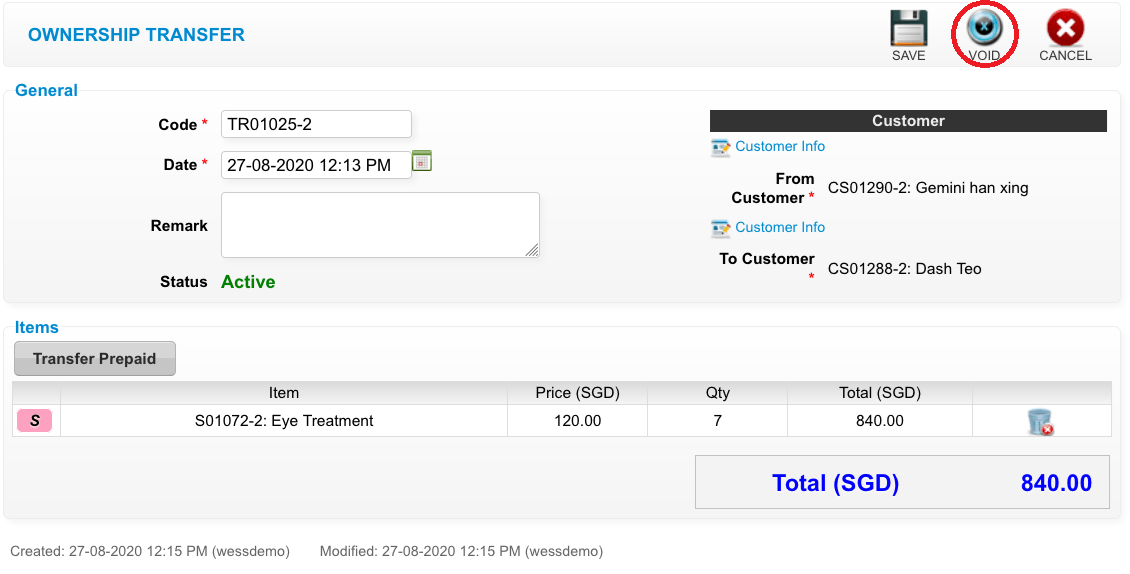
 Step 2: Click “OWNERSHIP TRANSFER”
 Step 3: Select the ownership transfer record
 Step 4: Click “EDIT”
 Step 5: Click “VOID”
 Last update: April 2021
Step 2: Click “OWNERSHIP TRANSFER”
Step 3: Select the ownership transfer record
Step 4: Click “EDIT”
Step 5: Click “VOID”
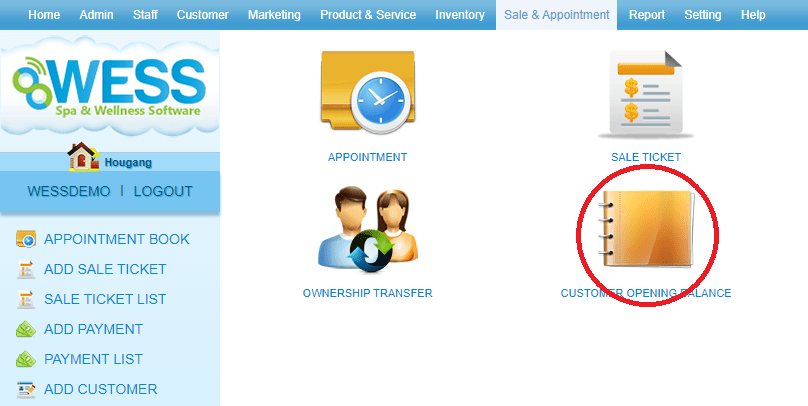
Last update: April 2021Step 1: Click “SALE & APPOINTMENT”
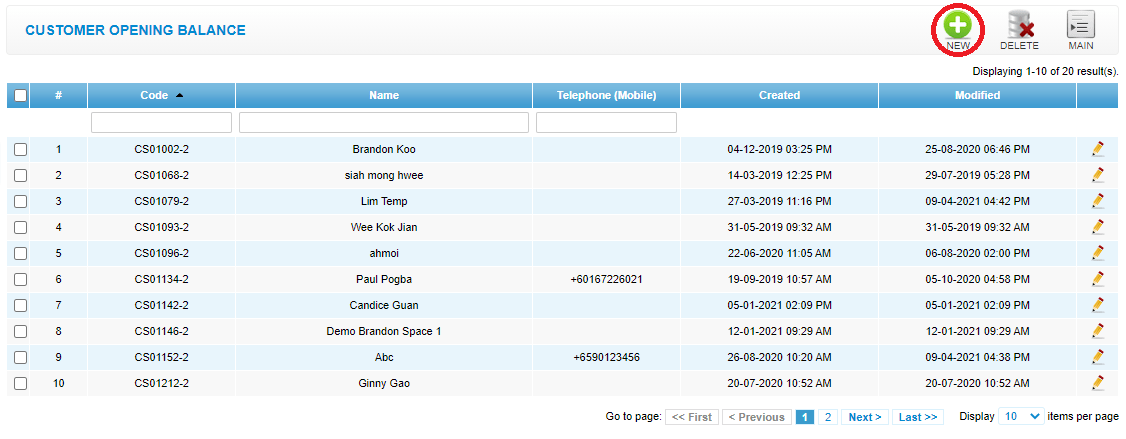
 Step 2: Click “CUSTOMER OPENING BALANCE”
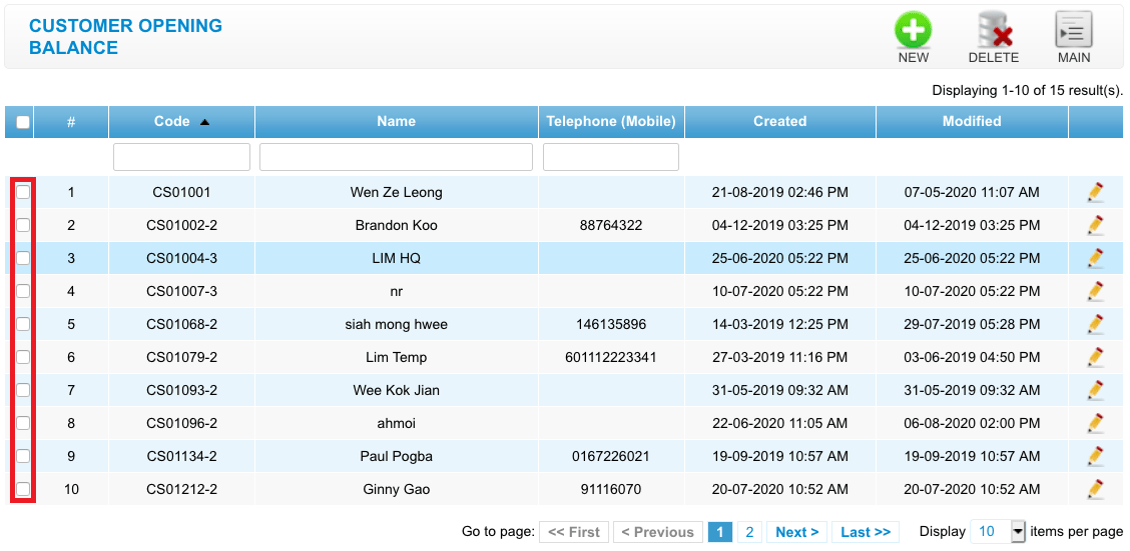
 Step 3: Click “NEW”
 Step 4: Enter the customer name
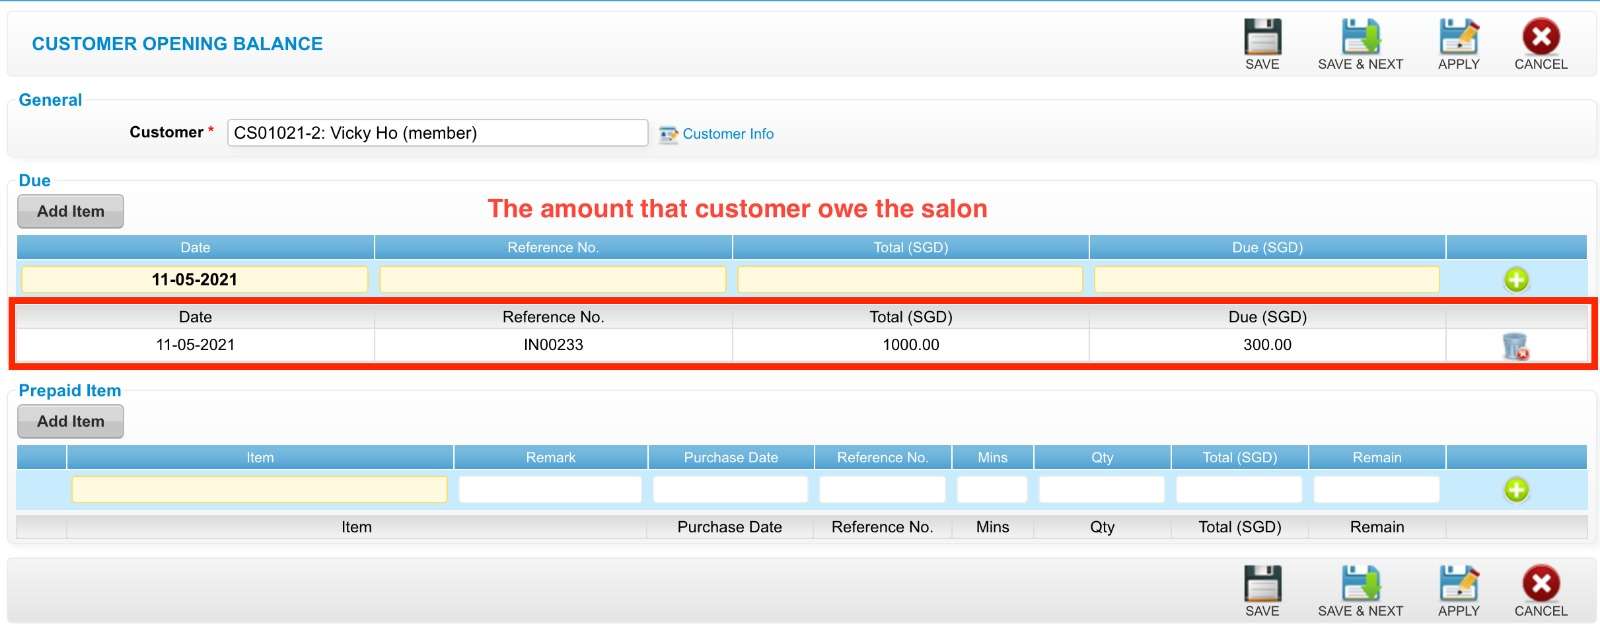
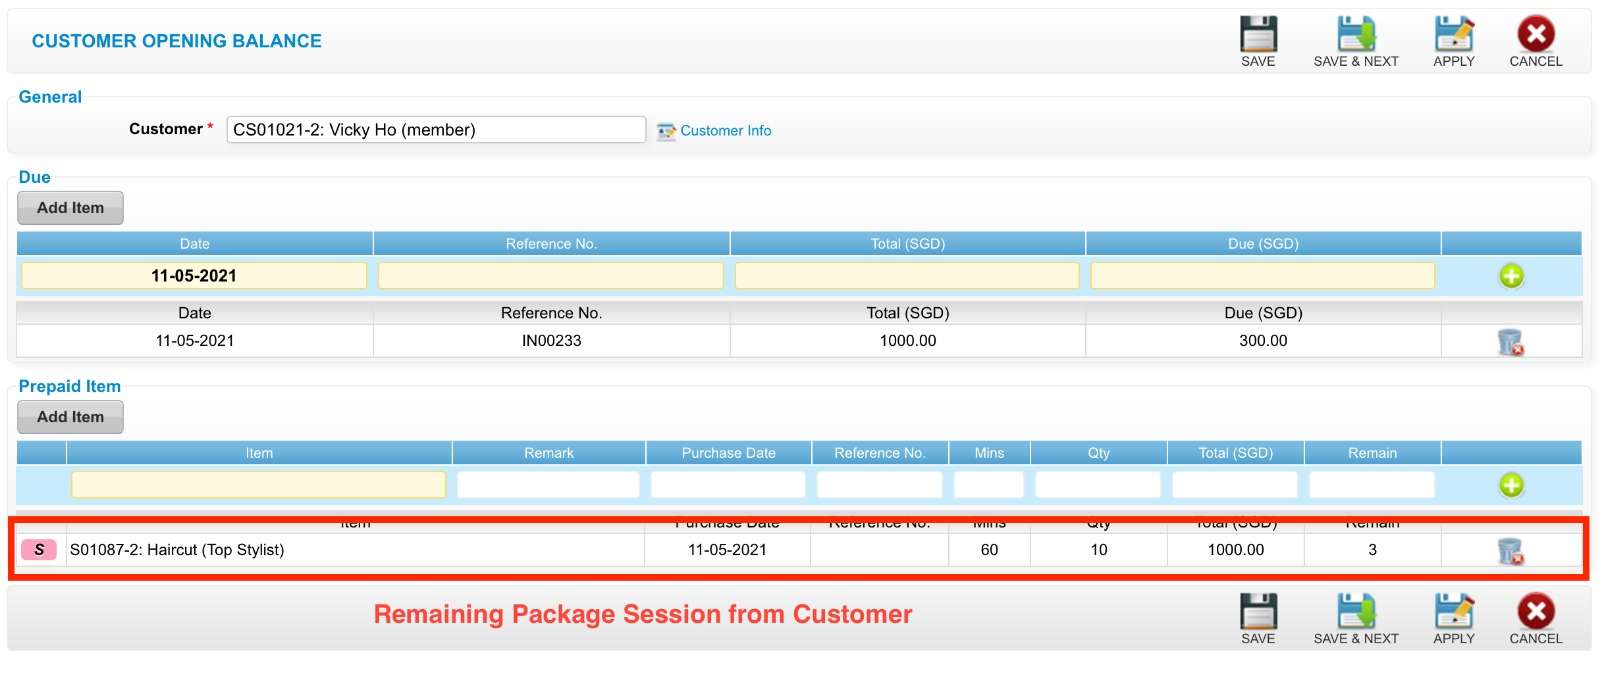
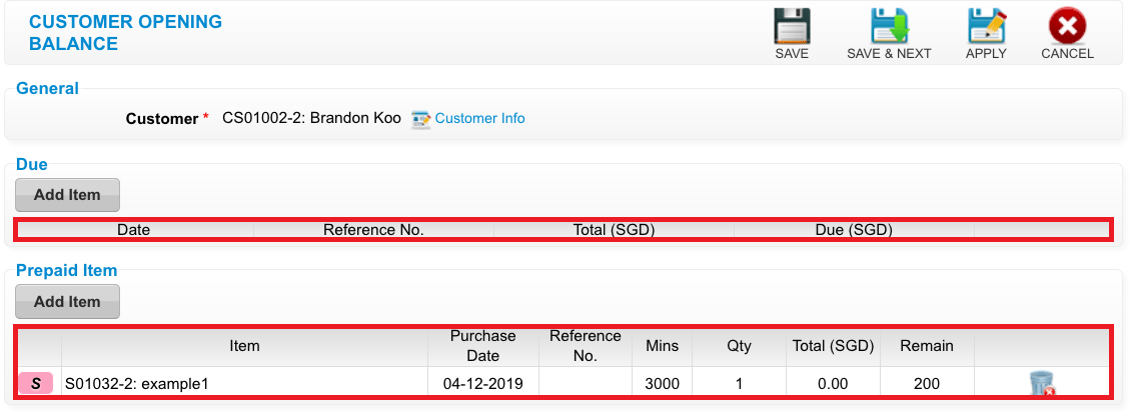
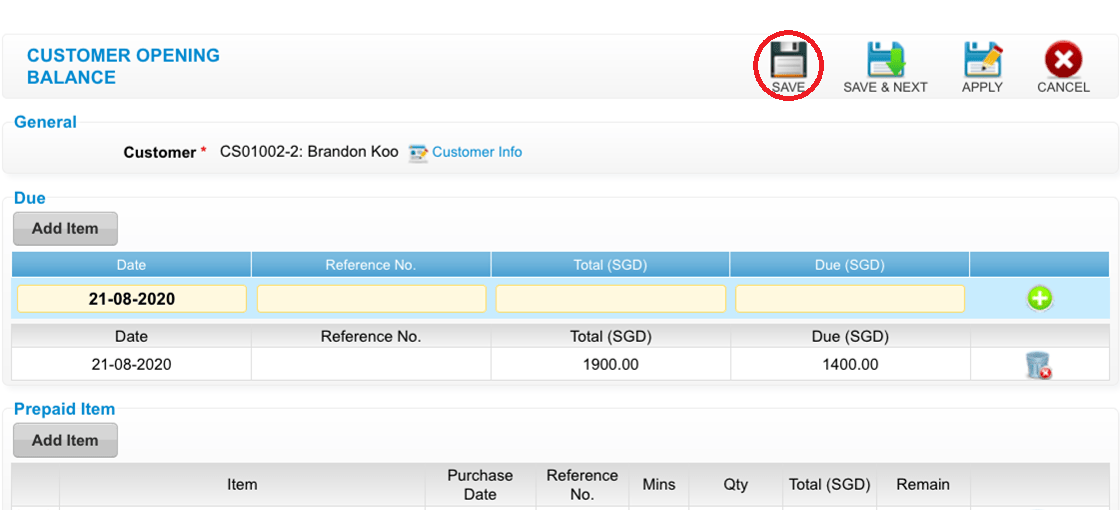
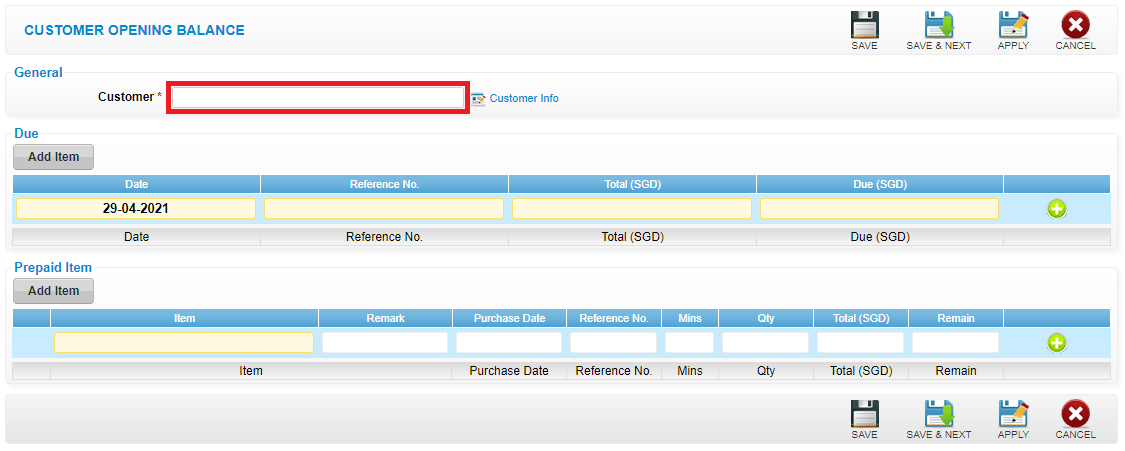 Step 5: Fill in the amount that customer owe the salon
 Step 6: Fill in the remaining package session from customer
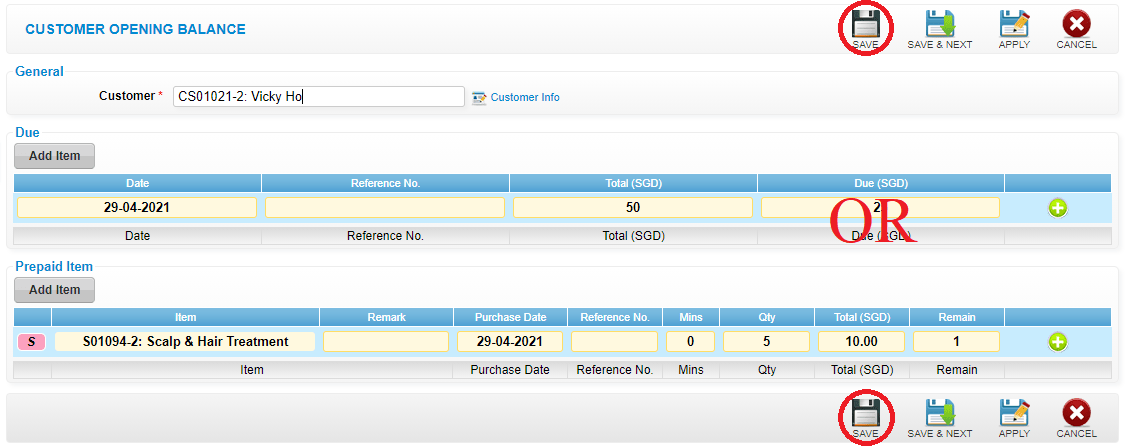
 Step 7: Click “SAVE”
 Last update: April 2021
Step 2: Click “CUSTOMER OPENING BALANCE”
Step 3: Click “NEW”
Step 4: Enter the customer name
Step 5: Fill in the amount that customer owe the salon
Step 6: Fill in the remaining package session from customer
Step 7: Click “SAVE”
Last update: April 2021Step 1: Click “SALE & APPOINTMENT”
 Step 2: Click “CUSTOMER OPENING BALANCE”
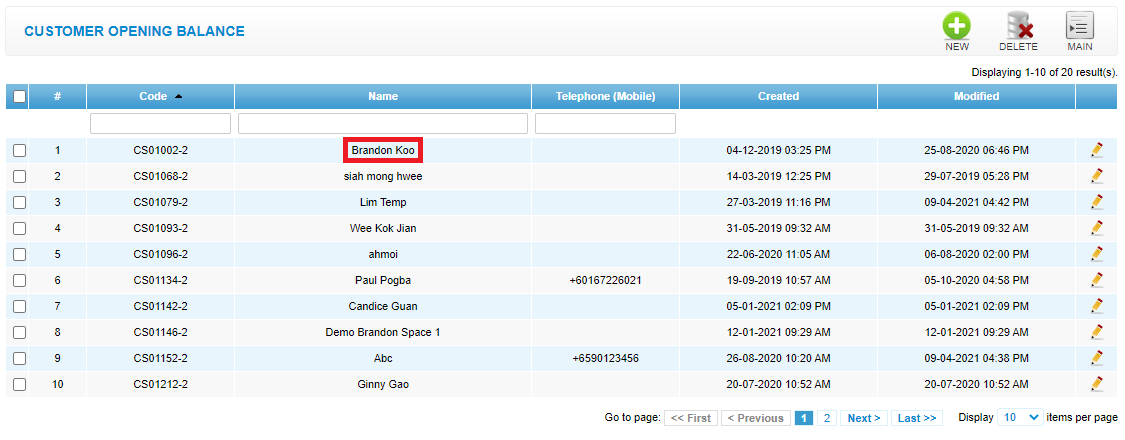
 Step 3: Select the user
 Step 4: Click “EDIT”
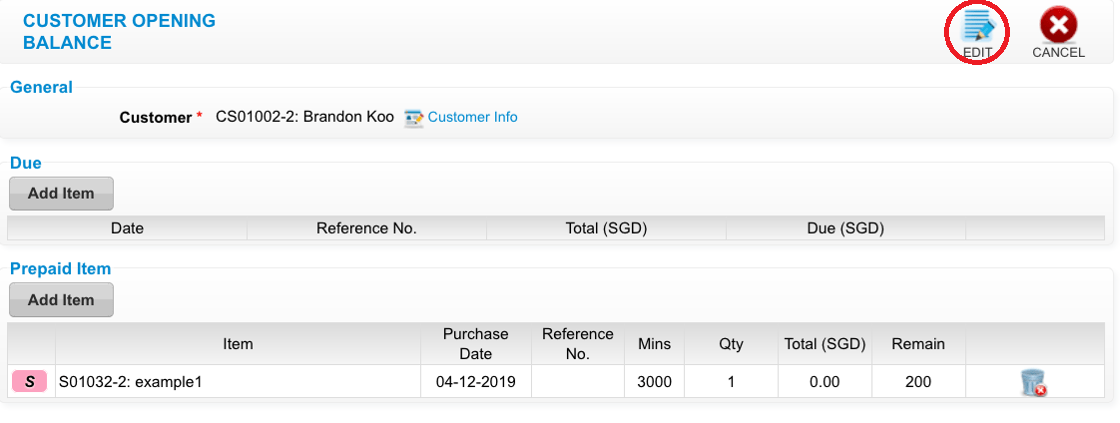 Step 5: You can make the changes if needed
 Step 6: Click “SAVE”
 Last update: April 2021
Step 2: Click “CUSTOMER OPENING BALANCE”
Step 3: Select the user
Step 4: Click “EDIT”
Step 5: You can make the changes if needed
Step 6: Click “SAVE”
Last update: April 2021Step 1: Click “SALE & APPOINTMENT”
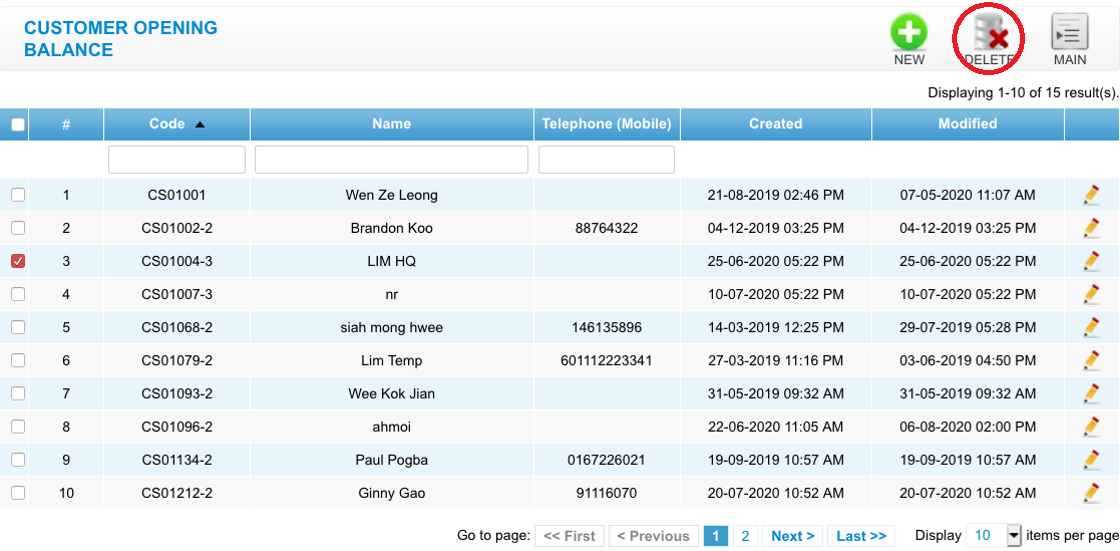
 Step 2: Click “CUSTOMER OPENING BALANCE”
 Step 3: Select the customer opening balance record want to delete
 Step 4: Click “DELETE”
 Last update: April 2021
Step 2: Click “CUSTOMER OPENING BALANCE”
Step 3: Select the customer opening balance record want to delete
Step 4: Click “DELETE”
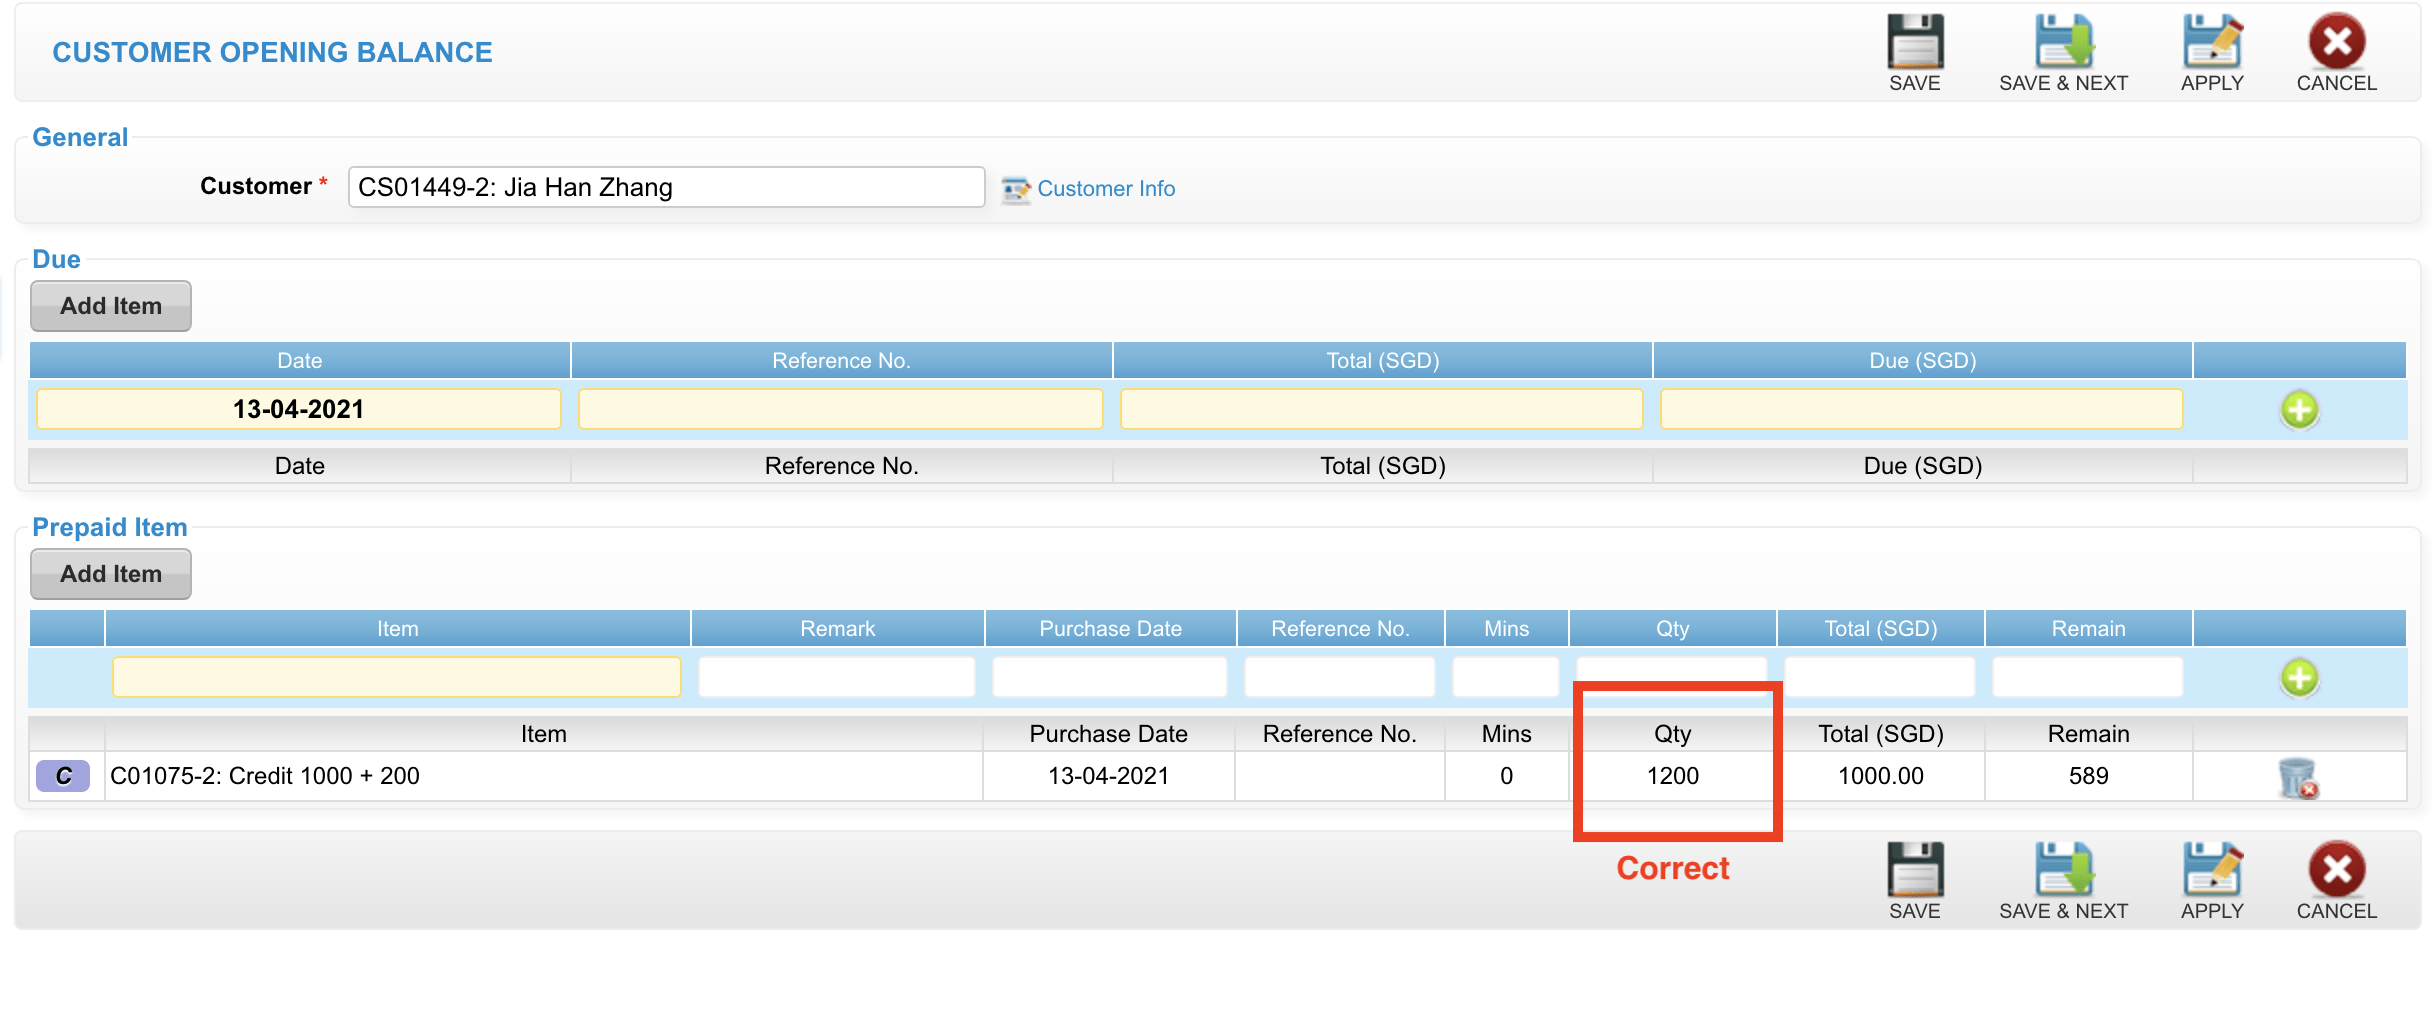
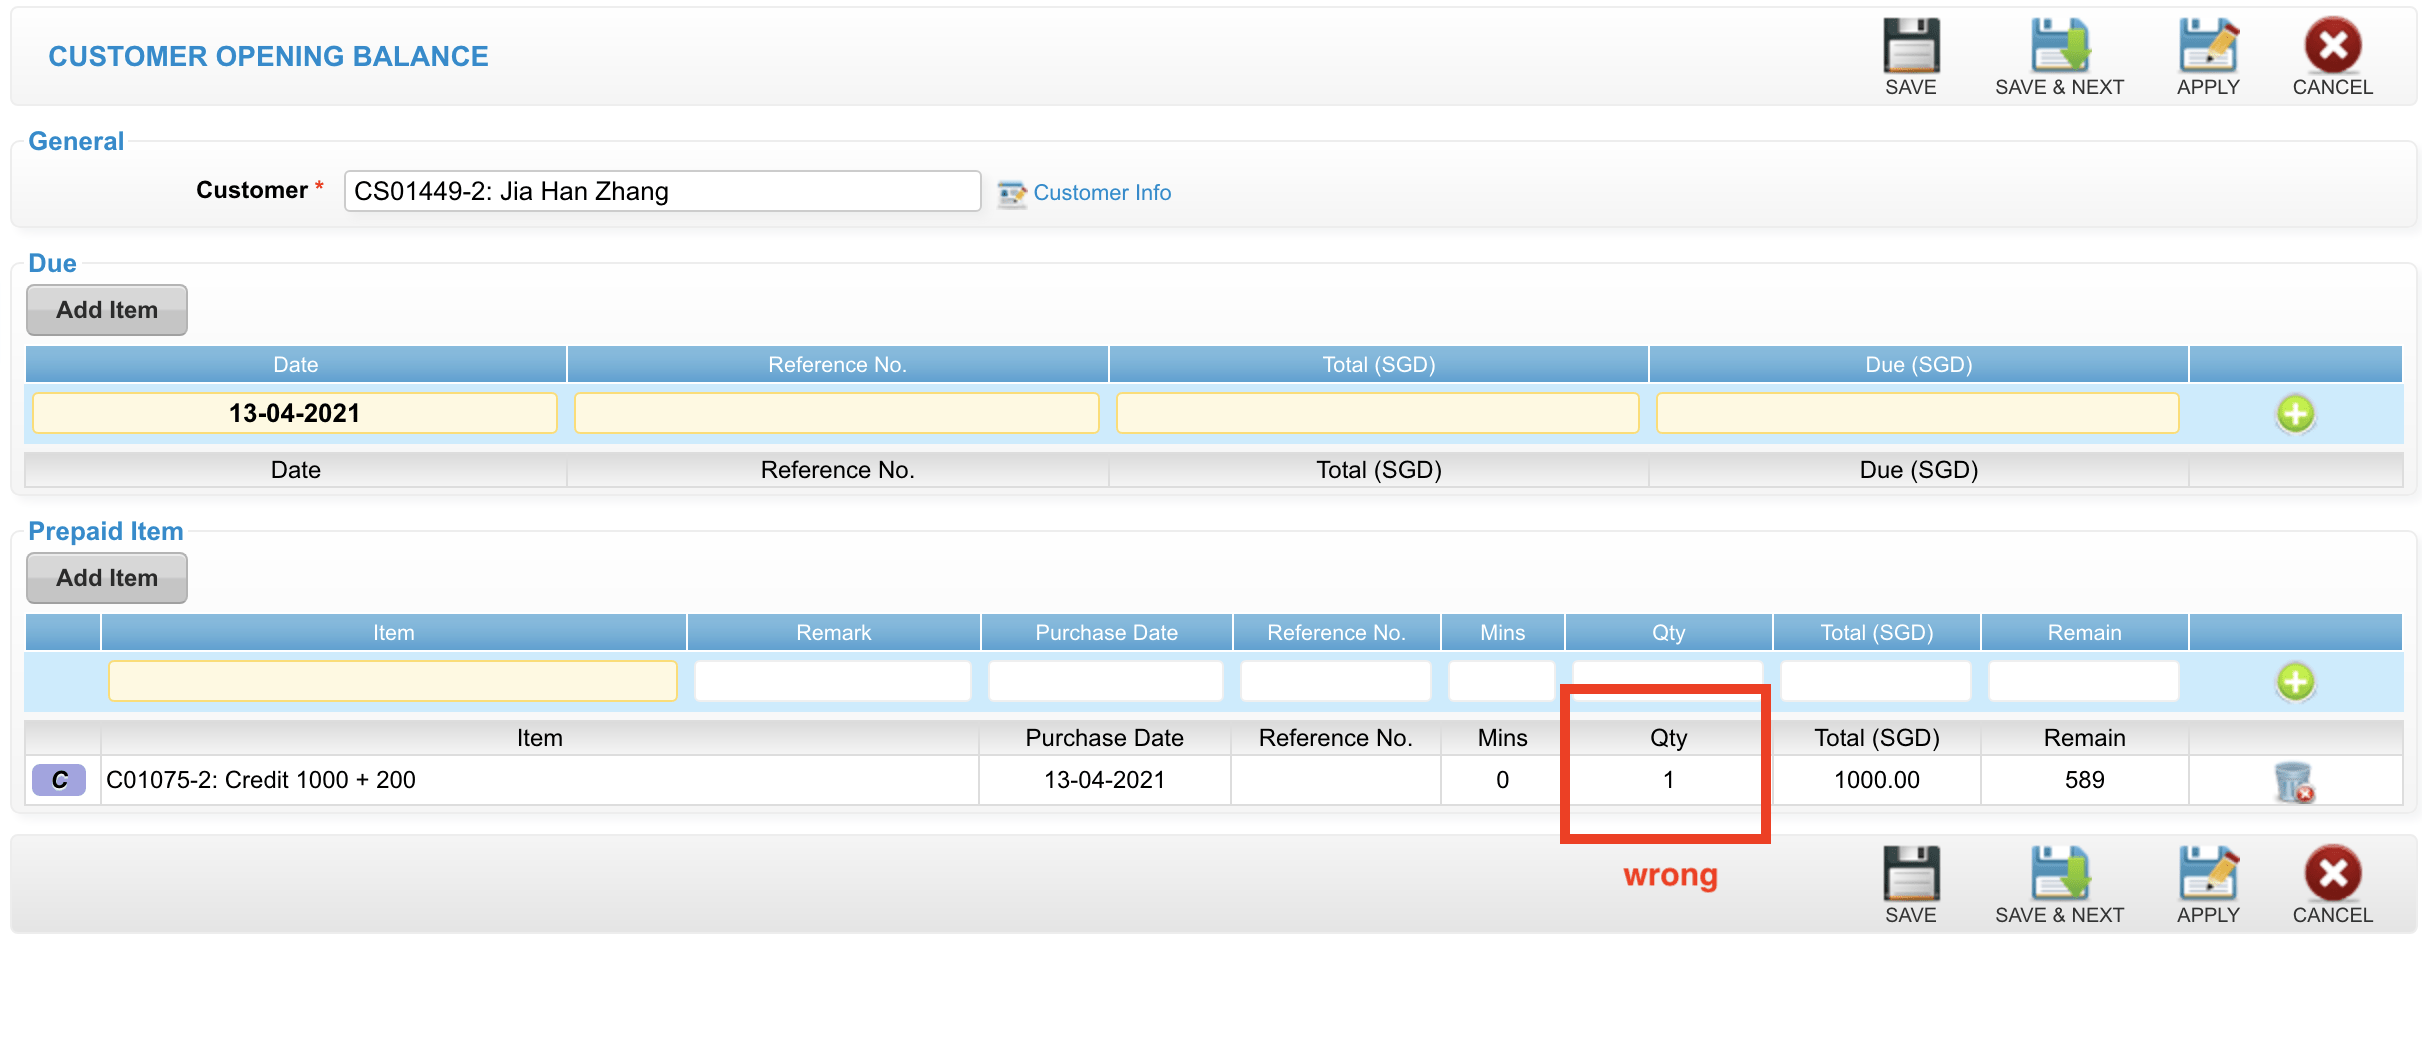
Last update: April 2021If you want to insert the customer’s credit, do take note that the “QTY” column should enter the correct figure
(* Example: $1000 free $200 credit. The “QTY” you should key in $1200 instead of $1000 (or $1))
 Last update: April 2021
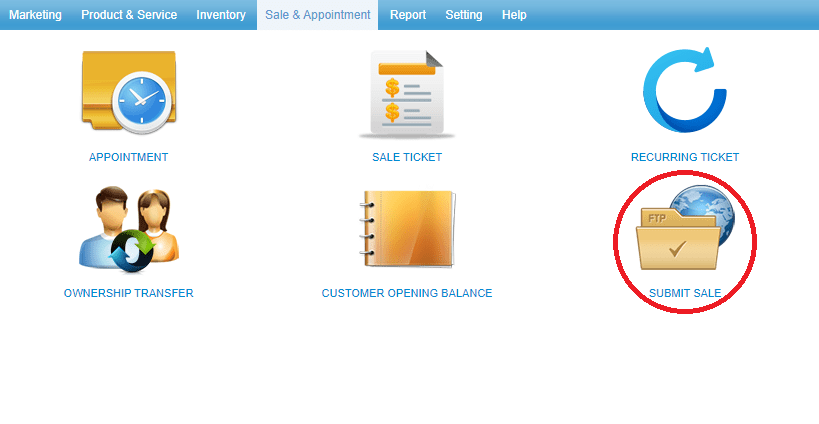
Last update: April 2021Step 1: Click “SALE & APPOINTMENT”
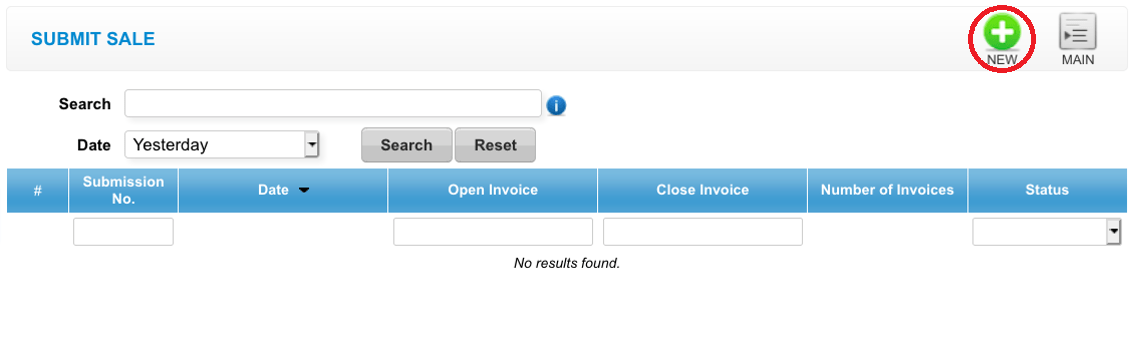
 Step 2: Click “SUBMIT SALE”
 Step 3: Click “NEW”
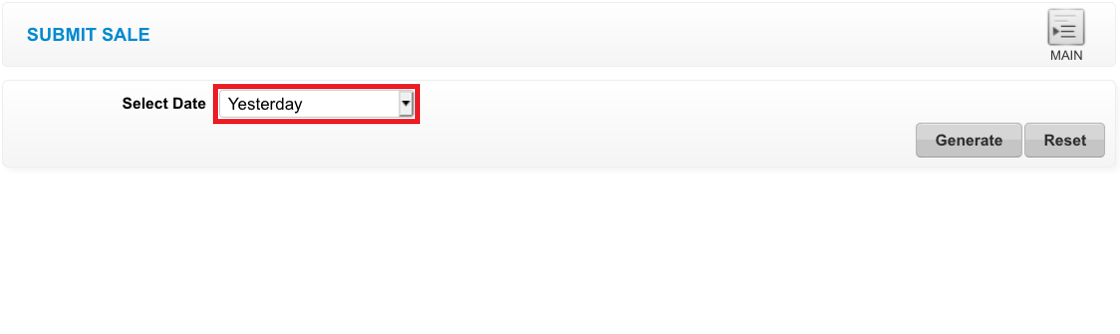
 Step 4: Click and select the date
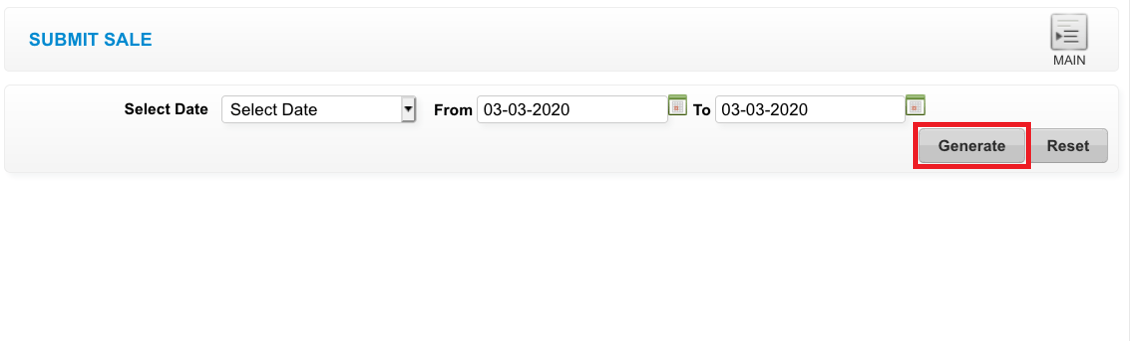
 Step 5: Click “GENERATE”
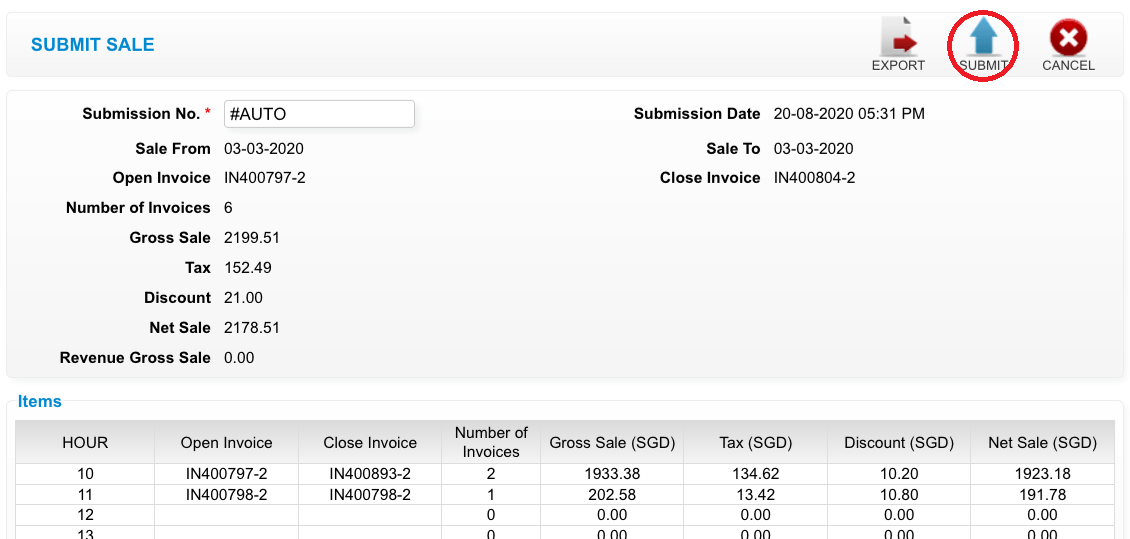
 Step 6: Click “SUBMIT”
 Last update: April 2021
Step 2: Click “SUBMIT SALE”
Step 3: Click “NEW”
Step 4: Click and select the date
Step 5: Click “GENERATE”
Step 6: Click “SUBMIT”
Last update: April 2021Step 1: Click “SALE & APPOINTMENT”
Step 2: Click “SUBMIT SALE”
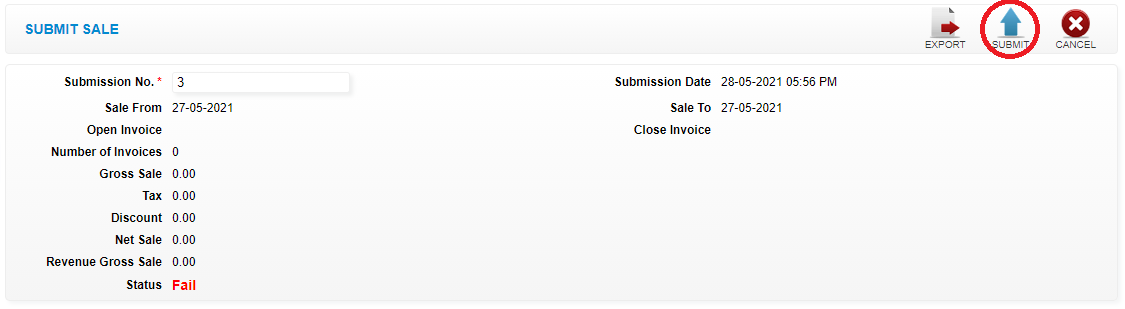
Step 3: Select the fail sale want to resubmit
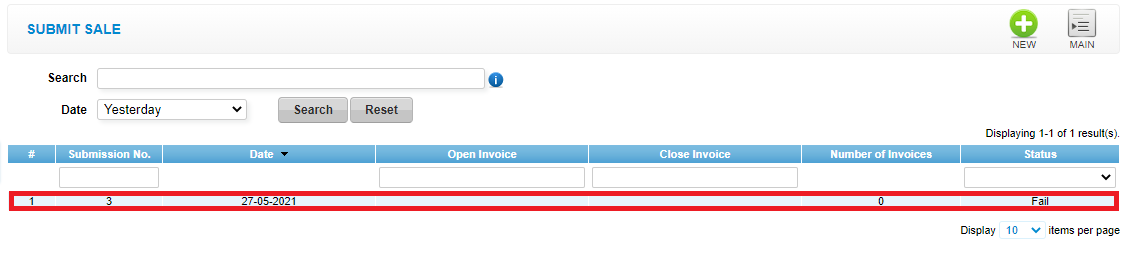 Step 4: Click “SUBMIT”
 Last update: April 2021
Step 2: Click “SUBMIT SALE”
Step 3: Select the fail sale want to resubmit
Step 4: Click “SUBMIT”
Last update: April 2021Step 1: Click “SALE & APPOINTMENT”
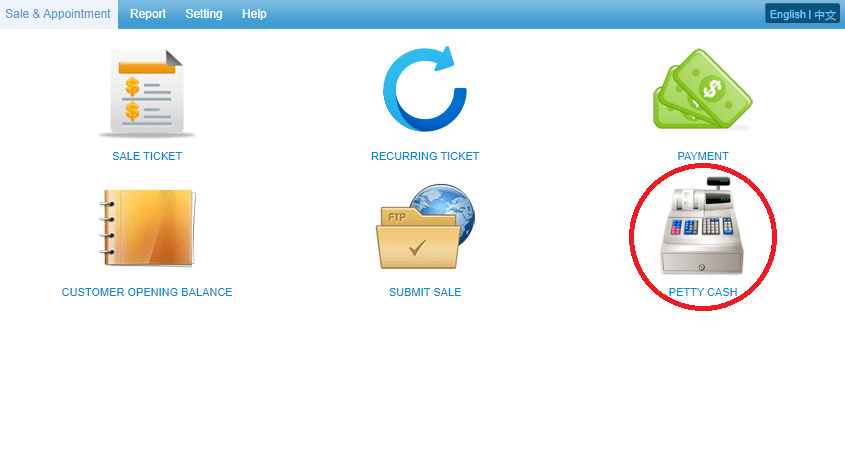
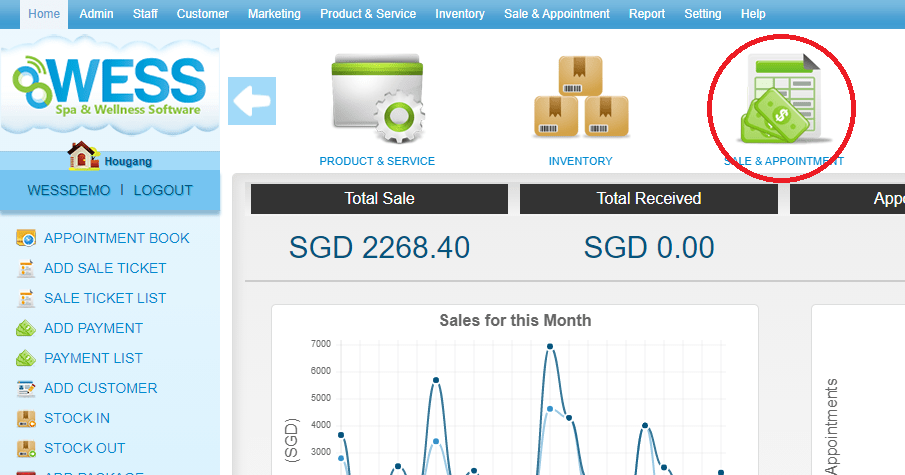 Step 2: Click “PETTY CASH”
 Step 3: Click “NEW”
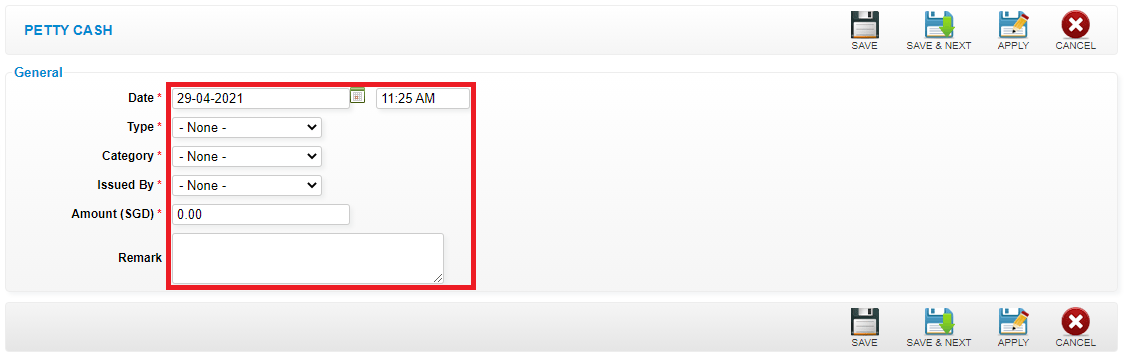
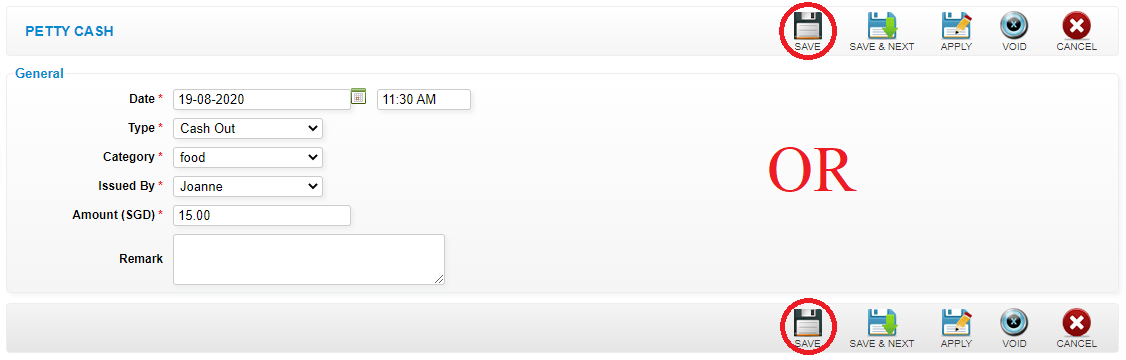
 Step 4: Fill in petty cash details
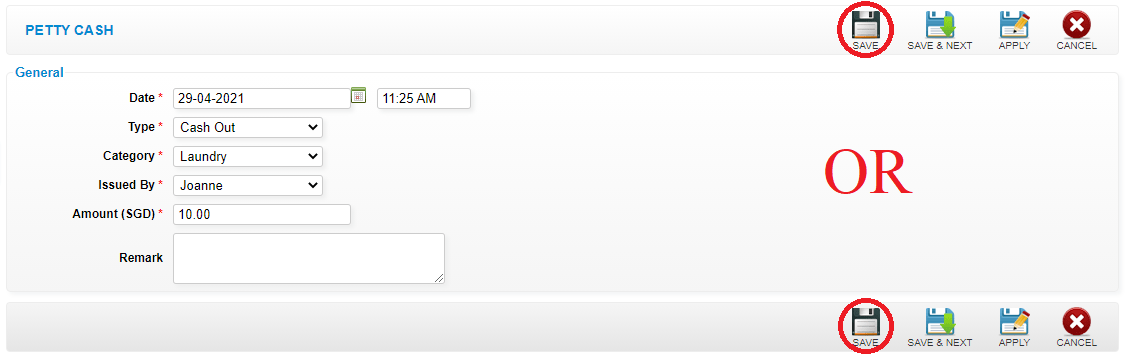
 Step 4: Click “SAVE”
 Last update: April 2021
Step 2: Click “PETTY CASH”
Step 3: Click “NEW”
Step 4: Fill in petty cash details
Step 4: Click “SAVE”
Last update: April 2021Step 1: Click “SALE & APPOINTMENT”
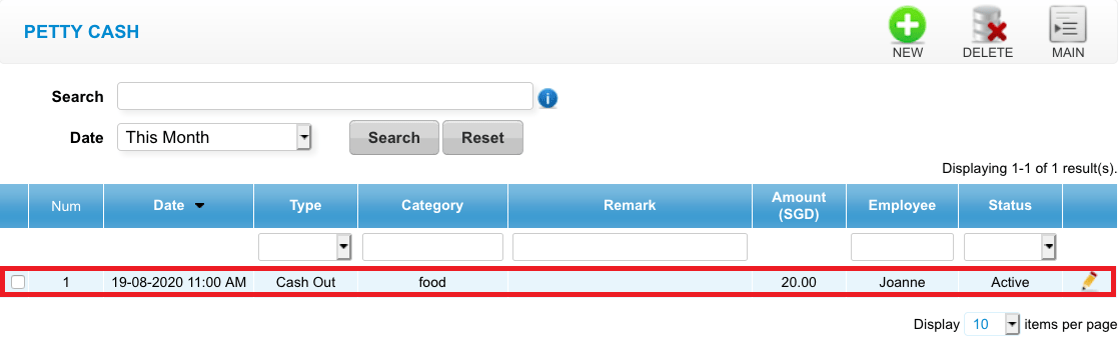
 Step 2: Click “PETTY CASH”
Step 3: Select the petty cash record
Step 2: Click “PETTY CASH”
Step 3: Select the petty cash record
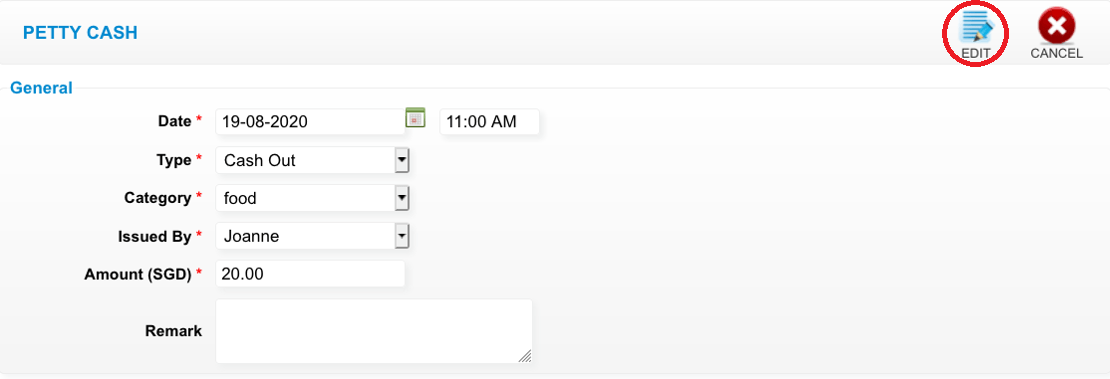
 Step 4: Click “EDIT”
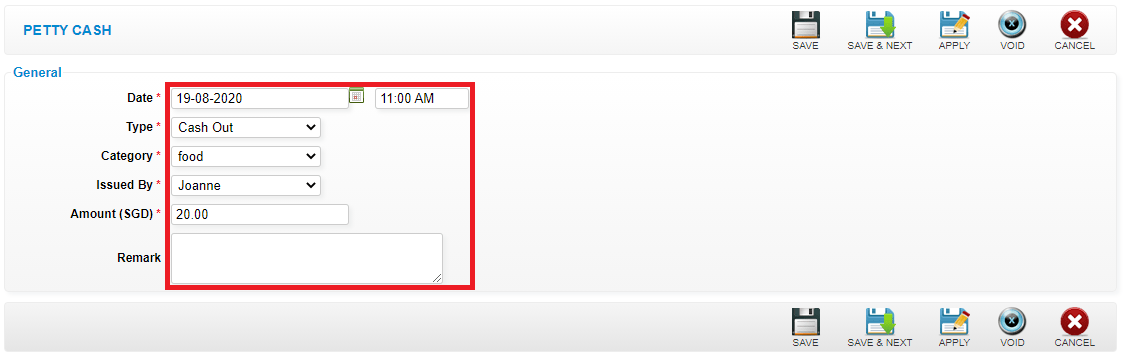
 Step 5: You can make the changes if needed
 Step 6: Click “SAVE”
 Last update: April 2021
Step 2: Click “PETTY CASH”
Step 3: Select the petty cash record
Step 4: Click “EDIT”
Step 5: You can make the changes if needed
Step 6: Click “SAVE”
Last update: April 2021Step 1: Click “SALE & APPOINTMENT”
 Step 2: Click “PETTY CASH”
Step 3: Select the petty cash record want to void
Step 2: Click “PETTY CASH”
Step 3: Select the petty cash record want to void
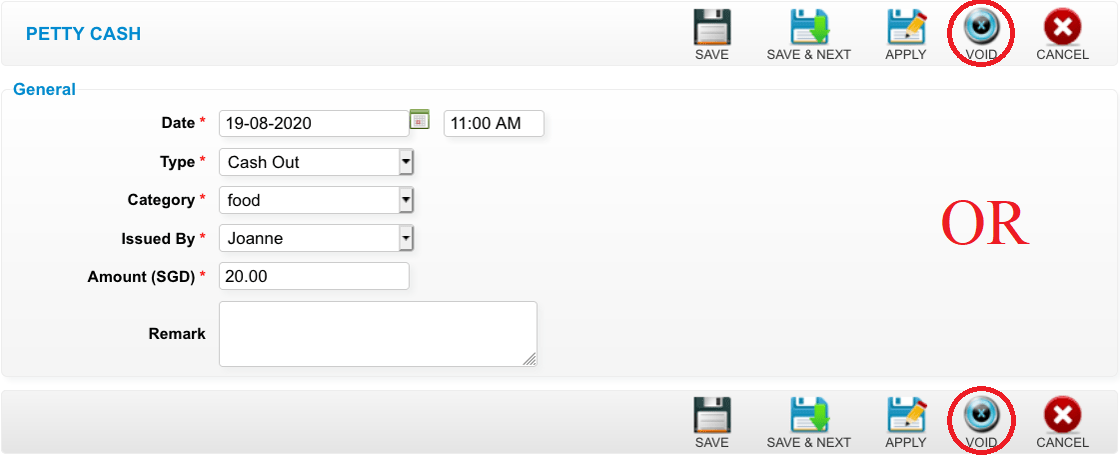
 Step 4: Click “EDIT”
 Step 5: Click “VOID”
 Last update: April 2021
Step 2: Click “PETTY CASH”
Step 3: Select the petty cash record want to void
Step 4: Click “EDIT”
Step 5: Click “VOID”
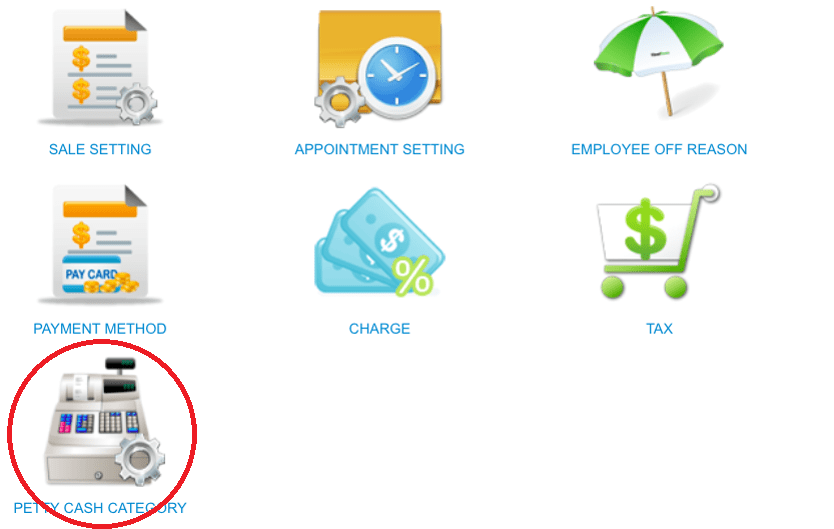
Last update: April 2021Step 1: Click “SETTING”
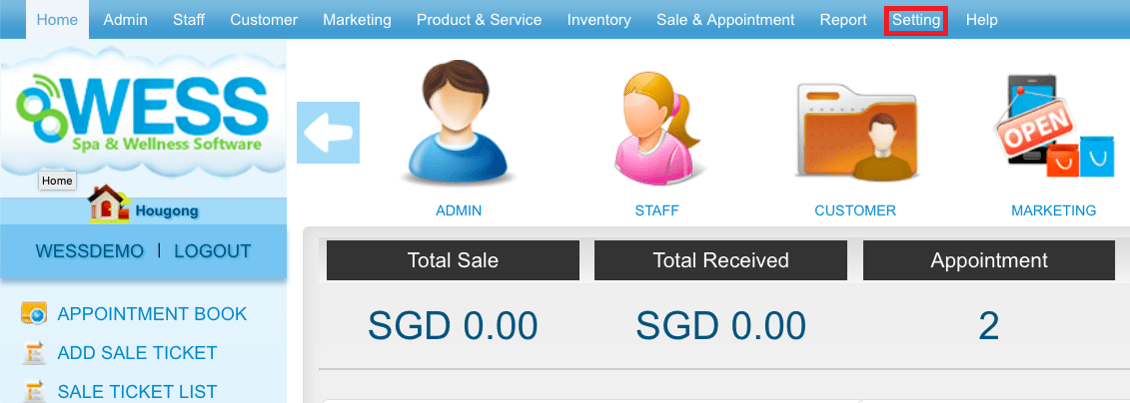 Step 2: Click “PETTY CASH CATEGORY”
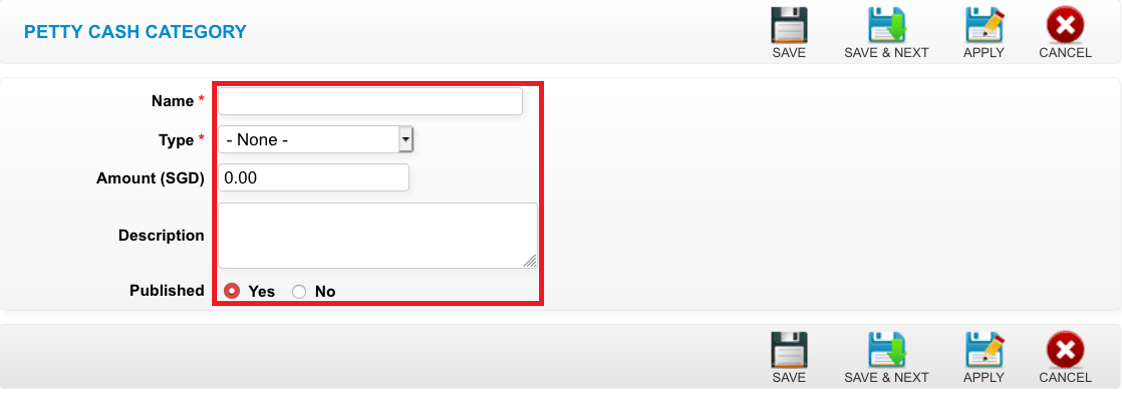
 Step 3: Click “NEW”
 Step 4: Fill in petty cash details
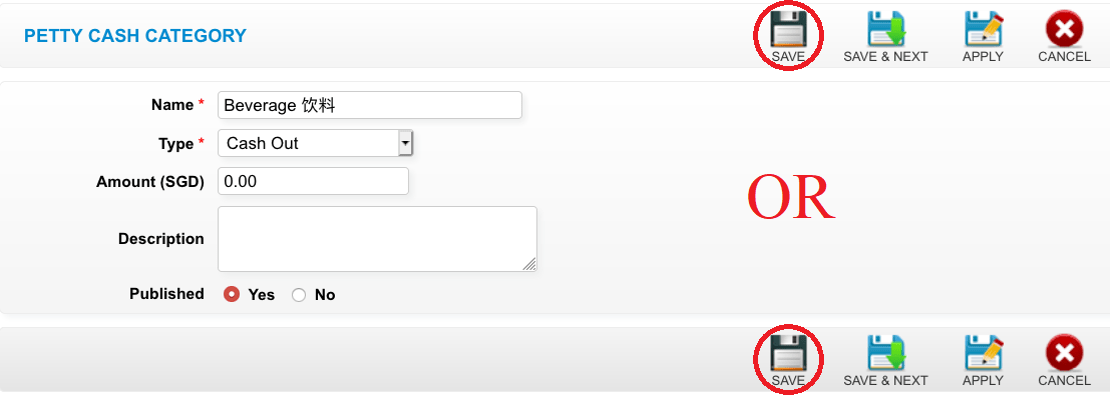
 Step 5: Click “SAVE”
 Last update: April 2021
Step 2: Click “PETTY CASH CATEGORY”
Step 3: Click “NEW”
Step 4: Fill in petty cash details
Step 5: Click “SAVE”
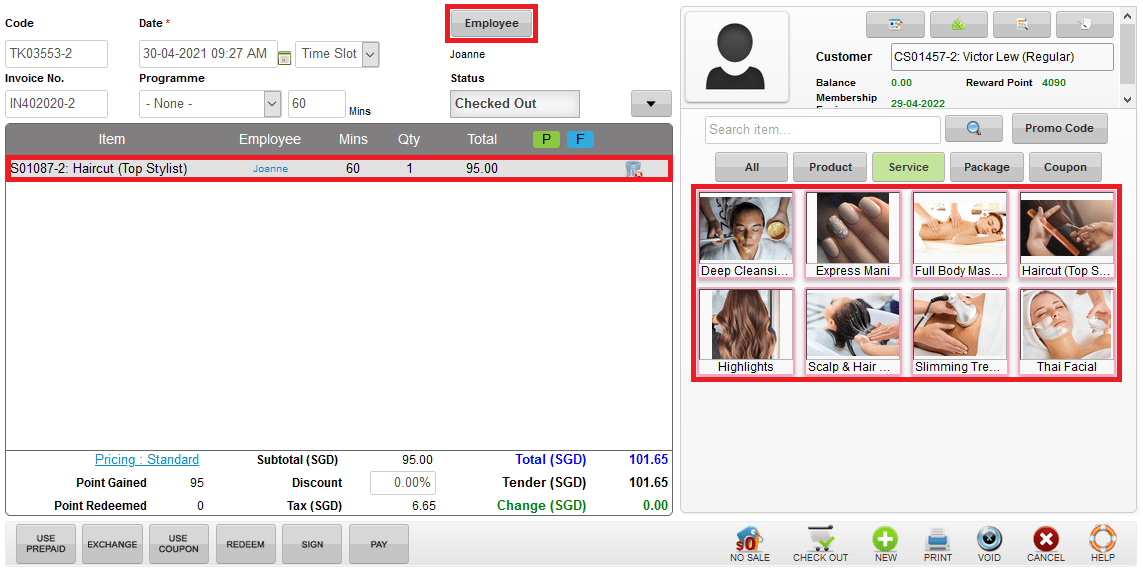
Last update: April 2021This issue is because sometimes when you change a prepaid service to a non-prepaid service, so the system will no auto-assign service employees to the item.
Solution:
Step 1: Click on the employee of the service
Step 2: Tick at the service column, tick an employee
Step 3: Click “SET”

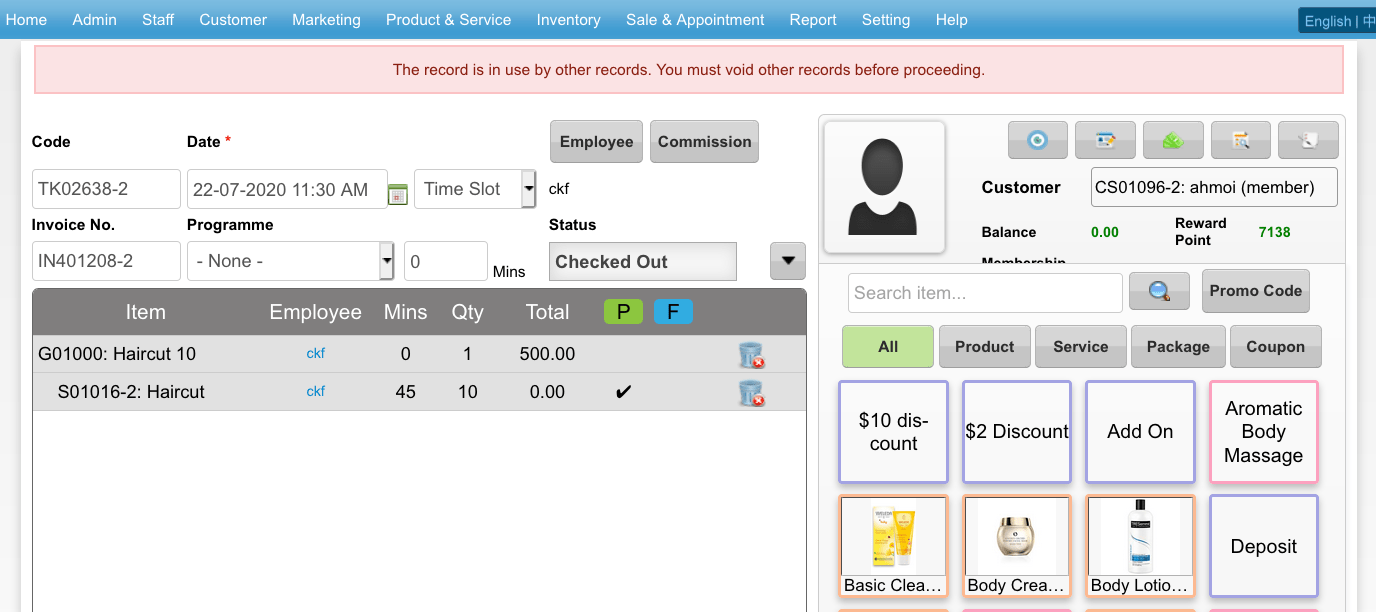
This is because the prepaid item in this ticket already used or the outstanding balance for this ticket already paid. So if you want to void this ticket, you may check which case can apply to this ticket.
CASE 1:
“If the prepaid item already used in other tickets.”
Step 1: So you may need to find out which ticket the customer consumes the prepaid item
Step 2: Edit the ticket and delete the item / void the ticket
Step 3: After that go back to the ticket and void it
CASE 2:
“If the outstanding balance already paid.”
Step 1: You may go to Payment and check which day and which record the customer paid the balance
Step 2: Click Edit and void the record
Step 3: After that, you may go back to the ticket and void it
This is because the staff from other outlet is misclick the outlet. This happened is because the user using multiple browser tabs to login to the different outlet.
 Solution:
Step 1: Go to “STAFF” > “STAFF” > “APPT ORDERING” > remove the staff from the below list
Step 2: You may ignore it. Because the staff name will disappear next day
Last update: April 2021
Solution:
Step 1: Go to “STAFF” > “STAFF” > “APPT ORDERING” > remove the staff from the below list
Step 2: You may ignore it. Because the staff name will disappear next day
Last update: April 2021
Solution:
Step 1: Go to “STAFF” > “STAFF” > “APPT ORDERING” > remove the staff from the below list
Step 2: You may ignore it. Because the staff name will disappear next day
Last update: April 2021